Creamy Cajun Shrimp & Bacon Alfredo

Creamy Cajun Shrimp & Bacon Alfredo

Creamy Cajun Shrimp & Bacon Alfredo


I think we’ve all learned how bad I am at following recipes, right? Well, today, I just threw the cookbooks out the window. Sorry, darlin… I’ll call a glass repair guy tomorrow.

I had a pound of very rare in our household (both because of cost and because my husband hates it so I rarely make it) jumbo shrimp. I had spent two days trying to figure out what to do with them. Batter fried? Tasty, but it doesn’t stretch far and since this is a rare treat, I wanted it to seem like more. Heck, give me an hour and I can finish a pound of fried shrimp myself. Gumbo? Too much trouble and I always use Andouille in my gumbo which I don’t have right now. So I started looking at recipes for Shrimp Alfredo. I didn’t like any of them lol. So I just went into the kitchen and started throwing Cajunish and Alfredoish (yes, those are now both official words) ingredients together. Those and bacon. Bacon makes everything better. I mean… it’s BACON!

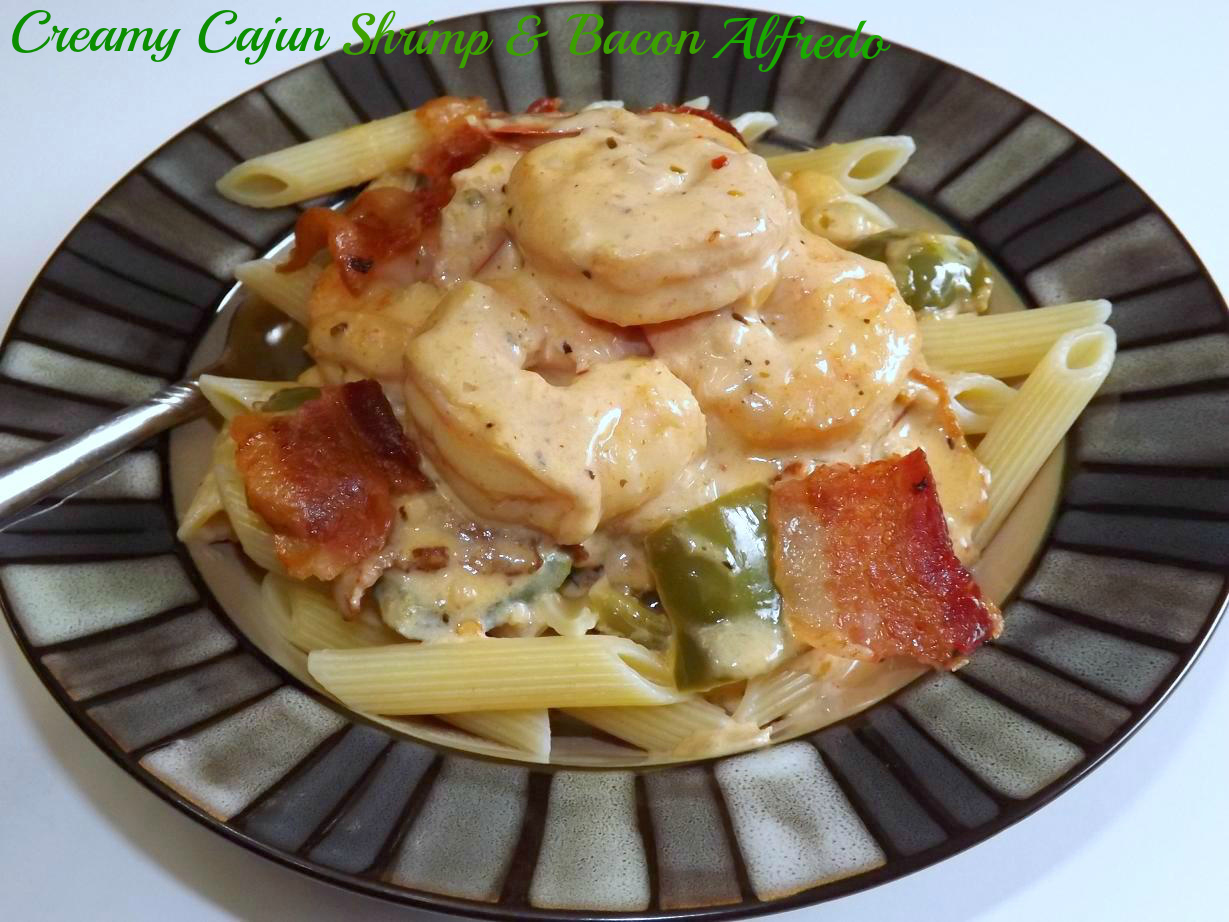
I must say; this sauce turned out wonderfully. Spicy, creamy, shrimpy :-p Seriously, it’s quite good. Not too spicy but has a nice bite for the heat seekers like myself. The green peppers and onions and garlic make their presence known. Add in the bacon and shrimp and oh my… seafood (bacony) Heaven on a plate. Ok, so the pic is of it in a bowl. Work with me here.

Note… I had no fettuccine , linguine or other traditional pastas here so I used Penne. I actually think I prefer it now. The shape helps it catch more sauce then you can on a flat noodle shape. But use what makes YOU happy.

You know the drill…

Creamy Cajun Shrimp & Bacon Alfredo

  • 1 pound shrimp (I used jumbo but you could use large or extra large too. Just don’t go smaller or you could end up with overcooked shrimp. Save the smaller shrimp for something where it’s not sitting in a hot sauce)
  • 1 pound bacon, cooked until crisp, crumbled, 4 tablespoons of drippings reserved
  • 1 large green bell pepper, chopped (about 1 cup)
  • 1 large onion, chopped (about 1 1/4 cups)
  • 3 cloves garlic, minced
  • 3 tablespoons salt free Cajun seasoning (it can be hard to find but it’s worth it)
  • 1/2 teaspoon ground red pepper flakes (optional)
  • 2 teaspoons hot sauce (optional)
  • 2 cups half and half or heavy cream
  • 1 cup fresh grated Parmesan Cheese (if you use that canned dried stuff, I’ll cry)
  • 8 ounces of Mascarpone cheese (could sub cream cheese)
  1. Start a large pot of water boiling. When water comes to a boil, cook your pasta to desired doneness. Drain and set aside in a covered bowl.
  2. While it heats, pour your reserved bacon droppings in a large skillet. Add in the green pepper, onion and garlic. Saute over medium heat until the veggies are soft and tender.
  3. Pat your shrimp dry then add into the veggie mix. Also add in the Cajun seasoning and red pepper flakes Saute just until the shrimp start firming up and turning pink. They will finish cooking as the sauce heats.
  4. Pour the cream into the shrimp mixture. Pour in the hot sauce also if using.
  5. Turn heat down to low and simmer for five minutes or until sauce starts to simmer (don’t boil it), stirring frequently. Add in the mascarpone and stir until smooth and melted Add in the crumbled bacon and serve the sauce over the warm pasta.
  6. Garnish with more Parmesan cheese. Because you can never have too much cheese.

Copyright Notice: From Cupcakes To Caviar images and original content are copyright protected. Please do not publish these materials anywhere without prior permission.


Honey Oatmeal Wheat Bread

Honey Oatmeal Wheat Bread

Honey Oatmeal Wheat Bread


I’ve mentioned before that I’m not a huge store bought bread sort of a person. I prefer my carbs in junk food form, preferably with a label that says “Ben & Jerry” or “Brachs Juicy Berries Gummi Candy” (yes, I’m still addicted to those.) I DO however, love artisan breads, good bakery breads or homemade breads. In a nutshell? I’m a bread snob. Well, confession time, unless I’m having Chicago public school flashbacks and craving a ham sandwich on mushy store bought white bread spread with butter. Don’t judge.

So, all of that said, I rarely have the budget for the good artisan breads that a lot of grocery stores carry now and I don’t live near a bakery. So if I want good bread, I have to make it myself. I’ve been baking bread long enough now that I am able to play with recipes without ending up with a disaster so that’s what I did here. I took a recipe I’ve had for years for oatmeal bread/rolls and mixed it up a bit. The results were completely awesome! This bread tastes great, not as strongly flavored as whole wheat would be but not as bland as white bread. It has a mild nutty flavor from the oats and the wheat flour. And the texture is out of this world. It is soft, ALMOST but not quite as soft as store bought which will please the mushy bread addicts lol. Yet it has a nice chewy bite to it and a density to please those of us who like breads with more character. Another plus is that the wheat gluten keeps it fresh longer plus adds a bit to the texture. I have it listed as optional but you really really need to buy some. It’s inexpensive and worth getting.

You know the drill. πŸ™‚

Honey Oatmeal Wheat Bread

  • 4 1/2 to 5 1/2 cups bread flour
  • 1 1/2 cups whole wheat flour
  • 1 1/2 cups old fashioned oatmeal  plus extra for sprinkling on the loaves
  • 2 tablespoons Vital Wheat Gluten, optional but highly recommended (you can find it in the flour aisle, usually on the top shelf. It contributes a LOT to bread texture and freshness so please buy some.)
  • 2 packs dry yeast (I use the Red Star Platinum yeast)
  • 1 tablespoon salt
  • 2 cups milk, warmed to between 115 and 120 degrees (NO hotter)
  • 4 tablespoons unsalted butter, room temp
  • 1/3 cup warm water
  • 1/2 cup honey plus more for brushing on top of loaves
  • sea salt for sprinkling on top
  1. Lightly grease two 9 inch loaf pans and set aside. In the bowl of a stand mixer, combine the wheat flour, 4 1/2 cups of the bread flour, oatmeal, yeast and salt. Mix well on low speed.
  2. Combine the milk and butter in a measuring cup. Stir to melt the butter, then add in the warm water and the honey. Pour this over the flour mixture, and using the dough hook, mix on low speed until it all comes together as a dough. Knead for about 2 to 3 minutes on low. If the dough is still more than just a LITTLE bit sticky and tacky, add more flour, 1/2 cup at a time. Machine knead after each addition for a minute or so, then check stickiness again. You want a nice firm but not dry dough. Your finger should just barely stick to it and it should have a sheen rather like what a semi gloss paint looks like when dry.
  3. Turn the dough out into an oiled bowl, turning it once to make sure all sides get the oil on them. Cover with a clean towel and put somewhere warm to rise. I usually turn my oven to it’s lowest setting, then turn it off after about 2 minutes of preheating. That leaves it a nice warm 80 degrees or so which is a perfect rising temp. Let it rise until it is doubled in bulk, about 60 to 90 minutes.
  4. When it’s doubled, punch it down (that’s always the fun part hehe) and divide it into two equal pieces. Start your oven preheating to 350 degrees. Now you can go one of two ways.
  5. First way to shape your dough is free hand- just…well, shape it into a dough shape. Not hard and the pro of it is it leaves you with less seams to pinch shut. it’s usually how I shape my loaves. Con is it takes some time to learn to free hand shape and not have a misshapen loaf.
  6. Two is to roll or pat the dough out into about a 9 inch rectangle and then roll it up tightly and pinch shut the seams with a damp finger. Pro to that is a prettier loaf (unless you miss a seam like I did on the one loaf in the photo…oops), con is if you don’t roll tightly enough, you end up with a loaf that has a hole running through the middle.
  7. Either way you go, shape the dough into two loaves and place in the prepared pans.
  8. Warm up about 1/4 cup of honey until it’s liquidy. Brush it evenly over the two loaves. Sprinkle with some extra oats and then with some coarse grained (I use kosher, same kind you see on pretzels) salt. Let the bread rise again in a warm place (NOT in the preheating oven lol) for 30 minutes or until it is almost doubled in bulk
  9. Bake at 350 degrees until the bread is golden brown and crusty looking, about 45 to 55 minutes.
  10. Let cool in the pan for five minutes, then turn out onto a rack to finish cooling, though we all know half a loaf, at least, won’t make it to cooled before it gets eaten hehe.
  11. When cooled, what doesn’t get eaten can be stored in ziploc bags for a few days. I made mine 4 days ago and it’s still wonderfully soft and fresh. THAT is why you need to buy the vital wheat gluten. Trust me on this.

Copyright Notice: From Cupcakes To Caviar images and original content are copyright protected. Please do not publish these materials anywhere without prior permission.


Sticky Asian Chicken Thighs

Sticky Asian Chicken Thighs

Sticky Asian Chicken Thighs

My brother in law Phil is a complete Asian food addict. Seriously. It’s a sickness. He is one of our countries beloved postmen (post people… post unisex? Heck, who knows what the PC term is these days.). When his day off was on Wednesday, his unwavering routine was to go to a neighborhood Chinese buffet for lunch. Every. Single. Wednesday.  The rest of us set our calendars by his routine. When he went on a Tuesday recently, we were all fairly sure that the world was ending.

His brother, my husband, is the same way. Say it with me class… anal creature of routine. It freaks me out because I am such a live by the seat of my pants, let life be a surprise sort of a gal. *laughs hysterically* Sorry. I couldn’t even fool myself with that one. I admit it. I too am one of those slightly rigid “don’t mess with my world, I like it the way it is” type of people. I’ve never decided if I admire or feel sorry for those of you who are the spontaneous live on the edge sorts.

I think my BIL would like this one. Marybeth, you need to make this for Phil! This is fall off the bone tender, spicy sweet (can be made more or less spicy depending on the amount of sriracha you add), a little bit salty and nice and sticky.I of course didn’t get sticky because I have those dainty girl manners and used a knife and fork. In reality, I simply hate sticky hands but dainty girl manners sounded cooler.

You know the drill… git to cookin’!

  • 3 lbs chicken thighs
  • 2 teaspoons sesame oil
  • 1 teaspoon olive oil (you want the sesame for flavor but you can’t use too much because it’s quite strongly flavored and you need enough oil to help prevent sticking, thus the olive oil)
  • 1/2 cup soy sauce
  • 2 teaspoons sriracha (more or less as desired)
  • 3/4 cup honey
  • 1/4 cup Thai sweet chili sauce
  • 1/2 cup ketchup (I know… sounds weird but believe it or not, a lot of “authentic” <aka Americanized> lol, Asian recipes use it for tang and flavor)
  • 2 tablespoons minced garlic
  1. Preheat oven to 350 degrees. Line a 13×9 inch pan with foil. Trust me. Line the pan.
  2. In a small bowl, combine all ingredients except for the chicken.
  3. Place the chicken in the prepared pan.
  4. Pour the sauce over it and turn the chicken in the sauce a couple of times to coat.
  5. Bake at 350 for about 75 minutes. Turn the chicken twice while cooking, making sure that you start and end with the chicken skin side up.
  6. Wonderful served with rice and the extra pan juices.

Copyright Notice: From Cupcakes To Caviar images and original content are copyright protected. Please do not publish these materials anywhere without prior permission.

Oatmeal Raisinet Cookies

Oatmeal Raisinet Cookies

I feel sorry for my husband at times. Why? He’s type 2 diabetic but man, does he love his sweets. Though he would deny that to his death bed. He also loves his savory snacks mind you but when I bake, he is all over it. There was a time I would buy him sugar free treats from the store, but he has come to realize that he prefers a few of the ‘real thing” as opposed to more of the artificial ones. He gets jealous as can be of me (in a loving way of course lol) because, even though I’m overweight (perils of food blogging) I have great blood sugar readings. If anything, I run too low. He also hates me for my low blood pressure too hehe. I am one weird fat woman physically. :-p

One of the things he loves is cookies. Non sweet lover or not (yeah, right. You know better, darlin’), he can eat his weight in cookies. Especially if it’s chocolate chip or oatmeal raisin. So I have had to make sure I have good recipes for both to keep the man supplied. The things we do for love, huh? *Bats eyes in my husbands direction and attempts to look flirtatious* But hey, the man willingly makes me cups of tea whenever I ask and sometimes, I don’t even have to ask. PLUS, he is the one who gets our 16 year old up for school in the mornings. He’s pretty awesome.

Ok, I’m done gushing now lol.

These are some pretty good oatmeal cookies. The original recipe came from food.com and I have just barely adapted it. One thing I do is just make half the recipe because the full recipe makes an ungodly amount of cookies, which is fine for say, Christmas goodie trays but not for everyday unless I’m serving cookies for dinner. The half recipe makes about 5 dozen smallish cookies. I also added the raisinets as the original just called for chocolate chips as we love raisins in oatmeal cookies here, plus I added more vanilla, some cinnamon and a little less sugar because they were far too sweet as written. Ok, so maybe I adapted it a bit more than I thought lol. When cooking these, watch them carefully. With a 375 temp, they can get overdone quickly. If you want chewier cookies, go for the lower cooking time. If you prefer crispier, go for the higher cook time. Either way though…

You know the drill. πŸ™‚

  • 1 cup unsalted butter, room temp
  • 3/4 cup sugar
  • 1 cup dark brown sugar
  • 2 eggs, room temp
  • 2 teaspoons vanilla extract
  • 2 cups flour
  • 2 1/2 cups oatmeal, divided in half
  • 1/2 teaspoon salt
  • 1 teaspoon baking powder
  • 1 teaspoon baking soda
  • 18 ounces raisinets (one bag and 2 individual sized boxes equals this amount)
  1. Preheat oven to 375 degrees. Lightly grease cookie sheets (I do two at a time) with cooking spray. Set aside.
  2. In the bowl of a stand mixer (you can do this with a heavy wooden spoon or hand mixer but it’s a fairly thick dough so it will be harder to stir) cream together the butter and sugars.
  3. Scrape down the sides of the bowl if needed, then add in the eggs and vanilla. beat well on low speed.
  4. In a food processor or blender, pulverize 1 1/4 cups of the oatmeal. In a large bowl, combine it with all the other dry ingredients, including the rest of the oatmeal. Don’t add the raisinets yet. Stir well to combine.
  5. Pour the dry ingredients into the wet ones, about 1/3 at a time, and mix well.
  6. Scrape down the bowl again, take the bowl off the base and stir in the raisinets.
  7. Use a small scoop to make cookies on the prepared sheets.
  8. Bake at 375 for 8 to 10 minutes. Let sit on sheet for one minute, then transfer to a wire rack to finish cooling.


Copyright Notice: From Cupcakes To Caviar images and original content are copyright protected. Please do not publish these materials anywhere without prior permission.


Ramblings And Reviews #2

It’s been an…interesting… couple of weeks here. Some good, some bad. My favorite Kitty, Horatio, died on the 19th of last month. He was about the best cat ever and I still miss him.

me and horatio

When he died, I told myself that that was it… no more indoor cats for me, just the cats we have that live outdoors. But, fate, as it often does, intervened. I was just fiddle farting around online one day and found myself going to the page for the local shelter. So what happened? We now have not one, but two, kittens in the house. Go figure. When I first thought about it, I was just going to get this little girl whom we have named Sierra-

SierraBut then she seemed lonely. Extremely loving, but lonely. So I had to get her brother. I justified it by reminding myself that they were rescue cats. No crazy cat lady here *coughcough*

This is her brother Opie. So named because he is a whiny sidekick but yet still cute as can be, like his namesake lol. If Sierra leaves his side, he whimpers and follows her around.

Opie

I have come to the conclusion (ok, I came to the conclusion years ago, but I’ve been in denial) that I have a serious lip balm addiction. I can barely make it through a store w/out buying another one. The bottom of my purse, which btw, I only keep lip balm and old receipts in, is covered in lip balms. Many many of them. One of my favorite brands is Eos. I absolutely love their products. They aren’t oily or greasy feeling on my mouth, just smooth. Plus they taste great. That can of course defeat the purpose of not getting chapped lips if you find yourself constantly licking your lips like a starving fat girl, but hey, I’ll deal with that drawback by just putting on more. I also love the lip balms from Kiss My Face, especially their Sliced Peach, but I haven’t been able to find it anywhere in months now. *Sobs* I would LOVE to try their Maple Sugar one, but I’ve never seen it in stores at all.

EosLately, I have been on a binge with the new “Hello” bars from Lindt

LindtOh. My. Gosh. I would say which one is my favorite but for the life of me, I can’t decide. When I try a piece of the coconut one, I’m in love. Then I try one of the others… same thing. They are pretty darn awesome!

On a non food addiction, beyond the bazillion lip balms, I have, for months now, loved this Body Butter from Trader Joes.

Trader Joes Body ButterIt smells fantastic; a strong but not overpowering coconut scent and it leaves you oh so smooth and soft. Just don’t eat it, tempted as you’ll be. πŸ˜›

Onto an actual good for you treat… I’ve been loving both of these products below lately. I found mine at Whole Foods.

ButtersThe Justins Vanilla Almond Butter is amazing. Smooth and creamy with just the slightest hint of vanilla. I would tell you that I use it in all sorts of wonderful recipes, but so far all I do is squeeze it out of the little pack into my waiting mouth hehe.

While I enjoy the Cacoa Bliss the texture takes a bit of getting used to. it has that slightly gritty texture that anything made with real coconut is going to have. But the taste is pure heaven. Coconut Chocolate Heaven. Go. Buy some.

Joshie

Why yes, that IS a pair of underwear on his head. And yes, I have every intention of saving this and using it for blackmail purposes when he becomes an ornery teenager. πŸ™‚

Last but not least, here’s your silly child pic for the week. I think my son needs massive therapy. πŸ˜€ I’m so proud!

Have a great rest of the week, everybody! Go cook something decadent and fattening!


Browned Butter Chocolate Chip Caramel Pie With Salted Caramel Sauce

Browned Butter Chocolate Chip Cookie Pie With Salted Caramel Sauce-001

I am one of those weirdos who owns enough cookbooks to fill a room. It would be a small room yes, but a room nonetheless. Adding in cooking magazines like those Holiday ones that come out yearly and old issues of Gourmet and Food And Wine, etc etc, as well as paper cookbooks like the ones Pillsbury used to put out monthly (do they even still do that?) I have over a thousand cookbooks. It’s a sickness. Honest. And in our modern era, it’s a sickness that has gotten worse. How? Because now, I can get a cookbook out of the library and if it’s one that I find I’ve put about 10 or more sticky tabs in to save the pages, that means it a keeper. That used to mean that I would have a bazillion overdue books lol. But now it means that I can find the same cookbook on Amazon and buy it, sometimes for as little as 4 bucks with shipping, and tab the hell out of that bad boy.

But a lot of my favorite cookbooks are older ones that have proved to be tried and true. My Fanny Farmer Baking Book is one that I use often as are, surprisingly enough, a handful of the old Pillsbury paper cookbooks. Probably because, back when I was still learning to cook for a family, I found many recipes that went into our traditional holiday routine from them.

Another that I use is an old spiral bound Nestle Toll House cookbook. I was looking through it for inspiration the other day when I saw a recipe for Toll House Pie. It’s one that many home cooks have made… a chocolate chip cookie dough set into a pie shell. Sounded like something I could play with. The first time I made it, I undercooked it. Plus, the recipe had NO vanilla in it at all and far too much butter, to the point where I had to clean my oven because it lefts puddles of scorched butter on the bottom of it.

This time, I did it MY way. I added in some vanilla extract, used less butter, browned the butter for a nutty flavor (on a side note, with the browned butter, this batter was good enough to just eat out of the bowl! OMG, it was yummy!), added some caramel bits and topped the slices with some salted caramel sauce and chocolate sauce. All in all, made that way, it can be either a special dessert for the family or something worthy of guests.

Don’t be tempted to add extra chocolate chips or caramel to this. You know you’ll want to (we ALL do it πŸ˜› ) but I think that was part of the reason my first pie didn’t cook correctly. There was just too much in it for it to cook through even though it seemed done. Stick to the measurements here.

You know the drill. πŸ™‚

Browned Butter Chocolate Chip Caramel Pie With Salted Caramel Sauce

  • 2 eggs
  • 1/2 cup flour
  • 1/2 cup sugar
  • 1/2 cup dark brown sugar
  • 3/4 cup unsalted butter, browned to a golden brown, then cooled to room temp
  • 1 1/2 teaspoons vanilla extract
  • 1 cup semi sweet chocolate chips
  • 1/2 cup Kraft caramel bits (you can also use whole caramels; just cut into quarters to get the 1/2 cup measure)
  • 1 9 inch pie shell, unbaked (you can use store bought or homemade. I went the lazy route this time and used a frozen shell)
  • A half batch of this caramel sauce or you can use pre-jarred (I used Trader Joes Salted Caramel sauce because it’s amazing and almost as good as homemade) for drizzling…pouring…eating plain…bathing in…whatever
  • Chocolate sauce for drizzling
  1. Preheat your oven to 325 degrees.
  2. In a large bowl, beat the eggs until foamy.
  3. Add in the flour, sugar, dark brown sugar and vanilla extract.
  4. Blend in the browned butter, then fold in the chocolate chips and the caramel bits.
  5. Spoon into the pie shell and smooth top with a rubber/silicone spatula. Eat what’s left on the spatula. Make sure it’s a lot. You can thank me later.
  6. Bake at 325 for 60 to 70 minutes. The top should be golden brown and dry looking. Let cool to room temp before slicing then use a hot sharp (preferably serrated) knife to get clean cuts. Cut this into VERY thin slices as it’s quite sweet and rich. You should be able to get ten slices from this pie easily.
  7. Top each slice with a (large) dollop of salted caramel and drizzle with chocolate sauce. Sprinkle each slice with a little sea salt if you’re so inclined. If you’re really into overkill and diabetic comas, spoon on some whipped cream too. I won’t judge.

Copyright Notice: From Cupcakes To Caviar images and original content are copyright protected. Please do not publish these materials anywhere without prior permission.


Lemon-White Chocolate Pound Cake With A Lemon Honey Glaze

Lemon White Chocolate Pound Cake With A Lemon Honey Glaze

Lemon White Chocolate Pound Cake With A Lemon Honey Glaze


I have a thing for pound cake. I may have mentioned that before. While I love fancier desserts too, especially those that are rich, creamy and filled with 5000 sticky calories per serving, I also love the simple desserts. Pound cake is just so homey, comforting, and darned easy. And if you want creamy, all you need to do is top it with whipped cream, 12 scoops of ice cream and chocolate sauce. Not that I’d do that of course. Nope, nope, nope, not me *wipes chocolate sauce off chin*


I was torn between making a lemon pound cake, which I’ve been promising my husband for weeks lol, or Pumpkin Bread, because personally, I’m ready to get my Autumn on. But the followers on my facebook page voted for the pound cake (you meanie butts you!!! You’d better be glad I lurves you all! πŸ˜› ) so here you go.

As I mentioned to them, I can’t, however, make just a “normal” pound cake. I’ve said before (and will probably say again because I’m getting old and forgetful. Did I mention that I’m getting old and forgetful?) and will say again (because I’m old and forgetful) that I lack the gene that makes me capable of making a recipe as listed. Nope… gotta either drastically change one so that it is like giving plastic surgery to Justin Bieber and making him look like Madonna or I have to just make up one of my own.

This one is just your basic pound cake incarnation. But I added a ton of lemon flavor as well as a touch of ginger for zing to the batter. Then for good measure I dumped some white chocolate chunks in there. They melted entirely into the batter, leaving these little pockets of slightly crispy sweetness. And if you’ve never had white chocolate with lemon, you’re in for a treat. They go SO well together! Then I topped this with a tart lemony glaze that has a subtle hint of honey.

This is NOT a mild little cake. It’s quite sweet, so serve small slices.

You know the drill…

Lemon-White Chocolate Pound Cake With A Lemon Honey Glaze

  • 1 1/2 cups flour
  • 1 cup sugar
  • 1 teaspoon ground ginger
  • 1/2 teaspoon baking powder
  • 1/2 teaspoon salt
  • 1/2 teaspoon baking soda
  • 2 tablespoons lemon zest
  • 1 cup white chocolate chips
  • 3 eggs
  • 1 teaspoon vanilla extract
  • 1 1/2 teaspoons lemon extract (if you have an emulsion, even better, Use 1 teaspoon)
  • 1/2 cup lemon juice
  • 2/3 cup oil
  • GLAZE-
  • 1 cup powdered sugar
  • 2 tablespoons honey
  • 2 teaspoons sour cream
  • 1 teaspoon lemon zest
  • 1/4 teaspoon lemon extract
  • 2 tablespoons lemon juice
  1. Preheat oven to 350 degrees. Spray a 9 inch loaf pan with a non stick spray such as Bakers Joy.
  2. In a large bowl, combine the flour, sugar, baking powder, salt, baking soda, lemon zest and white chocolate chips. Stir well.
  3. In a medium bowl, combine the eggs, extracts, lemon juice and oil. Whisk to combine.
  4. Pour the wet ingredients into the dry ones, all at once. Stir well to combine until there are no dry floury spots left.
  5. Pour the batter into the prepared pan Bake at 350 until a wooden skewer inserted into the middle comes out clean, about 60 minutes. If it starts to get too brown on top, cover loosely with foil.
  6. When done, cool in pan for five minutes, then run a butter knife along the edges to loosen the cake and turn it out onto a wire rack to finish cooling.
  7. For glaze, combine all the glaze ingredients in a small bowl. Whisk to combine, making sure to get rid of all the lumps.
  8. Pour or spoon glaze over the cooled cake.

Copyright Notice: From Cupcakes To Caviar images and original content are copyright protected. Please do not publish these materials anywhere without prior permission.


Cheesy Sausage Potato Skillet

Yum

Cheesy Sausage Potato Skillet

Cheesy Sausage Potato Skillet

Growing up in Chicago, I have always had a love for sausage of pretty much every kind. Well, you will never get me to try blood sausage and I’m fine with that status quo. But when you are raised in a large city filled with a humongous population of Eastern European immigrants, you grow up loving the food. And sausages are extremely popular in the Midwest. Heck, there are stores that sell JUST sausage. *Sobs because I miss Chicago, if only for the food and culture*

Here in Kentucky, there is a plethora of the typical smoked sausage products, but not a lot in the way of fresh. Luckily, I also love smoked sausage as does my family :-D. My usual way of making them is just to simmer them in some water. I’m boring and a purist πŸ˜› (Saith the woman who touts Cheetos as one of the main food groups). One night last week, when the guys had had fast food (I’m NOT a fast food person normally) I was hunting for something to make for my dinner. We had some smoked sausage so I played around a little. Knowing my men, I made a full pan of this because well… they’re guys. Need I say more?

This was delicious if I do say so myself. It’s nothing Earth shaking and has been done before in different variations. But here’s MY variation. Cheesy, sausagey (yes, that too is now a word), filled with crispy potatoes, green peppers and onions and smothered in a ton of cheese. This is homey, simply, easy to throw together comfort food at it’s best. It’s also easily changed up to fit your family preferences. Don’t like onions? Don’t use them. Use YOUR favorite sausage. Not a Cajun seasoning fan? Omit it πŸ™‚ Etc etc etc.

You know the drill. πŸ™‚

Cheesy Sausage Potato Skillet

  • 1 lb of your favorite smoked sausage, sliced into bite sized pieces (I used Johnsonville Andouille)
  • 4 potatoes, cut into bite sized cubes
  • 1 green pepper, chopped
  • 1 onion, chopped
  • 1 teaspoon salt free Cajun seasoning
  • 8 ounces Colby Jack cheese, shredded (or your favorite cheese)
  • salt and pepper to taste
  • sliced green onions for garnish
  1.  Over medium heat in a medium skillet, cook your smoked sausage until browned and crispy. Remove from the pan with a slotted spoon and set aside. Leave the drippings in the pan.
  2. Using the same pan and drippings, add your potatoes, green pepper, onion and Cajun seasoning. Cook, stirring occasionally, until the potatoes are tender and crispy and can be easily pierced through with a fork.
  3. Spoon the sausage back into the skillet. Stir to combine and cook for about 2 minutes to reheat the sausage.
  4. Top the dish with the shredded cheese. Turn off the heat, cover the pan and leave it on the stove for about 5 to 6 minutes until the cheese is melted. Garnish with the green onions and enjoy!

Copyright Notice: From Cupcakes To Caviar images and original content are copyright protected. Please do not publish these materials anywhere without prior permission.


Toasted Coconut Key Lime Pie Fudge

Toasted Coconut Key Lime Pie Fudge

Toasted Coconut Key Lime Pie Fudge


Last post I made was an ode to Autumn because our weather had been so unseasonably cool and wet. Now however August is back with a vengeance. It’s hot as Hades out there and extremely humid. So my mind is back to thinking of Summery foods. And what is more Summery than key lime pie? Why, key lime pie made into fudge with some tropical coconut flavors thrown in there for good measure, of course.

On another note, today is my birthday! I am 49 years old today. Damn… I’m old. Lol. The only 49 year old I know of with a 4 year old son. So what were my birthday meals like? Totally not exciting, that’s what they were like hehe. I made smoked sausage, rice a roni and carrots. Woohoo?? And my birthday cake is from Wal mart. I have got to learn that it’s ok to make myself a nice birthday dinner the same as I do for the rest of the family. Why do we women do that anyway?  But all in all, it’s been a nice birthday. I have my kids, I have the worlds best husband who is still happy to make cups of tea because he loves me. I have books to read, food to eat and lifes little luxuries. I’m good. πŸ™‚

This fudge is quite yummy. Even the non sweets loving hubby loved it. I was originally going to make just key lime pie fudge but do you have any idea how many of those there are online?! At least 99,999,999,999,999 (please don’t ask me to say out loud what number that is). I could NOT bring myself to just repeat the version someone else made. Nope, not me. So I made this MY way. How, you ask? You did ask, I hope? T’was easy. I topped this with swirls of a homemade lime curd, added some coconut flavor to the fudge itself and topped it all off with some toasted coconut. Oh… my…gosh… this is good! I will definitely be making this again and I am pretty sure it will make into my Christmas treats too. Smooth, creamy, very rich, but saved from overwhelming sweetness by the lime curd and the toasted coconut. The lime curd is just the same recipe I use for lemon curd, with lime juice and zest subbed in there. It makes a pint of curd and you only need half a cup or so for the recipe, but I totally promise you, you won’t mind having extra. This stuff is amazingly good. I keep sneaking spoonsful of it on a spoon. You can do that, spread it on a muffin or scone, top ice cream with it…

You know the drill. Git to cookin’!

Toasted Coconut Key Lime Pie Fudge

  • 1/4 cup sugar
  • 1 1/4 cups graham cracker crumbs
  • 6 tablespoons unsalted butter, melted
  • 1 lb GOOD white chocolate, chopped (please don’t use, say, “Acme Brand White Baking Chips”. Use the real thing here. It will make a difference.
  • 1 14 oz can sweetened condensed milk (NOT evaporated milk)
  • 1 tablespoon butter
  • zest of one small lime
  • 3 tablespoons lime juice (this will take about 2 small limes t get)
  • 1/2 cup Lime Curd (Use this recipe for lemon curd, just substituting limes where it calls for lemons)
  • 1 teaspoon coconut flavoring
  • 1 teaspoon vanilla extract
  • 1/2 cup sweetened coconut, toasted
  1. Preheat your oven to 350 degrees and line a 8 or 9 inch square pan with foil Butter the foil, then set the pan aside.
  2. In a medium bowl, combine the sugar, graham cracker crumbs and melted butter. Stir well. Dump mixture into the prepared pan and press down into the bottom of the pan to form a crust.
  3. Bake at 350 degrees for about 10 minutes. Take out and set aside to cool.
  4. In a medium non stick saucepot, combine your white chocolate, a tablespoon butter and sweetened condensed milk.
  5. Cook over medium heat, stirring constantly, until mixture is smooth and all the chocolate is melted. Remove from heat and add in the lime zest, lime juice and extracts.
  6. Quickly pour into the prepared pan. Spoon dollops of the lime curd over the top of the fudge then using a butter knife (or your fingers. I won’t tell), swirl it into the fudge. Top that with the toasted coconut, pressing down lightly to make sure the coconut sticks.
  7. Refrigerate until firm, about 3 hours.
  8. Using a knife you heat under hot water and wipe dry is the easiest way to cut this (or any) fudge. You’ll get much cleaner cuts.
  9. Leftovers can be stored tightly wrapped or even better, wrap each piece individually and freeze them. When you need a sweets fix, there you have it… portion controlled fudge πŸ™‚

Copyright Notice: From Cupcakes To Caviar images and original content are copyright protected. Please do not publish these materials anywhere without prior permission.


Decadent Extra Creamy Pumpkin Pie in a Cornmeal Crust

Decadent Extra Creamy Pumpkin Pie In A Cornmeal Crust

Decadent Extra Creamy Pumpkin Pie In A Cornmeal Crust

When I started this blog, I had a hard time making certain things to post on the blog. Why? Because I am a rabid traditionalist and it tends to make me a bit rigid in my thinking at times. As much as I go against the seasonal cooking idea in some things I make (Pumpkin Cranberry Bread in June, Chili or beef stew in the middle of Summer, grilling out when my back porch is covered in snow and I can’t feel my toes) there are other things that I make ONLY on the holidays. My world famous sausage stuffing is only for Thanksgiving. Honest… world famous…. it’s been eaten and enjoyed by major celebrities, heads of state of at least 32 countries, 4 popes and Queen Elizabeth. We just call her Liz here cause we’re BFF’S like that. My Pecan Pie? Only Christmas and Thanksgiving. My Turtle Cookies? Christmas. The pumpkin pie I have been making since my oldest son, now 27, was about 4? Only at Thanksgiving and since the older kids have grown and moved out, sometimes at Christmas if they didn’t make it home for Thanksgiving.

But the other day I realized something. By doing that, I was going against the whole reason I started this blog. For years, I heard what a good cook I was, how I needed to write a cookbook of country/homey classics, etc etc etc. So I started blogging. And when I started, one of the things I wanted to do was share our families favorite dishes. But by being so darn rigid, I wasn’t able to do so. Because if I only make this pumpkin pie at Thanksgiving, how can I share it with YOU in time for you to make it for YOUR Thanksgiving? I couldn’t share it after the fact because then it was too late. So I just didn’t share at all. That stops now. This year my family and I will enjoy our holiday favorites a time or two before the holidays so that I can share them with you.

On that note, this is truly the best pumpkin pie ever. I got the original recipe from The Fannie Farmer Baking Book (best baking book ever… you have got to hunt it down on Amazon) and over time, have adapted to more to our tastes; i.e., a bit more spice, using cream and so on. But basically, it’s the same recipe from the book. This crust is wonderful. It’s not like cornbread so don’t worry about that. It just has a bit more texture and a touch of crunch from the cornmeal and the rustic flavor of it goes so well with a pie like pumpkin. But feel free to sub your favorite pie crust recipe or even a store bought one. Since this pie uses dark brown sugar and extra spices, it IS darker when cooked than the typical color. So don’t think you overcooked it when it comes out a dark orangeish brown instead of the “normal” light orange color. It’s still fine. πŸ™‚

Decadent Extra Creamy Pumpkin Pie With A Cornmeal Crust

  • Crust- (Can sub your favorite crust)
  • 1 cup all purpose flour
  • 1/2 cup yellow cornmeal (NOT cornmeal mix)
  • 1/4 teaspoon salt
  • 1 tablespoon sugar
  • 1/2 cup solid shortening, chilled
  • 3 to 6 tablespoons water (I usually make this in late Autumn and use about 3 tablespoons, but it being Summer, I used closer to the 6 this time)
  • Pumpkin Filling-
  • 2 cups pumpkin puree (NOT pre-made pie filling)
  • 3 eggs
  • 1 egg yolk (adds extra richness but is optional)
  • 1 1/2 cups heavy cream
  • 3/4 cup dark brown sugar
  • 1/2 teaspoon salt
  • 1 tablespoon cinnamon
  • 1 1/2 teaspoons ground ginger
  • 3/4 teaspoon nutmeg (do freshly grated if you can. It’s so much better.)
  • 1/2 teaspoon ground cloves (be careful with the cloves and don’t go overboard- they can be very strong and bitter if you use too much)
  • 1/2 teaspoon ground allspice
  • 1 teaspoon vanilla extract
  1. Crust-
  2. Preheat oven to 425 degrees.
  3. Combine the cornmeal, flour, sugar and salt in a large bowl. Using a pastry blender,  cut the cold shortening into the flour mixture until it resembles fine crumbs. Add the water, about 2 tablespoons at a time. Mix thoroughly. When enough water has been added, you should have a cohesive mixture that you can form into a ball, which, when pressed, doesn’t crumble at all. it will however, be a soft dough.
  4. On a lightly floured board or counter, roll the dough out to be 2 inches wider than the pie pan you are using is when inverted. This dough tears easily but it also patches easily. the easiest way to get it into the pan is the old method of easing it off of the counter with a spatula, then wrapping it around the rolling pin and laying it in the pie pan.
  5. After laying the dough in the pan, gently press it into the sides of the pan. Don’t stretch or pull at the dough because that can cause it to shrink up as it bakes. Crimp your top edges and prick the crust all over with a fork.
  6. Bake at 425 for 10 minutes or until it is just beginning to brown. Set aside.
  7. For the filling-
  8. In a large bowl, beat the pumpkin puree, eggs and the egg yolk.
  9. Add the cream and sugar, then beat in the spices and vanilla. Taste a bit on your finger to make sure it has enough spice for you. If not, add a bit more.
  10. Beat until the mixture is smooth with no pumpkin or sugar lumps.
  11. Pour into the prepared pie crust.
  12. Bake at 425 for 10 minutes, then turn the heat down to 300. Bake for about 40 minutes, until the filling is almost set. A sharp knife inserted off center should come out almost clean, with just a few moist crumbs on it and the center of the pie should still be slightly jiggly. It will set up as it cools.
  13. Chill to finish setting. It can then be served either at room temp or chilled. Serve with whipped cream, creme fraiche or ice cream. Enjoy! We’ve always loved this pie. I hope you do too. πŸ™‚

Copyright Notice: From Cupcakes To Caviar images and original content are copyright protected. Please do not publish these materials anywhere without prior permission.