
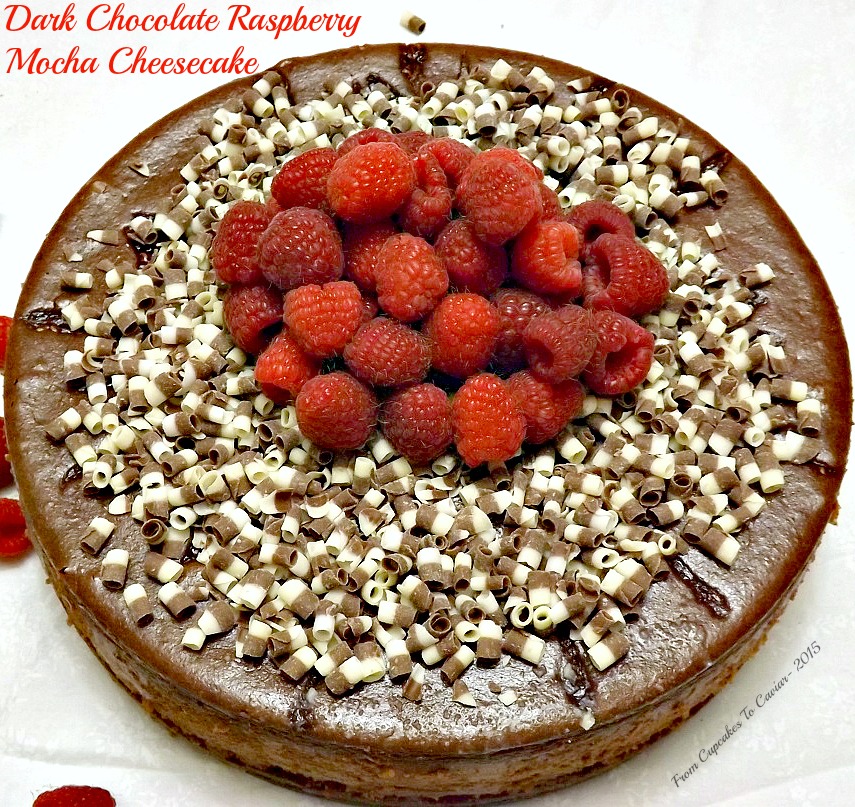
Dark Chocolate Raspberry Mocha Cheesecake

Hey everyone. Sorry about the rather long hiatus from here. I’ve been ill. Nothing earth shattering. You’re not getting rid of me that easily. Just been having some “I had a stroke a few years ago and it likes to come back and bite me in the arse at times” issues. So you’re still stuck with me. I was just too drained to be cooking and couldn’t balance well, which could have caused trouble, lol.
I tried making a cheesecake anyway while I was down and oh my, talk about a disaster. I have been making cheesecakes since my oldest son, now almost 29, was an infant. SO I have a wee bit of experience. But oh….my….heavens. I put what was a delicious batter in the oven and it wouldn’t cook. It puffed and overflowed all over my oven. It was greasy, grainy, watery; you name the bad adjective when it comes to cheesecakes and that cheesecake wore that adjective proudly, like a badge of honor. Once it overflowed, I had hopes that it would at least be salvageable for the family, since it certainly wouldn’t work as a post. But…ummmm…no. Totally…and completely…disgusting. I scraped the sodden gritty mess into the garbage and tried not to whimper like a 3 year old denied a chocolate bar. Or a 50 year old who just had to trash about 12 dollars worth of ingredients *whimpers*
Then today I tried again. I think I turned the oven light on 72 times and peeked into the oven to see what was happening. And lo and behold, I haven’t lost my skills. WooT!! Yay for non disgusting cheesecake! So, I’ve mentioned before that I’m not a huge coffee drinker. When I drink it, it has to be highly flavored and creamed. I’m one of those “I like a little coffee with my cream and sugar” people. But strangely enough, I love coffee flavored desserts. Coffee ice cream, tiramisu, anything mocha flavored. I’m all over them. So I decided to play with that flavor idea in the cheesecake. But I wanted a mild coffee flavor, not an in your face caffeine punch from cheesecake. So I made a raspberry mocha… in cheesecake form. 😀
This is a pretty wonderful cheesecake. Creamy, rich, but not heavy. It has a mild chocolate/coffee flavor on first bite. Then you get some of the raspberry preserves with those flavors and that explosion of tart berry. THEN some of the chocolate curls and fresh berries;so good! Talk about happily confused taste buds. 😀
Don’t freak at the long instructions here. It’s mostly me jabbering on with some cheesecake tips that will help ANY time you make a cheesecake.
You know the drill… 🙂
Mrs. Cupcake… who wants more cheesecake and then NEEDS five hours on my exercise bike.
Dark Chocolate Raspberry Mocha Cheesecake
- Crust-
- 2 to 2 1/2 cups vanilla wafers
- 6 tablespoons unsalted butter, melted
- 1/3 cup sugar
- Filling-
- 2 8 ounce packages cream cheese, room temp
- 1 8 ounce package mascarpone cheese, room temp (can use another cream cheese instead, but the mascarpone is decadently creamy)
- 2/3 cup sugar
- 3 eggs, room temp also
- 1 10 to 12 ounce package chocolate chips (I used bittersweet Ghirardelli’s ), melted according to package directions
- 1 cup heavy cream
- 1 tablespoon instant coffee granules or espresso powder (use a teaspoon or so more if you want a heavier coffee flavor)
- 1 tablespoon vanilla extract
- 2 tablespoons unsalted butter, melted
- 1/2 cup raspberry preserves
- Boiling water for the water bath
- Fresh raspberries and chocolate curls for garnish
- Preheat oven to 325 degrees. Wrap a 9 inch springform pan in two layers of heavy duty foil, each layer going in a different direction to make sure the whole pan is well covered. Lightly grease the pan and place inside a large baking dish. In your food processor, pulse the cookies until they are fine crumbs. Add in the sugar and 6 tablespoons melted butter. Pulse until well combined. Alternately, you can crush the cookies in a ziploc bag and then combine the ingredients in a bowl.
- Press the mixture over the bottom and a little bit up the sides. Bake at 325 for 8 minutes; just long enough to set the crust. Set aside.
- In a large bowl, combine the cream cheese, mascarpone and sugar. Beat at medium speed until creamy. Add in the eggs, one at a time, beating well after each addition, scraping the bowl as needed.
- Add in the melted chocolate and beat on low speed just until combined.
- Pour the instant coffee granules into the cream; stir to dissolve. Whisk the cream and the melted butter into the batter. Trust me on the whisk. You use the beater and you’re going to be wearing cream.
- Pour the batter into the prepared pan and smooth the top. Microwave the preserves for about ten second, just enough to thin them out a bit. Dollop the preserves onto the top of the cheesecake batter. Use a butter knife to drag through the preserves, spreading the preserves decoratively through the batter.
- Place the baking dish with the pan in the oven and carefully pour boiling water around the springform pan, going about an inch up the sides of the pan. Carefully push the rack in, being careful to not splatter water into the cheesecake pan.
- Bake at 325 for between 65 to 85 minutes (I have gone to both extremes for some reason; cheesecakes are finicky). When it is looking set up to about midway into the cheesecake, stick a instant read thermometer carefully into the middle of the cheesecake. You are looking for a temp of about 150 degrees. If it is that, turn the oven off, prop the door open with a dishtowel or something, and leave the cheesecake completely alone to finish cooking in the turned off oven. The final temp needs to be between 160 to 165. Any higher and you will most likely end up with a huge crack down the middle of the cheesecake. Plus, letting it sit in the slowly cooling oven helps protect from quick temp changes which can also cause it to crack. When the oven has completely cooled, take the cheesecake out and let it come to room temp. Then chill until cold, preferably overnight. They slice sooooo much better that way.
- When ready to serve, garnish with fresh raspberries and chocolate curls. Slice with a sharp knife dipped in hot water and dried in between cuts.
Copyright Notice: From Cupcakes To Caviar images and original content are copyright protected. Please do not publish these materials anywhere without prior permission.


%20Milk%20Shake "Pin It")

