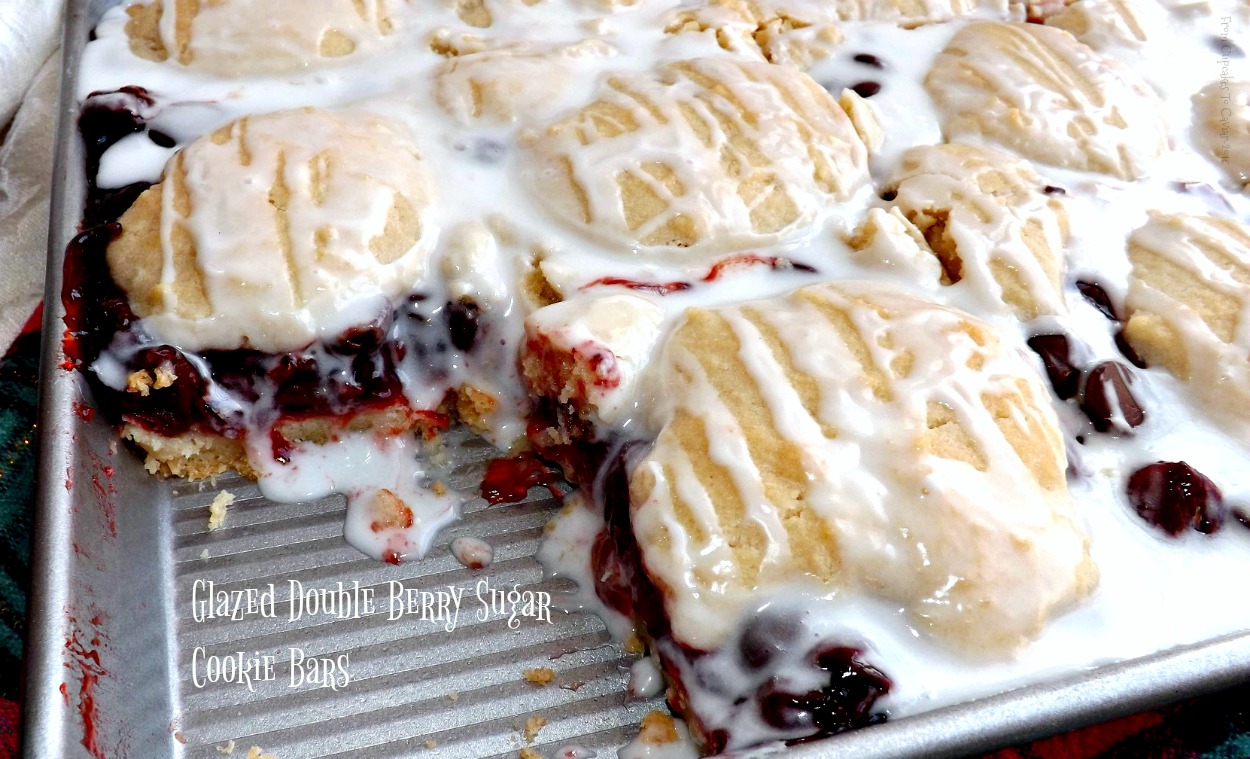
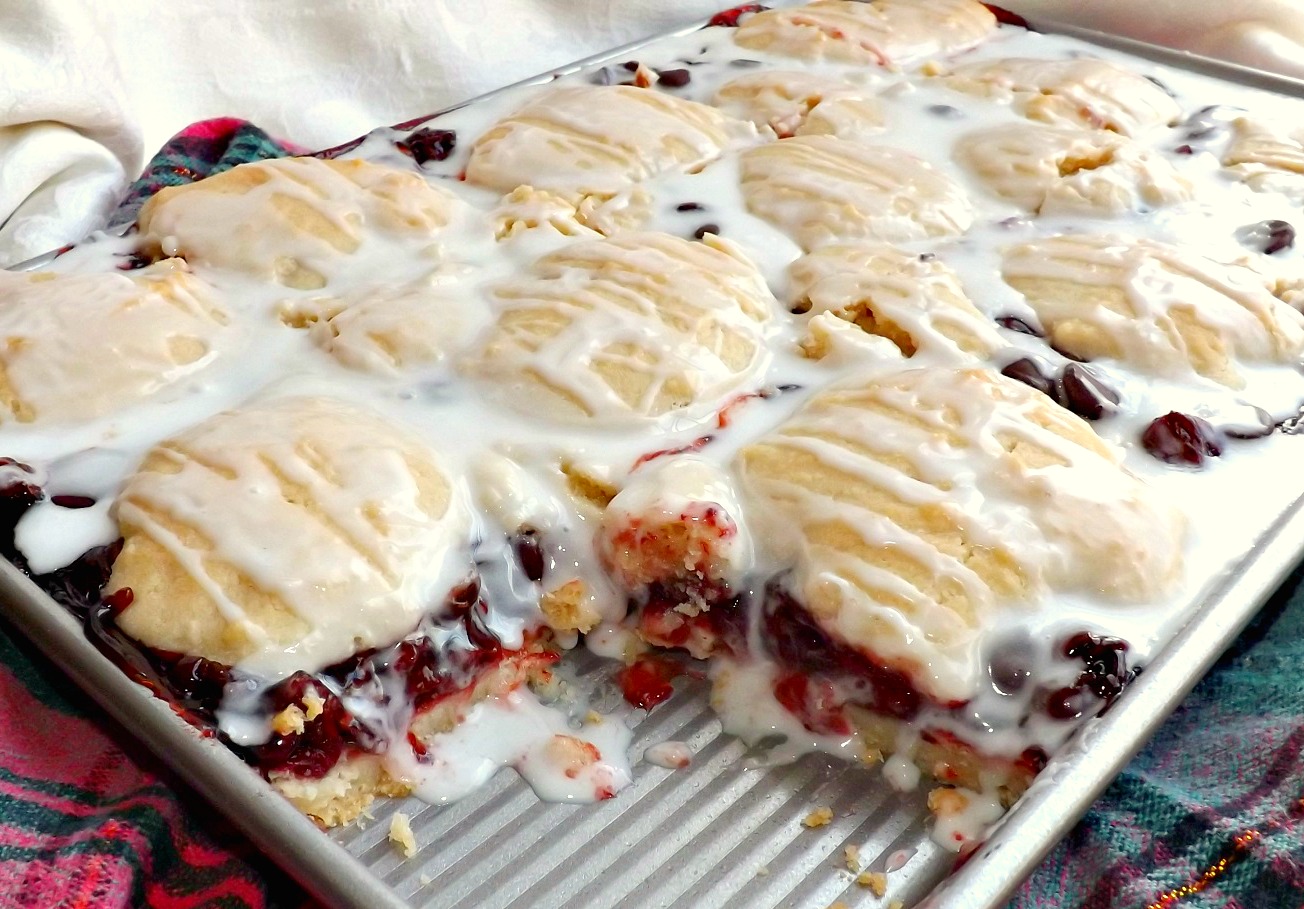
Glazed Double Berry Sugar Cookie Bars
Russ saw me making these bars the other day, grinned and said, “I LOVE baking season!”. Lol. He certainly does. Him, the boys, and I admit to a fondness for it myself. It’s funny; the rest of the year, I’m not as big on making cookies. I’m more of a quick bread, yeast bread sort of baker The whole plopping cookie dough down, or cutting, shaping, etc, drives me nuts. I shamefully confess that my attention span is that of a four year old in many ways and standing or sitting still to get something repetitive done isn’t a favored pastime. But at Christmas I’m all about the cookies.
The standing long enough to shape or roll though is exactly why I love bar cookies 😀 I get the dough in a pan, top with whatever if that is part of it, bake, cut, eat. What could be easier, right? These are delicious. Not really the type you’d put on a cookie tray though, so don’t use them for that. These are the ones you put out with the rest of the desserts. They are large, hearty bars, meant to be eaten with a fork.
Kind of still on topic, do you have your tree up yet? This is the first time in my life I’ve ever had a real tree. I grew up with fakes ones, used them my whole life, but Russ decided this year that he wanted a real one. I’m not sure how I feel about it. I think I had this vague expectation that the house would suddenly smell all Christmasy and piney. But *sobs* it doesn’t. It’s like having a fake tree in the house, but we have to keep it watered. It IS prettier than the fake tree we had, though. That one had seen better days and I’m pretty sure the mice had attacked it when it was stored in the garage.
Back to the cookies *as she rushes from one topic to the next like a crazed caffeine fueled toddler*, these are fantastic and as I said, perfect for the holiday dessert mix. The crust and topping are similar to a cakey sugar cookie, filled with a sweet and tangy mixture of berry pie filling and chocolate chips. Sugar cookie, fruit, chocolate. Do I even NEED to say more? Seriously; make these. They are wonderful, plus the fact that they use canned pie filling pushes them into the easy category as well, which is always a plus, especially this time of year. *I adapted this from a recipe on the BHG site*
Glazed Double Berry Sugar Cookie Bars
- 1/2 cup unsalted butter, room temp
- 1/2 cup shortening, room temp
- 1 3/4 cup sugar
- 1 1/2 teaspoons baking powder
- 1/2 teaspoon salt
- 3 eggs
- 1 1/2 teaspoons vanilla extract
- 1 1/2 teaspoons almond extract, divided
- 3 cups flour
- 2 21 ounce cans of your favorite pie filling- I used cherry and strawberry (you won’t use all of the second can)
- 1 cup semi sweet or bittersweet chocolate chips
- Glaze-
- 1 cup powdered sugar
- 1/2 teaspoon almond (or vanilla) extract mixed with
- 2 teaspoons half and half or milk (you may need a touch more cream to get the consistency glaze you like; start with this)
- Preheat oven to 350.
- In a large bowl, on low speed, beat together the butter and shortening. Add in the sugar, baking powder, salt, vanilla extract and 1 teaspoon of the almond extract and beat well.
- Still using the mixer on low *unless you enjoy being covered with flying flour*, carefully beat in 2 cups of the flour. Get a heavy wooden spoon and use that to mix in that last cup of flour.
- Scoop out and set aside 1 1/2 cups of the dough. Press the rest into the bottom of a 15×10 inch baking pan. I find the easiest way to do this with sticky dough is to dump it all in the pan, then lightly flour my fingers to press the dough in, repeating the flouring as needed.
- Bake the dough at 350 for 12 minutes. it will be just starting to turn a pale brown at the edges.
- While it bakes, stir the remaining 1/2 teaspoon of almond extract into the pie filling.
- After taking the crust out, carefully spread with desired amount of pie filling. I used about 1 1/2 cans. One can isn’t enough; two is a bit too much. Sprinkle the chocolate chips over the top, then dollop spoonfuls of the remaining cookie dough evenly over the fruit filling.
- Continue baking at 350 for 35 to 45 minutes or until the top is a light golden brown.
- Let cool for an hour, then glaze. The glaze is easy peasy. Just whisk together the glaze ingredients, adding more milk if you want it thinner and drizzle desired amount over the pan of bars. When totally cool, slice into squares.
Copyright Notice: From Cupcakes To Caviar images and original content are copyright protected. Please do not publish these materials anywhere without prior permission.
Glazed Double Berry Sugar Cookie Bars