Skillet Pears With An Autumn Spiced Caramel Sauce

Skillet Pears With An Autumn Spiced Caramel Sauce 9

Skillet Pears With An Autumn Spiced Caramel Sauce

Every year, I look forward to this season. Fall and I are good friends. It allows me to breathe like a relatively normal person and I…well, other than gush its praises, I’m not sure what I do for it, but we’re BFF’s nonetheless. I THINK *I say this with fingers crossed and a furtive prayer that I’m not proved wrong* that Summer is finally over here in Kentucky. And that, my friends, makes me oh so happy. We live on ten acres of land and my asthma makes outdoor time difficult for me in the Summer. So, I stay inside and look longingly at our woods and imagine myself sitting in the front yard, under our at least one hundred year old maple tree with a book. Now, I can go outside and see what my Fig tree is doing, see if the pecan tree has grown at all and just go into the woods and breathe deep. There is nothing like the scents in the woods during Autumn.

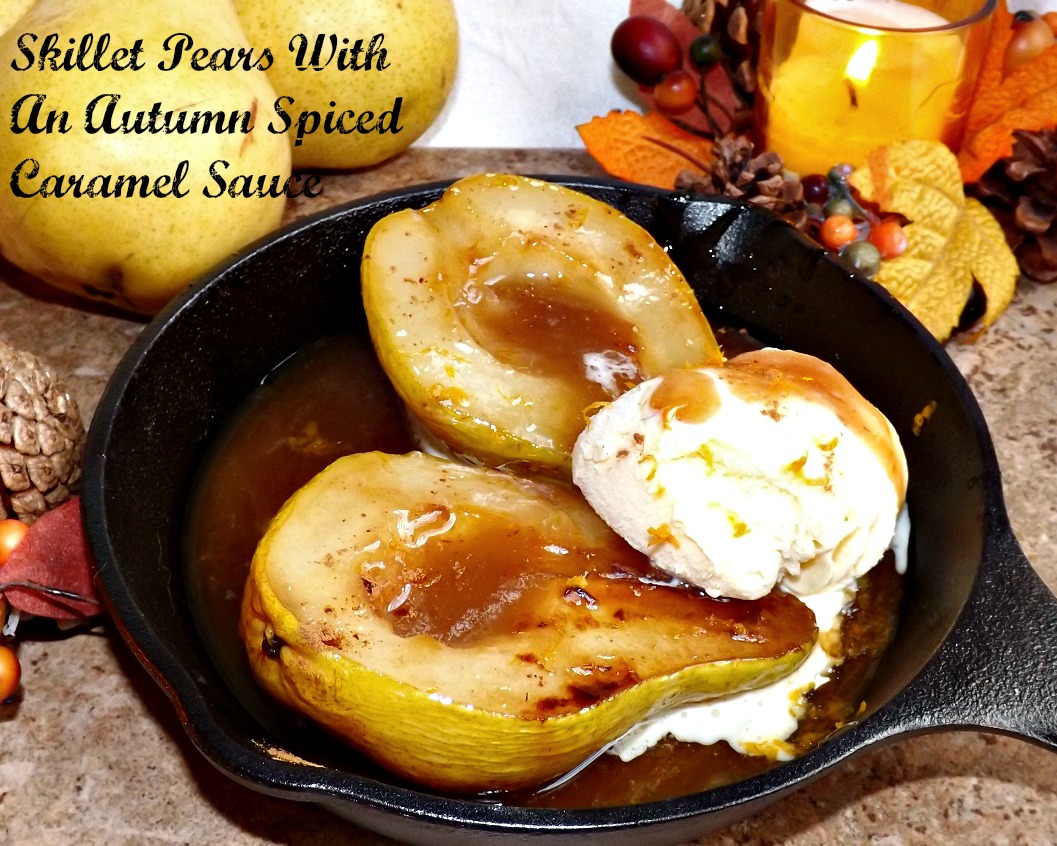
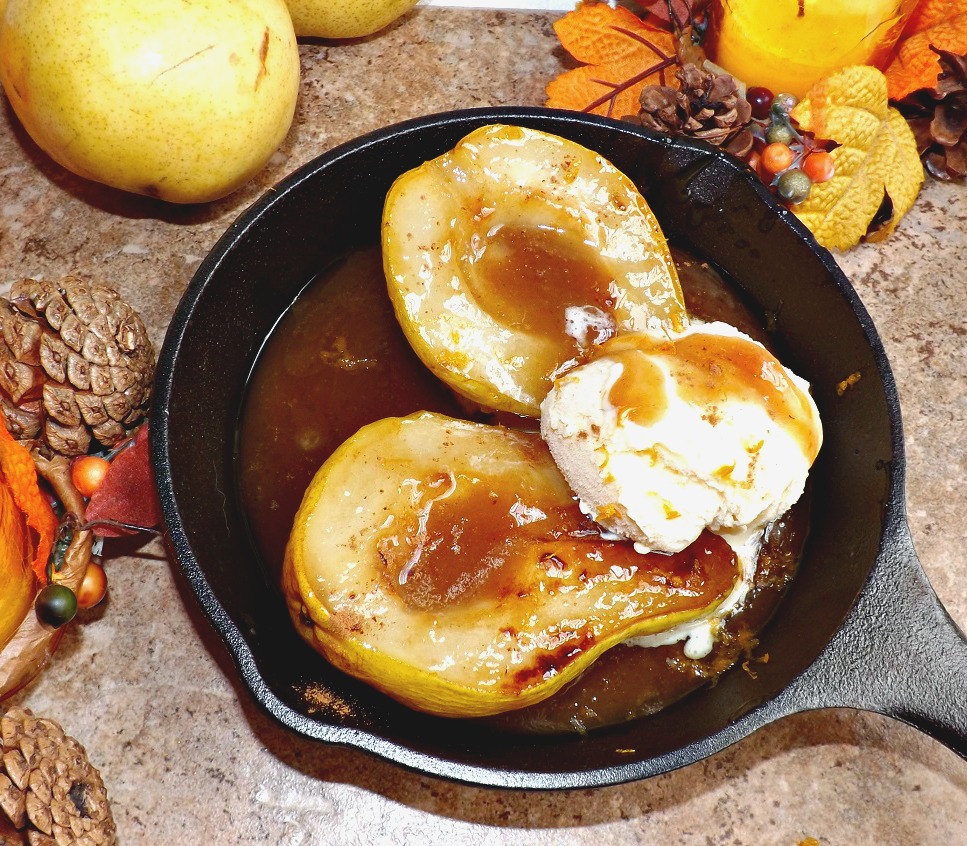
I also love the foods of Autumn, in case you’ve missed that in the last five and a half years 😛 One that I feel doesn’t get enough Autumn love is pears. They are wonderful most of the year, but right now, they lean more towards fantastic. So when I saw the base for this recipe in a C.I. cookbook, I had to make it. BUT… and here is where it is no surprise because I have said these words about 900 times in the last years, I had to change it up. I wanted it to have more of a Fall-ish (yes, that is now a word. I said so.) flavor. Plus, I like a bit of butter in my caramel which theirs didn’t have. So, what did I do? Besides adding butter, I added some warm Autumn spices and some orange zest to the caramel. Those changes, plus some vanilla extract, took this from good but ordinary to outstanding. The tender pears covered in caramel, that is itself sweet, creamy and with the subtle flavors of Fall, was wonderful. I added a scoop of vanilla ice cream to the it, because ice cream, and it took this completely over the top.

Don’t be nervous over the idea of caramel sauce. This one is quite easy and the whole dish takes just one pan.

You know the drill… get to cooking! <3

Skillet Pears With An Autumn Spiced Caramel Sauce

  • 3 ripe (but not mushy) pears. I used Barlett because it’s a wonderful all around pear.
  • 1/3 cup water
  • 2/3 cups sugar
  • 1 teaspoon vanilla extract
  • 3/4 teaspoon ground cinnamon
  • 1/4 teaspoon nutmeg
  • 1/8 teaspoon ground cloves
  • 1/8 teaspoon salt
  • 2/3 cup heavy cream
  • 2 tablespoons unsalted butter
  • 2 tablespoons orange zest (you could sub about 1/2 teaspoon orange extract, in which case add it in at the same time you add the vanilla)
  1. Slice and core the three pears and set aside. In a large skillet (I used my cast iron. Just cooking in it feels rustic and Autumnish), pour the water. Add the sugar to the middle of the pan. Gently stir to make sure all of the sugar is wet, then turn the heat to medium high. Add in the vanilla extract, spices and salt and give it another gentle stir.
  2. Bring to a boil over medium high heat, then lower the heat to medium and cook until all the sugar is dissolved and the mixture is bubbling.
  3. Add the pears, cut side down, to the bubbling sugar (be careful not to splatter on yourself!) and cook until the pears are fork tender, about 15 minutes.
  4. While it cooks, add the butter and orange zest (if using instead of orange extract) to the heavy cream and microwave for about 90 seconds or just until barely hot to the touch.
  5. When the pears are tender, slowly pour the cream around the pears. Give the pan a gentle shake to help mix it and continue to cook until the sauce is a light golden brown color, about five minutes.
  6. Then, you can either serve the pears straight from the pan (which is what I did. I just moved some to a smaller pan for the photo, lol) or transfer them to individual plates and serve with sauce puddled around them. No matter how you serve them, sprinkle with a touch of cinnamon and grate some extra orange zest over the top.

Copyright Notice: From Cupcakes To Caviar images and original content are copyright protected. Please do not publish these materials anywhere without prior permission.

Skillet Pears With An Autumn Spiced Caramel Sauce

Skillet Pears With An Autumn Spiced Caramel Sauce


Save

Save

Caramel, Toasted Coconut & Pecan Blondies

Caramel, Toasted Coconut & Pecan Blondies

Caramel, Toasted Coconut & Pecan Blondies

The first graders in Joshies school have their Easter egg hunt tomorrow. He wants me to come be one of the volunteer moms who hides eggs and acts all gleeful to be in a crowd of moms I don’t know. *Sobs* The child is young. He hasn’t yet learned that his mother is a total introvert, with social anxiety issues to boot. While I COULD go do this, and use it as a handy excuse to have a drink later, I think I prefer to go to the Easter egg hunt, cheer him on from the back of the mass of people and then quietly slink off to wait for school to end and Spring break to start. Though Spring break brings with it its own reasons to have a bottle of booze handy.

I already have his first Spring break snackie all ready with these blondies (Did ya see that smooth segue there? Huh, huh, huh?). Generally speaking, I prefer chocolaty brownie type bars, but every once in a while I get a wild hair and want to play with something else.  One of my favorite brownie recipes are these caramel pecan brownies. They are so easy and what you get from that easiness is an outstanding brownie; chewy, chocolaty and gooey. In other words, right up my alley. But the idea had been flitting around in my head to see what else I could do with the basic recipe. I know some people like their chocolate a little more muted and these should please those people immensely. But you know what? The rest of you will love them too. I know I do. These are simple as can be since they use cake mix (yes, cake mix. Quit rolling your eyes; they’ll stick that way.) and bagged caramels. I’ve learned in my many years of life (many, many years) that things don’t always have to be fancy to be delicious. These turned out really well. They are almost candylike in their texture; chewy, but not hard to chew, gooey, with just enough chocolate in them. Plus, the toasted coconut and pecans add a nice crunch and flavor to them. Cut these in fairly small bars. They are pretty rich.

You know the drill… 🙂

Caramel, Toasted Coconut & Pecan Blondies

  • 1 box yellow cake mix
  • 1/3 cup evaporated milk (you can sub half and half it you prefer)
  • 1/2 cup unsalted butter, melted and slightly cooled
  • 1 teaspoon vanilla extract
  • 1/2 teaspoon almond extract
  • 1 cup coarsely chopped pecans, toasted
  • 1 cup toasted coconut (350 oven, single layer in a baking dish for about ten minutes; stir once during toasting)
  • 21 ounces (give or take) caramel candy (I used Kraft; it takes about a bag and a half), unwrapped (I assume you know to unwrap them, but I have to be careful here 😛 )
  • 1/2 cup evaporated milk or half and half (yes, this is supposed to be in here twice)
  • 1 cup chocolate chips
  1. Preheat oven to 350. Line a 13×9 baking pan with foil; lightly grease the foil.
  2. In a medium bowl, combine the cake mix, 1/3 cup evaporated milk, melted butter and extracts. Use a spoon to mix just until combined. It’s ok if there are still some lumps in the batter.
  3. Use your hands (lightly grease or flour them; it helps) to spread/press about half the batter into the prepared pan. It may take a touch more than half; that’s fine. Bake at 350 for five minutes.
  4. While it’s baking, in a medium bowl, combine the caramels and the 1/2 cup evaporated milk. Microwave on high for 1 minute; stir. Then continue to microwave in 30 second increments, stirring after each one, until the caramels are melted. It’s again ok if there are small lumps and it’s not perfectly smooth. You just want a more or less smooth caramel mixture, but a few lumps won’t hurt.
  5. Pour half the caramel sauce on top of the partially baked crust. be careful spreading it since the crust isn’t cooked all the way and will tear if you’re not gentle. Top this with the toasted coconut, pecans and half the chocolate chips. Then pour the rest of the caramel sauce over the top.
  6. Mix the other half of the chocolate chips with the remaining batter, then spoon dollops of the batter over the top of the caramel. it’s not going to cover it all; that’s cool. Just try to evenly space the dollops over the top.
  7. Put the pan bake in the 350 oven for about 20 minutes, or until the top it browned and the caramel is bubbly.
  8. Let cool in the pan at LEAST a couple of hours (overnight in a cool place is best), then use the foil to lift the blondies out onto a cutting board. If they start to sag in the middle, they aren’t cool enough yet.. Peel off the foil, then cut the blondies into serving size pieces.

Copyright Notice: From Cupcakes To Caviar images and original content are copyright protected. Please do not publish these materials anywhere without prior permission.


Caramel Mocha Shake With Cocoa Whipped Cream & A Hamilton Beach Giveaway!!


Caramel Mocha Shake With Cocoa Whipped Cream


My husband is one of those people who has to have his gallon few cups of coffee in the morning when he gets up or it is like living with a drowsy grizzly bear. I’m normally a tea person myself, but in the last year or so have gotten into the habit of having a cup or two of coffee every other day or so. I think it came about because of the convenience of things like K-Cups. I wasn’t feeling like I was wasting coffee by making a half pot and not even finishing that much. So when the lovely people at Hamilton Beach contacted me and asked if I was interested in doing the first Brand Ambassador Campaign of 2015 by receiving and reviewing one of their 2-Way FlexBrew Coffee Makers , I was thrilled. I thoroughly enjoyed working with them last year and hope to continue to do so for a long time. Their products are wonderful and this coffee maker was no exception.

Hamilton Beach 2-Way FlexBrew Coffee Maker

Hamilton Beach 2-Way FlexBrew Coffee Maker

The 2-Way FlexBrew Coffee Makers is so darn convenient! It works for the coffee guzzlers like my husband because on one side you have a 12 cup carafe and can make a full pot to get going. On the other side is an individual brewer where you can make it one cup at a time using a K-Cup pod or the coffee reservoir that comes with it. Using the reservoir, you can use whatever type/flavor of coffee you prefer, not just a prepackaged pod. Better for the environment and less expensive. This side of the brewer works wonderfully for someone like me who does it one cup at a time  So far, we are loving the FlexBrew. There is a bit of a learning curve with the K-Cup side as you insert the pods a bit differently and it can be tricky getting the insert in until you get used to it. But once you do, it’s easy peasy. The K-Cup side can brew up to a 14 ounce cup of coffee and like I said, you can use the insert it comes with to use your own coffee and not a pod. Another feature I love is that you can make the coffee regular strength or, as they call it, “bold”. Basically, bold has the coffee stay in the filter for a bit longer, thus draining out every bit of flavor and making a stronger cup of coffee. This works great for me on the days when I’m needing a bit more of a caffeine jolt.

As usual when I review one of their products, Hamilton Beach is letting me offer one of these Flex Brew Coffee Makers to one of my readers. That reader could be you! The entry form is down below *points down*

With the weather heating up, it was a natural choice for me to make a yummy coffee milkshake using coffee made in the FlexBrew. Oh my, this puts those drinks from a certain national coffee chain to shame. I used a chocolate caramel gelato (imagine that…me…using caramel :-P) and instead of plain old milk, I used chocolate milk in this. Then I topped it off with a cocoa whipped cream and a drizzle of caramel syrup. With the coffee brewing time included, this takes maybe 7 minutes to make. You can be sitting on your porch with this not particularly diet friendly drink in hand, enjoying the weather. And if you were really feeling froggy, you could throw a shot or two of Kahlua or Baileys in this to give it an adult flair. 😀

You know the drill… and don’t forget to enter the giveaway!!!!

Caramel Mocha Shake With Cocoa Whipped Cream

  • 1/2 cup freshly brewed coffee (throw a couple of ice cubes in it to cool it down quickly)
  • 2 cups chocolate or chocolate/caramel gelato (I used Breyers Chocolate Caramel Gelato)
  • 1 1/2 cups good quality chocolate milk (please don’t use something like a Yoo-Hoo. I’ll cry. Those are just chocolate flavored water.)
  • 2 cups ice cubes
  • 2 tablespoons caramel syrup
  • Cocoa whipped cream-
  • 1/2 cup heavy cream
  • 2 tablespoons sugar
  • 1 tablespoon unsweetened cocoa powder
  • dash of vanilla extract
  1. Make your whipped cream while your coffee brews- simply combine all the whipped cream ingredients in a medium bowl and use a whisk to beat until firm peaks form, about 4 minutes. You can do it… work those arm muscles!
  2. Combine all the shake ingredients (and don’t forget to add that shot of Kahlua if you’re wanting to go that route) in a blender. Cover and blend on high speed until thoroughly blended, about 2 minutes.
  3. Pour into 3 glasses and top with the cocoa whipped cream. Drizzle with some extra caramel syrup.

Copyright Notice: From Cupcakes To Caviar images and original content are copyright protected. Please do not publish these materials anywhere without prior permission.

Hamilton Beach provided me with a 2-Way Flexbrew Coffee maker for myself and will send one to one winner of my giveaway, 18 years or older, in the United States. I received no other compensation for this and all opinions are my own.

[promosimple id=”733c”]


Product Info for the Hamilton Beach 2-Way FlexBrew Coffee Maker-

  • Single serve side:
  • Compatible with K-Cup®* Packs or ground coffee
  • Brews up to 14oz from ground coffee in travel mug**
  • Adjustable cup rest allows for standard-size cups or travel mugs
  • Better coffee extraction than the leading competitor
  • 12 cup carafe:
    • Brew a full pot of coffee
    • Regular or bold brew strength
    • Programmable timer with 2 hour automatic shutoff
    • Automatic pause & serve to grab a cup before the brew cycle is done
  • Durable, stainless steel features and dishwasher safe, removable parts
  • Equipped with a “Quick Start” Guide with simple, step-by-step brewing guidelines
  • Customer service support available through a US toll-free number
  • One-year warranty
  • This model is the same as 49983A, 49983P and 49983S.

Brewing with a Single-Serve Pack 

For some java drinkers, pouring fresh-ground coffee into their coffeemaker is the perfect start to their day. For other coffee lovers, being able to quickly insert a pre-packaged, single portion pack into their coffeemaker and enjoy a piping hot cup in a few minutes is a match made in heaven. The 2-Way FlexBrew® Coffeemaker offers the added convenience factor of a pack holder, which allows quick instant brewing in less time than an in-store café experience. Simply insert the single-serve pack and push the lever down – that’s it.

Brewing with Ground Coffee

Pre-packaged coffee isn’t for everyone or every palate. The 2-Way FlexBrew® Coffeemaker caters to coffee aficionados by featuring a single-serve permanent filter brew basket that holds a variety of fresh-tasting ground coffee. You can grind your own coffee beans to the medium-grind setting or save time and purchase pre-ground coffee. Brands such as Folgers, Maxwell House, Dunkin’ Donuts, and Starbucks are recommended because they are medium-grind coffees.

Note: Coffee that is ground too finely will cause an overflow. If you are unsure about the coarseness of your coffee, check with your coffee manufacturer.

About Homemade Brewing

Did you know that 86% of coffee drinkers still brew most of their java at home? With more and more Americans picking up the coffee habit and cutting back to save money, coffeemakers are now being designed to be more feasible and economical for the home budget and lifestyle. Source: 2012, National Coffee Association of USA

Caramel Mocha Shake With Cocoa Whipped Cream2


Easy Caramel Pecan Brownies

Easy Caramel Brownies

Easy Caramel Brownies


I first saw this recipe back in like 1984 or 1985 or so, just after I got married to my ex. I was deep into the newlywed “cut out recipes and save them” phase. I got it from, of all places, TV Guide. This was back when TV guide was interesting. It was about the size of a Readers Digest magazine, had a fair amount of articles in it and a nice synopsis of practically every show that came on. They also had a piece at times highlighting celebrity recipes. This one came from John Davidson (yes, I realize fully half of you have no idea who he is, lol while the rest of you are googling his name as you think, “Wow. Is he even still alive? He’s like 200 years old, right?”)) and was aptly titled “John Davidsons Brownies”. The TV Guide people were somewhat lacking in imagination. I guess they used all their creativity describing episodes of M*A*S*H or The Waltons and had none left for recipe titles.

Since then, it has, as most recipes do anymore, swept the web under many different guises with some people (who obviously forget that the rest of us can google) going so far as to say they made these up. You can find it under “Turtle Brownies”, “Cake Mix Brownies” and 900 other names. But it’s still always the same basic recipe. This is one of those times when you don’t want to try to be fancy. No homemade caramel sauce here… no from scratch cake. Normally, I would balk at wrapped cheap caramels, but know what? They totally work here. I hadn’t made these in forever and I had forgotten how good they are. They are intensely chocolatey (in part because I use a chocolate fudge cake mix, not the German chocolate one originally called for), gooey from the caramel and they have a nice crunch from the nuts. I’m not usually a nut person (just nutty personally) but they also help cut the sweetness in the brownies. That way you can eat more of them! 😀

About all I do differently from the original is the cake mix flavor, plus I use half and half rather than the evaporated milk it used and I add about a teaspoon of vanilla extract to the batter.

So what do we have here? Intensely chocolatey brownies, gooey caramel and crunchy nuts. And they’re so easy you can let the kids make them and you can sit and watch old M*A*S*H reruns.  Yeah, you want these.

You know the drill…

Easy Caramel Brownies

  • 1 box dark chocolate fudge cake mix (or whatever chocolate flavor trips your trigger)
  • 1/4 cup half and half
  • 1/2 cup unsalted butter, melted
  • 1 teaspoon vanilla extract
  • 1 14 ounce bag caramels (I use Kraft)
  • 1/2 cup half and half
  • 1 cup chocolate chips
  • 1 cup chopped pecans, lightly toasted in a 350 oven (the toasting is optional, but it’s a really good idea)
  1. Preheat oven to 350 degrees. Line a 13×9 inch pan with foil and spray it lightly with cooking spray.
  2. In a medium bowl, using a wooden spoon (or whatever, just do this by hand) combine the cake mix, 1/4 cup half and half, vanilla extract and the melted butter.. It will be a fairly stiff batter; you didn’t do anything incorrectly. Press about half of this (may take a touch more) into the bottom of the prepared pan. It will be a thin layer.
  3. Bake at 350 for about 5 minutes while you prepare the caramels.
  4. Unwrap the caramels and put them, along with the 1/2 cup of half and half, in a small microwave safe bowl. Microwave for one minute, stir, then microwave in 30 second increments, stirring after each one, until they are melted and smooth. Mine take about  two and a half minutes.
  5. Take the brownies out, sprinkle the pecans on top of them, then the chocolate chips. Pour the caramel sauce in an even layer over this. Then, use your hands to break up small pieces of the remaining brownie batter and place it all over the caramel. It will NOT cover the whole thing. You’ll end up with a rather cobblestone look.
  6. Place the pan back in the oven and continue baking until the top is firm and set and the caramel is bubbly, about 15 to 20 minutes.
  7. Let cool for at least an hour, then pull them out using the foil and cut into pieces. They are fairly rich, so it doesn’t take much to satisfy anyone but the most addicted chocoholic. In other words, me. Heck, just cut big squares. Who am I kidding?

Copyright Notice: From Cupcakes To Caviar images and original content are copyright protected. Please do not publish these materials anywhere without prior permission.

Caramel Apple Pie Streusel Bars

Caramel Apple Pie Streusel Bars

Caramel Apple Pie Streusel Bars


I am notorious for totally sucking at making apple pies. I add far too much cinnamon and don’t slice my apples thinly enough, leaving some pieces half raw and others too mushy. I also stunk at pie crusts.  Well, I used to be anyway. For holidays, I STILL tend to buy Marie Callendars Dutch Apple Pie. Why, if I no longer suck? Cause 1) I’m lazy and 2) I love them, so I keep using the whole “I stink at making apple pies!” excuse. Sooner or later, my husband will catch on that I continue to buy $8.00 pies when I could just as easily make one for half the cost, but for now, when Thanksgiving day gets here, I have a Marie Callendar pie waiting in the freezer. Darlin’, if you’re reading this, I’m lying right here…honest, I still stink at making pies *bats lashes and looks innocent*

But, to be honest, I may just leave that pie in there this year and make these bars. I had originally planned on a bar that could be more hand held and had a double crust. But, as happens with me often, and with a lot of bloggers, it morphed into something different. This is still caramel apple pie, but less hand held bar (even though it was done is a square pan) and more “cut a slab of this bad boy, put it on a plate and smother it in caramel sauce and vanilla ice cream” sort of pie. It CAN be hand held, if you’re on the run, since it’s not drippy unless you put far too much caramel lol. But it’s really more of a plate dessert.

This is more multi-step than I usually do, but none of those steps are difficult. Make the dough for the crust and while it’s chilling, prepare your streusel and the pie filling. Then roll out your dough, put it in the pan, top with the filling, then top with the streusel. Voila… ready to go. You DO need to let this cool until it’s completely cool however. Really, with any fruit pie, you should do that. How many times have you cut a warm pie and ended up with half of the filling oozing out into the pan? Let it cool and if you want it warm, you can nuke it for 30 seconds. Trust me. It will set up firmer and not be an oozing mess. Once ready to serve, cover it as desired in caramel sauce (in my case, about 8 or 9 cups worth) and maybe some ice cream. Eat, Enjoy. Thank me. Oh..this crust makes enough for two, so if you’re not wanting to double up the filling and streusel and make two pans, just freeze the other half of the dough until you need it. It never hurts to have some on hand.

Caramel Apple Pie Streusel Bars

  • Crust- (lightly adapted from Emeril Lagasse)
  • 3 1/4 cups flour
  • 1 teaspoon salt
  • 2 teaspoons sugar
  • 1/2 cup butter, cold
  • 2/3 cup solid shortening, cold
  • 6 to 10 tablespoons ice water (the original recipe called for 4 to 5, but that was nowhere near enough)
  • Filling-
  • 5 1/2 cups cored, peeled and chopped (bite sized chunks) apples, about 5 apples. I used a mix of tart and sweet apples
  • 1 1/2 tablespoons lemon juice
  • 2/3 cup sugar
  • 3 tablespoons flour
  • 1 tablespoon cinnamon
  • 1/2 teaspoon ground cloves
  • 1/2 teaspoon ground nutmeg
  • 1/2 teaspoon ground ginger
  • 1 cup Kraft caramel bits (found in the baking aisle)
  • Streusel-
  • 3/4 cup flour
  • 3/4 cups oats (NOT instant)
  • 1 teaspoon cinnamon
  • 1/2 teaspoon salt
  • 1/2 cup dark brown sugar
  • 1/2 cup unsalted butter, cold
  • caramel sauce for topping
  1. Make the crust- Preheat oven to 375 degrees. Line a 9×9 square pan with foil, using two long pieces, each going in the opposite direction. (line one way, turn pan, line the opposite way, so that all four sides of the pan have a layer of foil) In a large bowl, combine the flour, salt and sugar. Using a pastry blender, cut in the butter and shortening until it looks like small pebbles or peas.
  2. Add the ice water, no more than 2 tablespoons at a time, mixing well after each addition. Add water until the dough comes together when mixed and isn’t sticky, just firm and holding itself together when pressed. Wrap dough in foil or plastic and chill while you make the streusel and filling.
  3. Streusel-
  4. In a medium bowl, combine the flour, oats, salt, sugar and cinnamon. Cut in the butter using a pastry blender or your fingers until it is crumbly with, again, pea sized pieces. It’s ok if some chunks are a bit larger. Set aside.
  5. Filling-
  6. In a large bowl, toss the apple chunks with the lemon juice. In a small bowl, combine the flour, spices and sugar. Pour over the apples and mix well, making sure to stir from the bottom, as the flour will settle. Add in the caramel pieces and stir well.
  7. Put together-
  8. Get your chilled dough. Cut in half and store half for later use. On a lightly floured board, roll the dough out into a square that measures about 2 inches larger than the pan, about 11×11. Easiest way to gauge- just hold the pan upside down over the dough and eye how large it is. If you need more dough, just use some from the saved half. That half can still be used for mini tarts or tassies. Gently (I use a dough scraper) lift the dough up and lay it in the pan. Press gently down into the pans, going up the sides about 2 inches. If it is uneven, carefully cut tiny bits off of the higher areas and use it to patch onto the shorter ones.
  9. Pour the filling over the prepared crust, smoothing top. Sprinkle the streusel over the filling. Bake at 375 minutes until the top is golden brown and the filling is bubbling around the edges, about 60 to 70 minutes.
  10. Let cool in the pan until completely cool. Cut and serve, drizzling (pouring copious amounts of…) caramel sauce on top of each piece, reheating for about 30 seconds in the microwave is desired.

Copyright Notice: From Cupcakes To Caviar images and original content are copyright protected. Please do not publish these materials anywhere without prior permission.

Easy Caramel Apple Granola


Easy Caramel Apple Granola

Easy Caramel Apple Granola

Back when I was a kid (yeah, yeah, when dinosaurs roamed the earth and we wrote by chiseling on stone tablets), cereal was so much more fun. No one was worrying about whether it was gluten free, because no one knew what the heck gluten was. There was no panic over HFCS being used in cereals because we had the good stuff in our cereals… real sugar! Parents didn’t make their children start their days with food that was approved by our presidents wife (wth is up with that crap, anyway?); food that would carefully begin their days with a perfect balance of nutrients so that little Joey could go kick little Bobbys ass out on the playground when no one was looking because little Joeys mom and little Bobbys mom were in a feud over whose youth soccer league was better.
Nope… when I was a kid, we had far more fun being..well, kids. We ate Pop Tarts for breakfast (for the record, no, my son does not eat pop tarts for breakfast and yes, I know that makes me hypocritical. Ask me if I care. 😀 ), followed by a heaping bowl of something like Kaboom… aka round sugar shapes disguised with a bit of grain. Or maybe King Vitamin, aka, round sugary shapes disguised by a vitamin or two. Then there was the really fun stuff like Count Chocula, which one can only get now during the Halloween season (when the heck did Halloween become big business and even GET its own season, btw?) or one of my favorites, Super Sugar Crisp, well named because sugar made up 95% of its ingredients. In other words, damn, it tasted good! Now however, they have changed the name and the ingredients because the word sugar makes everybody freak out.
Did I forget to mention that was a child, we also played outside unattended, even after dark, and the police weren’t called on our parents, that if we acted up at school, our parents didn’t go in and blame the teacher, but actually disciplined us for what we did wrong and lets not forget the ever reliable, we walked five miles to school… uphill…. both ways.
All that being said, even when I was a kid, one of my favorite cereals has always been any type of granola. Granola has always had this strange rep as healthy. But guess what… it rarely is 😀 It has its good points nutritionally. Since it has a high proportion of fruit, nuts and grains, it has a fair amount of fiber and protein. But that comes with a price. It is also very calorie dense and if you use it like a “normal” cereal and just pour it in a bowl and douse it in milk, you will most likely end up with a 600 calorie bowl of breakfast. It’s better to use it more sparingly; portioned out for the kiddos or yourself in a baggie or mixed into yogurt, spooned over some ice cream or served as a snack with some cheese and fresh fruit.
When I got the idea for this granola, I was sure I would find 500 other incarnations of it online. But lo and behold, while there are caramel apple desserts galore, there was not one caramel apple granola that I found in like 20 pages of Google search. (Edited to add- my brother informed me that yes, there ARE a bunch of them and I realized that what I had googled was what I had originally intended to call this- caramel apple PIE granola. There are none of those, but alas, I’m not original in the other name. *sobs* Brothers! Always have to ruin ones fun!!) Yay for a brief moment of being unique!! I also originally intended to make this completely from scratch, but changed my mind. There are a TON of tasty, plain granolas out there for a decent price that are easily doctored up so I just rolled with that idea. I used my favorite plain granola- Cascadian Farms Fruit And Nut Blend. Then I added some salted caramel sauce (Trader Joes brand, but feel free to use homemade and to use a plain caramel sauce rather than salted), some chopped dried apple slices, some dried cherries, some roasted pistachio pieces for a bit of protein and crunch, mixed it all together and baked it for long enough to “set” the caramel. Let it cool, break it up and voila, you have the perfect snack!

You know the drill… 🙂

Caramel Apple Granola

  • 4 cups (one 13.5 ounce box) of your favorite plain granola
  • 2 cups chopped dried apple slices (about 1.5 bags)
  • 2/3 cup dried tart cherries
  • 2/3 cup roasted pistachios (no shell)
  • 1 1/4 cups caramel sauce (homemade, store bought, salted or not; your choice)
  • whatever else makes you happy in the way of nuts or fruit. You could also add about 1/4 cup of flax or chia seeds or some wheat germ
  1. Preheat oven to 325 degrees. Lightly grease a baking sheet with cooking spray.
  2. In a large bowl, combine all dry ingredients. Drizzle the caramel sauce over the top and using either a large wooden spoon or just your hands, mix it all together until the granola is evenly coated.
  3. Spread out onto the prepared baking sheet. Bake at 325 for ten minutes. Take out of the oven and break the granola up turning the pieces over, as the bottom will be getting crispy. Bake for ten more minutes at 325. Don’t over bake this. Remember, the granola was already ready to go. You are just baking this to set the caramel.
  4. Place the pan on a rack to cool completely. When cool, break this up into bite sized pieces (or chunks if that’s the way you roll… I tend to prefer smaller pieces so I can use it in yogurt). This is NOT a completely dry granola. It will have a slightly tacky feel even after baking because of the caramel sauce.
  5. When this is 199% cool, store in a tightly covered container.

Copyright Notice: From Cupcakes To Caviar images and original content are copyright protected. Please do not publish these materials anywhere without prior permission.

Caramel Apple Pie Bread With Streusel Topping

Caramel Apple Pie Bread With Streusel Topping

Caramel Apple Pie Bread With Streusel Topping


I remember when I was a child… or maybe I’ll be poetic and say, “I be remembering when I was but a wee tyke”. No, that doesn’t work. I feel like I should be wearing a Leprechauns outfit and eating Lucky Charms. So… I remember when I was a child, back in the Stone Age. Every Autumn our school would start selling caramel apples, or “Affy Tapples” as they were named. Yes, that was the specific brand name. I think they are still available in the Midwestern area. I always loved when they came around. End of the school day, there people would be, small booth set up in the school lobby, selling Affy Tapples for 25 cents. I would wager that the kids today pay a dollar or more for theirs; damned inflation. But, I would go there, tarnished quarter grasped in my dirty little hands and then I got it…. that much loved apple. Is there anything better in Autumn than a caramel apple? You get that tart juicy apple dripping down your chin, a blanket of sweet chewy caramel that gets stuck in your teeth and then the crunchy peanuts. The perfect treat when it comes to a mix of flavors and textures.

I wanted to recreate that experience with this bread, with one exception. I don’t use nuts a whole lot, one, because I am not a huge fan, though I have my times when I like them and two, I just can’t eat them much anymore, what with aging teeth lol. So no nuts in this bread. You could easily add a half cup or so of your favorite nut (would have to be salted chopped peanuts to be authentic though) to the batter.

This is a really good quick bread that goes together fairly quickly. One tip though- don’t shred your apples until just before you get to the step of adding the flour to the batter or they may have time to turn brown. It doesn’t take long for an apple to oxidize at all.  Sweet, moist, great for dessert or a quick breakfast. Have some hot coffee waiting, or tea if you’re like me, and enjoy.

You know the drill…. 🙂

Caramel Apple Pie Bread

  • 1/2 cup (one stick) unsalted butter, room temp
  • 1/2 cup dark brown sugar
  • 1/2 cup sugar
  • 1/2 cup buttermilk mixed with 2 teaspoons baking powder (Don’t mix this till just before you need it or you could end up with a volcanic science experiment hehe)
  • 2 eggs
  • 1 tablespoon vanilla extract
  • 2 cups flour
  • 1/2 teaspoon salt
  • 1 1 /2 teaspoons Cinnamon
  • 1/2 teaspoon ground cloves
  • 1/2 teaspoon ground nutmeg
  • 2 cups shredded tart apple (I used Granny Smiths and just shredded them on a box grater, I also didn’t peel mine; feel free to peel yours if you want, but there’s really no reason to do so) (remember; shred just before using so they don’t turn brown)
  • 1/2 cup raisins
  • 1 cup quartered Werthers Baking Caramels (takes about 20 caramels to get that amount)
  • Streusel-
  • 1/4 cup dark brown sugar
  • 3 tablespoons flour
  • 1/2 teaspoon cinnamon
  • 2 tablespoons unsalted butter, cold
  1. Preheat your oven to 350 degrees. Grease a 9 inch loaf pan and set aside.
  2. Make your streusel first and set it aside until ready for it- In a small bowl, combine the brown sugar, flour and cinnamon. Using a pastry blender or your fingers, cut in the softened butter until the mixture is crumbly.
  3. In a medium bowl on low speed with a hand mixer, beat the butter until creamy. Add in your sugars and beat well. Add in the eggs and vanilla extract. beat well.
  4. Add in the buttermilk/baking powder mixture. Mix well (darn, I’m using that phrase a lot)
  5. Dump in the flour, salt and spices. On low speed, mix just until combined.
  6. Gently fold in the caramels, the apples and the raisins. Pour the batter into the prepared pan.
  7. Sprinkle the top of the bread with the streusel.
  8. Bake at 350 degrees for 60 to 65 minutes or until a skewer inserted into the middle comes out clean. A small bit of moist crumb is ok; liquidy is NOT.
  9. Let cool in the pan for about 20 minutes, then turn out onto a rack to finish cooling. Be aware, this one is touchy to unpan due to the streusel. Make sure you have it totally loosened before trying or most of the streusel is going to end up on your counter and not on the bread.

Copyright Notice: From Cupcakes To Caviar images and original content are copyright protected. Please do not publish these materials anywhere without prior permission.


Chewy Salted Caramel Hazelnut Cheesecake Brownies

Chewy Salted Caramel Hazelnut Brownies

Chewy Salted Caramel Hazelnut Brownies


I’ve come to the realization that, during the Summer, I am NOT a prolific blogger. I bake like the dickens (what IS a dickens anyway and do they even bake?) during the fall, Winter and early Spring, but I live in Kentucky in a house with an A/C system that barely works when it’s hot out and I have asthma; not a good combination when trying to bake lol.

Weeks ago I said I was going to make some Nutella Brownies. Today the temp wasn’t bad so FINALLY I got around to it. Erhmmm, kind of. You see, I have the great honor of being mom to six kids, three of whom still live at home, with two of those being teenage walking stomachs boys. So what did I find when I went into the cabinet to grab the Nutella? An almost empty jar with incriminating spoon marks in it. Gee, wonder how THAT happened? So I went to the back up jar of Nutella wanna be imported from Italy that I got at Big Lots. And know what? That crap is Nasty with a capital nas! I wouldn’t feed that to my worst enemy. Welllll, I know of one woman I used to be friends with that I might feed it to as well as one ultra controlling ex boyfriend. 😀

So, being the inventive soul that I am (be nice and work with me here…) what did I do? I got out the jar of Jif Salted Caramel Hazelnut Spread that I keep on hand for emergencies. Those emergencies being when I am craving something sweet and delude myself into thinking that since this is made with nuts, it’s good for me. Point being, this is some yummy stuff! Not Nutella, I admit that, but it has a unique flavor of its own; sweet, salty, with an undertone of caramel to go with the hazelnuts.

Then when I was in the fridge getting eggs, I saw the cream cheese and I immediately thought of cheesecake brownies! So that’s what we have here- deep dark and chewy chocolate brownies swirled with a salted caramel hazelnut cheesecake, then topped with some salted caramel sauce. Can we spell decadence, class?? And OMG? Wait, that one is rather self explanatory. My bad. And maybe even “please don’t share these with anyone that you don’t want to have following you around the house whimpering like a puppy to get more from you”. Just sayin’. And you don’t really have to spell that last part. I understand.

You know the drill….

Salted Caramel Hazelnut Cheesecake Brownies

  • 8 ounces cream cheese, room temp
  • 2 tablespoons sugar
  • 1/2 cup Jif Salted Caramel Hazelnut Spread
  • 1 teaspoon vanilla extract
  • 1 cup (2 sticks) unsalted butter, melted and cooled
  • 2 teaspoons vanilla extract (not a typo; you need some for the swirl and the brownie batter)
  • 2 1/4 cups sugar
  • 4 eggs
  • 1 cup baking cocoa
  • 1 1/2 cups flour
  • 1 teaspoon baking powder
  • 1/2 teaspoon salt
  • salted caramel sauce for drizzling n top (I used Trader Joes brand)
  1. Preheat oven to 350 degrees. Line a greased 13×9 inch pan with parchment paper and lightly grease the paper.
  2. In a medium mixing bowl, beat the softened cream cheese until it is smooth and creamy. Scrape down the sides of the bowl. Add in the hazelnut spread, 2 tablespoons sugar and vanilla extract. Beat well to combine. Set aside while you make the brownie batter.
  3. In a medium bowl, combine the melted butter and the 2 1/4 cups sugar. Beat well for 3 to 4 minutes. Add in the eggs and 2 teaspoons vanilla extract. Beat well.
  4. Add in the flour, cocoa, baking powder and salt. Use a wooden spoon or rubber spatula to mix the batter just until it is combined.
  5. Spoon the batter into the prepared pan and smooth down.
  6. Drop spoonfuls of the cheesecake batter on top of the brownie batter and swirl it into the brownie batter using a butter knife.
  7. Bake at 350 for 35 to 40 minutes or until a toothpick or skewer inserted in the middle comes out mostly clean with no liquid batter on it, though a few moist crumbs are fine.
  8. Let cool in the pan on a rack for about an hour.
  9. Use the parchment paper to carefully lift the brownies out of the pan. Let them cool completely on the rack. Wrap loosely and refrigerate for about 2 hours or overnight. Take them out about an hour before you’re ready to serve them so that they will be easier to cut. Cut into squares of whatever size makes you happy; no 1/2 inch tidbits mentioned in THIS blog 😛
  10. Drizzle each square (chunk, half pan…whatever, I don’t judge) with some salted caramel sauce. Serve these with ice cold milk or some hot coffee. Thank me later.

Copyright Notice: From Cupcakes To Caviar images and original content are copyright protected. Please do not publish these materials anywhere without prior permission.


Café Caramel Parfait

Café Caramel Parfait

Café Caramel Parfait


When we cleaned out our garage, I found that I had about 798 cans of sweetened condensed milk. I kind of figured I might, just might, need to use some of them up. I was totally tempted to just sit down in front of the TV with a can or eight and a spoon and watch endless reruns of Downton Abbey, but just for YOU, I resisted that urge. Though in all honesty, I still have 796 cans of sweetened condensed milk left, so I make no promises as to my future plans. Downton Abbey and I have a date with destiny. Wait for me, Bates!!! I love you!

Sorry.

So what did I use some of that condensed milk for? Just for you, I made the noble sacrifice of developing a Café Caramel Parfait. Talk about easy, also. This is so easy, even my husband could make it. Ok, maybe I’m pushing it when I think that the man who lived on frozen burritos and Doritos before he met me could make this.

This is a whipped cream lightened with Dulce de leche, vanilla, a touch of instant coffee and sour cream layered with plain Dulce de leche. Easy, huh? You make your dulce de leche (or cheat and buy it premade), mix it with the other ingredients and layer.

This is rich and creamy, yet surprisingly light in taste (definitely not in calories). It’s like having your favorite coffee drink in a spoonable treat.

You know the drill… 🙂

Café Caramel Parfait

  • 2 cans sweetened condensed milk (or 3 small cans premade Dulce de leche)
  • 1 cup heavy cream
  • 1 teaspoon vanilla extract
  • 2 teaspoons instant coffee powder
  • 1/2 cup sour cream
  1. To make the Dulce de leche– I’m going to tell you how I do it, but know that it’s not “recommended” by many. I will touch on other methods, but how I make it is how I’ve done it for over ten years, with not even one problem.
  2. Fill a LARGE pot with water. Put your unopened cans of milk in the water. make sure, now and at all times, while it cooks, that the cans are covered by at least 2 to 3 inches of water. This keeps the pressure inside and outside of the pan equal and that is what makes this safe. The ONLY way this would explode would be if the pressure was different in and out of the can. Keep it covered and you’ll be fine.**
  3. Over medium heat, cook the cans of milk for 2 to 3 hours. The longer it cooks, the thicker and more…well…caramelly (yes, that is now a word. hush.) it will become. I usually cook in the 3 hour range. Just keep an eye on your water level.
  4. Once it’s cooked, turn the water off, leaving the cans in the water until the water is completely cool. take the cans out, let them cool also before you open them. When you do this, you’re best off to make a few cans and just store them in the cabinet. This is the the most time consuming part of this recipe so having extras never hurts. It’s great in coffee too!
  5. Once your caramel is cooled, you can beeeeginnnnn. :-p
  6. Whip the one cup heavy cream in a medium bowl until firm peaks form.  Slowly beat in 3/4 cup of the Dulce de leche, the vanilla and the instant coffee powder. Beat in the sour cream. Cover and chill for one hour (after eating a few spoons of it 😀 )
  7.  Scoop the remaining Dulce de leche into a small bowl. Beat at medium speed for about one minute. You’re just trying to lighten it up because it’s a very thick product.
  8. Spoon a layer of the Dulce de leche into 6 small glasses. Top with a layer of the chilled cream and then drizzle with more of the Dulce de leche. Chill until ready to serve. You may end up with a little of the cream and/or the caramel. Just cover it and store in the fridge. It’s wonderful in coffee or as a dip for fruit.

**Here is a wiki detailing some of the other ways to make the Dulce de lecheDulce De Leche Wiki . Feel free to use any of these methods. The only one I’VE used however is what I detail above. Many of the others leave you with slightly burned caramel. Ick!

Copyright Notice: From Cupcakes To Caviar images and original content are copyright protected. Please do not publish these materials anywhere without prior permission.

Fleur De Sel Caramels (Salted Caramels)

Fleur De Sel Caramels

Fleur De Sel Caramels

The fancy name sounds so purty, but it’s just salted caramels. I was about to say “just plain old salted caramels”, but that would have been an insult to these rich creamy pieces of goodness. There’s nothing plain about these. There’s also nothing difficult. Back when I first made my Homemade Caramel Sauce, I was one of those people that assumed that something that tasted so decadent had to be hard to make. Nope; flat out easy. Now don’t get me wrong. You walk away from this during the caramelizing of the sugar, you will end up with every smoke detector in a ten mile radius going off, an embarrassing fire department visit, a ruined pan that no amount of soaking will save and worst of all…. NO CARAMEL! And while this isn’t hard, it is not a put the pot on the stove during ANY step and go sit and watch The Real Housewives Of The Amazon Rainforest sort of thing to cook. You need to stick close by.

Is it worth it? You tell me. Your choice is this- go spend 5 bucks at Trader Joes for a container of caramels that, while good, gives you about 20 caramels for the price and STILL isn’t as good as homemade. Or you could go buy a bag of Kraft or Brachs caramels that are cheap but..well, you can tell they are cheap. Very little flavor, the mouth feel isn’t the same and you get what you pay for. OR… you can spend about 6 bucks and get a 9 inch pan of gloriously burnt sugar tasting, creamy rich “OMG, if I eat any more of these, I’m gonna weigh 500 pounds but they are so damn good!” caramels. So you choose. 😀

Also, if you prefer just regular caramels, just omit the salt in the caramel and on top. Regular caramels at your service. Fat girl pants optional.

P.S.- If you don’t have Fleur De Sel, you can use any coarse grained salt. Just don’t use table salt.

You know the drill….

Fleur De Sel Caramels (Salted Caramels)

  • 2 cups sugar
  • 2/3 cup light corn syrup
  • 1/2 cup water
  • 2 cups heavy cream, warmed
  • 1/2 cup unsalted butter, room temp, cut into 4 pieces
  • 1 1/2 teaspoon vanilla extract
  • 1/2 teaspoon fleur de sel

Make sure you have all your ingredients at hand. Have the cream measured and nearby and to save time, just grind your salt right into the cream as well as pour the vanilla in it and make sure your butter is unwrapped and at the ready. Then set it all aside right by the stove. Line a 9 inch square pan with foil (preferably the non stick kind.). Butter the foil, bottom and sides. Set aside near the stove.

  1. Get a nice deep heavy bottomed saucepot. At least a 4 quart one. Combine the sugar, water and corn syrup in the pot. Bring to a boil over medium high heat. Swirl the pan a couple of times while cooking but do NOT stir it. If you stir caramel as it’s cooking, you stand a good chance of ending up with grainy, gritty caramel.
  2. Boil until the mixture has turned a nice dark golden brown color. Do NOT leave the stove during this step. When it is the right color, immediately move it to a cool burner. Pour in the cream mixture all at once and carefully drop in the butter. This is going to sputter like crazy so be prepared. Just pour and then give it a minute to settle down some.
  3. Set it back on the stove over medium high heat. Don’t stir. Just swirl the pot a few times carefully to combine the mixture. You can, very carefully, if you have to, use a wooden spoon and gently stir in the middle of the mixture, making sure to not touch the sides or bottom of the pan. But just the one time to get things combined.
  4. Keep the mixture over medium high heat and cook to 245 degrees. Use a candy thermometer or good instant read thermometer to get an accurate reading. This will take about ten minutes.
  5. When it gets to 245 degrees, take off the heat and immediately pour into the prepared pan without scraping the bottom of the pot. If there’s any left in the bottom, just let it cool and consider it the cooks treat. 🙂
  6. Allow this to sit overnight or until firm. You can refrigerate it and it will get firmer much quicker but it also makes it a bit more difficult to cut, though not hard if you have a good knife. Cut into about 48 pieces, using a sharp knife.
  7. Sprinkle more fleur de sel on top of each piece and either wrap in plastic wrap or put in mini candy cups. These are perfect for Christmas gift giving!

Copyright Notice: From Cupcakes To Caviar images and original content are copyright protected. Please do not publish these materials anywhere without prior permission.