Silky Cheesecake Flan

Silky Cheesecake Flan

Do you ever have those moments when you see something become a trend and you can only think to yourself “mannnn, I’ve been doing that/making that/going there/whatever for years now. WAY before it became trendy. Then you’re torn between feeling ahead of the game and wanting to make sure everyone knows you did it first so you don’t seem like a follower. There are a ton of foods I feel like that with. It’s like “no fair! I was making that way before any of you did it!!”

Flan is one of those foods. I was making it way back in the early 80’s, long before it became trendy restaurant food. WHY was I making it? Like duhhhh man; it’s made with high fat heavy cream and this is me. Need I say more? 😛 As a variation of the “If you build it, they will come”, with me, it’s always been “add cream and I will eat it”. Hey, we all have our weak spots. Cream is one of mine.

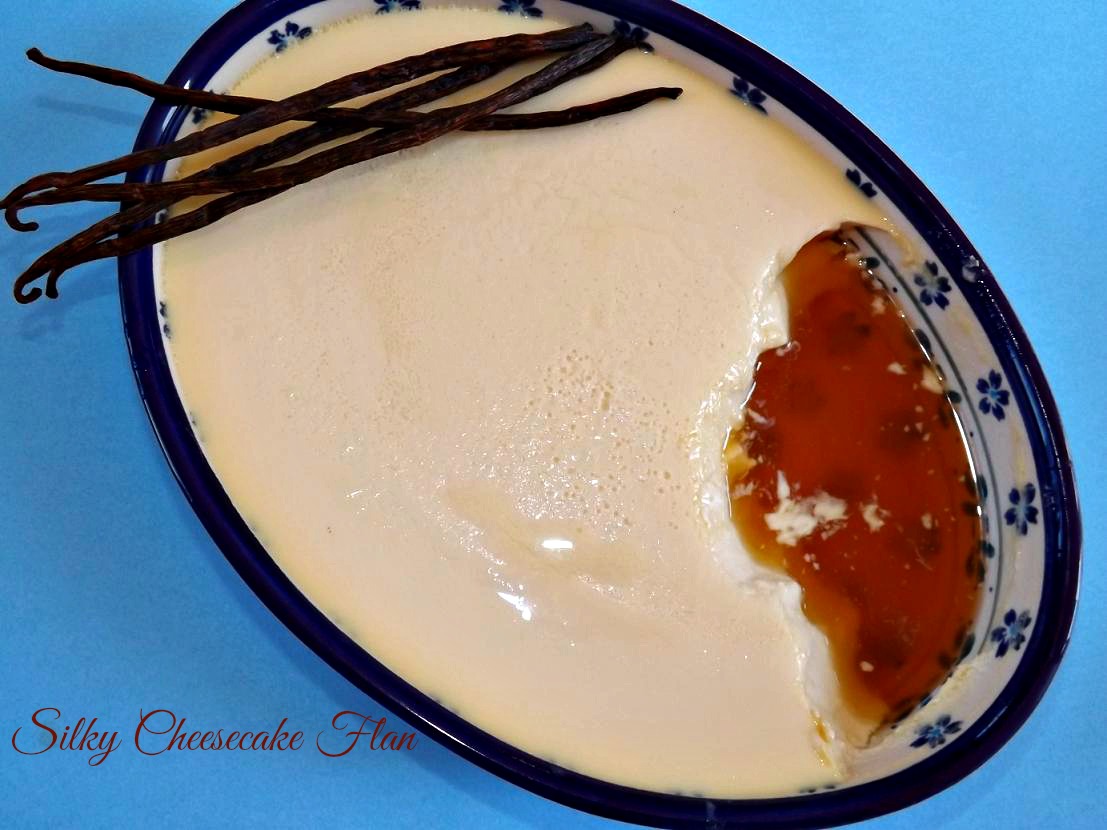
For years, I used a flan recipe I found in one of those old Pillsbury paperback cookbooks they sold monthly. I still do periodically when I’m feeling like a purist.  But sometimes I like to change it up and make a cheesecake flan. It’s called that because you use cream cheese in it. The cream cheese contributes a silkiness you don’t get with regular flan (though the regular stuff is pretty damned amazing texture wise itself) and a subtle tang. That flavor mixed with the caramel sauce is outstanding.

Word of note- when I make flan, I do NOT do the whole invert and let the caramel run down it, yada yada yada. I want to get to eating and half the time, it droops when inverted and doesn’t look nearly as pretty as it does just spooning it out of the dish and drizzling (or in my case, pouring on by the quart) the caramel sauce on top of each serving. If you want to invert, go for it. But I promise you, no one will care if you don’t.  This is smooth, creamy, just melts in your mouth. The flan itself isn’t overly sweet and the burnt sugar taste of the caramel just sets it off so well, you will find yourself eating and eating…and eating…and cursing me…and eating..and cursing more.

You know the drill….

Silky Cheesecake Flan

  • 1 1/2 cups sugar
  • 1/4 cup water
  • 1 8 ounce package cream cheese, softened
  • 4 eggs
  • 1 egg yolk
  • 1 can sweetened condensed milk
  • 2 1/2 cups heavy cream
  • 1 tablespoon vanilla extract
  • 4 cups boiling water
  1. Take a 3 quart baking dish and place it inside of another larger (a 13×9 pan or bigger works well) and set near the stove. Preheat the oven to 350 degrees.
  2. Combine the sugar and water in a small sauce pot.
  3. Over medium high heat, let the sugar mixture cook, swirling the pan occasionally, until the color is a dark reddish brown. When it gets to that, even if there are still some sugar lumps, remove from the heat. If you keep swirling for a few seconds, the lumps will melt and even if they don’t, it’s not a big deal.
  4. Immediately pour the caramel into the waiting pan.
  5. In a large bowl, beat the cream cheese on low until creamy. Add in the eggs and egg yolk and using a whisk, gently mix with the cream cheese. You’re trying to make as little foam as possible here because the air bubbles won’t dissipate and will leave unattractive pock marks all over the flan, though they obviously don’t effect the taste.
  6. Gently beat in the condensed milk, then the heavy cream and vanilla extract.
  7. Carefully pour the custard into the prepared pan. Put the pan into the oven and then carefully pour the boiling water around the baking dish with the custard in it, being careful not to splash any water into the pan. Lightly cover the pan with foil.
  8. Immediately turn the heat down to 325 degrees and bake the flan for 45 to 60 minutes, until just the center third of the flan is slightly jiggly (not liquidy, just rather like half set jello). Carefully remove the flan pan from the other pan. I’ve found that the best way to do this without burning your fingers with the water is to use a baster to drain out most of the water, then lift the pan out. Let the flan cool for about an hour at room temp, then refrigerate until completely chilled, at least 2 hours more.
  9. If you want to invert it, you run a butter knife all around the edges and then lay a large serving plate over the top. Quickly but carefully flip the dish and pan over and the flan should slide out. Spoon the caramel sauce remaining in the pan over the flan. But, as I said, I rarely bother with the inversion. It tastes just as good and is far less work, if not as dramatic looking.

Copyright Notice: From Cupcakes To Caviar images and original content are copyright protected. Please do not publish these materials anywhere without prior permission.


Soft, Fresh, Multi Grain Bread

Soft, Fresh Multi Grain Bread

Soft, Fresh Multi Grain Bread


I can just see many of you now. “Ewwwww, she said multi grain! That must mean its healthy and tastes like old cat litter!!” Fine, so maybe I’m transferring my own reaction to hearing the words multi grain. But I know SOME of you are like me. We hear those words and automatically close the page or go look for something made with heavy cream, tons of sugar and chocolate. Again, maybe that’s mainly me. No, no, nooooo, I KNOW others do it.

That said, I DO however like fresh breads. But even I know that ones made with all white flour have little to no nutritional value. They’re just empty (albeit extremely tasty) calories made up of carbs. But oh my, they are delicious. I have tried the store bought whole grain breads and it is nearly impossible t find one that doesn’t taste like cardboard. So I make my own. Until you try it, you can never know how tasty a FRESH loaf of whole grain bread is. Soft, fluffy (no, not as fluffy as white bread but nowhere near as dense as store bought cardboard multi grain bread. The only drawback with this bread is it doesn’t store well. It gets rather crumbly with age. But it rarely lasts long enough around here for that to be a problem. Sliced thin (if cutting for sandwiches, always wait until bread is totally cool before slicing), it makes great sandwiches. Sliced a bit thicker and slathered with butter and jam, this is a fantastic snack or side for a meal. We had it tonight with a yummy creamy turkey dumpling soup. Sooooo good together!

You know the drill… git to cookin’!

With this recipe, make sure to premeasure your grains and have them ready to go. It’s easy to get flustered and forget one or more when using this many different types of grain in one bread.

Multi Grain Bread

  • 3- 3 1/4 cups bread flour
  • 2 teaspoons salt
  • 2 packages dry yeast
  • 1 1/2 cups water
  • 1 cup milk
  • 1/4 cup vegetable or canola oil
  • 1/4 cup molasses
  • 2 cups whole wheat flour
  • 1/2 cup rye flour (you can buy rye flour in fairly small bags and once you try this recipe, believe me, it won’t go to waste)
  • 1/2 cup rolled oats
  • 1/2 cup cornmeal
  • 1/2 cup shelled sunflower seeds or pepitas, your choice
  • 2 tablespoons vital wheat gluten (optional but I recommend it. It helps make a typically dense loaf like this much lighter plus helps it keep better. You can find it with the flours and yeasts at the grocery store)
  • 1/4 cup wheat germ (if you want a touch more sweetness, feel free to use the honey wheat germ)
  1. In the bowl of a stand mixer fitted with the dough hook, combine two cups of the bread flour, the salt and the yeast.
  2. Combine the rye flour, oats, cornmeal, sunflower seeds, vital wheat gluten if using and wheat germ in a small bowl. Set aside.
  3. In a large microwave safe measuring cup, heat the water, milk, oil and molasses to between 120 degrees and 130 degrees.
  4. Add the warmed liquid to the flour mixture in the stand mixer bowl. Beat 2 minutes at low speed.
  5. Add in the combined grain mixture you set aside along with an additional 3/4 cup bread flour. Let the mixer combine and then knead this for about 5 minutes.
  6. Turn the mixer off and feel the dough. It should be just VERY slightly tacky to the touch, but your finger shouldn’t stick to it at all.
  7. Turn the dough out onto a lightly floured counter and knead for just a minute or so. Put into an oiled bowl and turn the dough to make sure all sides get oil on them.
  8. Cover with a clean towel and let rise until doubled in bulk, about 30 to 45 minutes.
  9. When risen, punch down and shape into two loaves. Put them into 2 well greased 9 inch loaf pans and again, let rise until nearly doubled in bulk. While they rise, preheat your oven to 350 degrees.
  10. When risen, bake at 350 degrees until the loaves are golden brown and firm to the touch on top, about 20 to 25 minutes. Turn bread out onto a rack to cool for about one hour. I know, I know, you will end up slicing it while it’s still warm, but I have to at least try to pretend I don’t know this and that I think you’ll leave it to cool.

Copyright Notice: From Cupcakes To Caviar images and original content are copyright protected. Please do not publish these materials anywhere without prior permission.


Snickerdoodle Banana Bread

Snickerdoodle Banana Bread

Snickerdoodle Banana Bread


Wow. Been almost two weeks since I’ve posted. Well, Christmas break is over. Right now is the perfect time for some baking since the bulk of the nation is feeling their wittle toesies freeze off and baking gives you a chance to stand in front of the oven and cry out “oh, my God, I’m freezing to death!” Then again, maybe it’s just me that whines that much when I’m cold. But, native Chicagoan I may be, but I’ve lived in Kentucky since 1988, so a temp of -1 with a wind chill of just about 20 below zero is a weeeee bit chilly. So I whine. I wear 32 pairs of socks, 12 hoodies and 8 pairs of gloves. Try walking in 32 pairs of socks. I look like a fat drunk penguin.

When I was trying to figure out what to bake, I went to my Pinterest account to look through my Foods/Recipes To Try board. I found one I pined ages ago- Snickerdoodle Bread. The recipe, as far as my google digging can tell, originally comes from Barbara Bakes though there are now a bazillion incarnations on the web. When I started baking, I saw I had a ton of bananas I needed to use up, so I figured I’d try making this into Snickerdoodle Banana Bread. I thought i was being sooooo original. Then, just before I got ready to post this, I googled it only to find out that 900000 other people were just as “original” as I was lol. Just goes to show that the old saw about there is no original thought, is rather true. Either way though, I was really pleased with how this turned out and 900000 versions aside, mine was still MY version. This is a nice moist bread and as I made it, has a really nice banana flavor along with a yummy cinnamon sugar one.

You know the drill…. 🙂

Snickerdoodle Banana Bread

  • 3 cups flour
  • 2 teaspoons baking powder
  • 1/2 teaspoon salt
  • 1 tablespoon cinnamon
  • 1 cup unsalted butter, room temp
  • 2 cups sugar
  • 1 cup mashed banana (about 4 medium)
  • 4 eggs
  • 1 tablespoon vanilla extract
  • 1 teaspoon banana flavoring (optional but adds flavor)
  • 1 cup sour cream
  • 1 bag Hersheys Cinnamon Chips
  • 2 tablespoons each of sugar and cinnamon, mixed
  1. Preheat oven to 350 degrees and either spray 2 loaf pans with Bakers Joy or grease them and lightly flour them.
  2. In a medium bowl, combine the flour, baking powder, salt, cinnamon chips and 1 tablespoon cinnamon.
  3. In a large bowl, cream together the butter and sugar. Add in the mashed banana and sour cream and mix well. Add in the vanilla extract and banana flavoring. Add the eggs, one at a time, beating well after each addition.
  4. Dump the flour mixture into the butter/egg mixture. Stir just until thoroughly combined. Don’t overbeat.
  5. Divide the batter evenly between the two prepared pans. Sprinkle the tops of the batters with the combined sugar cinnamon mix.
  6. Bake at 350 until the bread is golden brown and a skewer inserted into the center comes out clean. let cool in the pan for five minutes, then carefully turn out onto a wire rack to finish cooling.

Copyright Notice: From Cupcakes To Caviar images and original content are copyright protected. Please do not publish these materials anywhere without prior permission.


Thumbprint Cookies

Thumbprint Cookies

Back when my oldest (now grown) kids were little, I started a tradition that has stuck to this day and will probably continue until I am too old and feeble in mind and body to get to the stove. Mind you, there are some who would say that I already am feeble in mind, but that’s another story. And those people don’t get cookies from me. 😛

The tradition started because when they were little, I was too broke to buy them Christmas presents. I always had food in the house though so I figured that I may not be able to get them gifts, but they could have cookies. Plus, I always seemed to be trying to recreate a festive Norman Rockwell sort of holiday (even though my family is more like one of those Christmas movies where they are dysfunctional as all heck, yet are funny and have each others backs) and cookies seemed one way to do it.

So even now, I make cookies. Lots…and lots…of cookies. Oh my gosh, do I make cookies. I am the reason there is a shortage of baking supplies in Kentucky every year. And the reason my kids, husband and myself all need larger clothing come New Years Day. I usually make about 15 different kinds of cookies plus fudge, scones, all sorts of baked goods. Then we get fatter.

One of the ones I have been making since the first year I started this is Thumbprint Cookies. Who doesn’t like those, huh? The ones I make aren’t fancy; there are no unusual ingredients in them though I have branched out in the toppings since back in the day. These are simple, easy for a beginning cook, great for the kids to help with and they taste yummy. You can top these with jam, marmalade, different curds, chocolate kisses. You name it. This makes a LOT of cookies but the recipe is easily cut in half.

You know the drill… 🙂

Thumbprint Cookies

  • 1 cup sugar
  • 2 cup unsalted butter, room temp
  • 2 teaspoons vanilla extract
  • 2 eggs
  • 4 1/2 cups flour
  • 2 teaspoons baking powder
  • 1 bag mini chocolate chips (make sure it’s the mini ones; the regular sized ones poke out and get hard when baked plus make it difficult to shape the cookies)
  • toppings of choice
  1. Preheat oven to 350.
  2. In a large bowl, beat the sugar, butter, vanilla and eggs until light and creamy.
  3. Add in the flour and baking powder. Mix well.
  4. Fold in the chips; mix well.
  5. Wrap the dough in plastic wrap and chill for about 30 minutes.
  6. Shape the dough into 1 inch balls and place on a cookie sheet 2 inches apart. Make a bowl shaped indent on the top of each cookie ball. I use the cap from a 2 liter bottle of pop; it works perfectly.
  7. Bake at 350 for about 12 minutes; until the edges of the cookie are light brown and the tops are set. While still in the pan, lightly repress the indentation since baking will have made it puff out.
  8. Remove from the pan and cool on a rack. When they are cool, fill with your choice of toppings. Store with waxed paper between the layers so they don’t stick together.

Copyright Notice: From Cupcakes To Caviar images and original content are copyright protected. Please do not publish these materials anywhere without prior permission.


Red Velvet Peppermint Cheesecake Brownies

Red Velvet Peppermint Cheesecake Brownies

Red Velvet Peppermint Cheesecake Brownies


Out of my six kids, three are already grown and married and I have 7 grandkids. Yes… seven. Four from my oldest son and 3 from my only daughter. My son Cameron and his wife Tiffany haven’t decided if I am getting any from them, the boogerheads. But that’s ok… I mean, here I am, at the age of 29 with 7 grandkids! That should keep me going, right? At my young age? (You’re falling for this, aren’t you? Humor me here.)

My daughter in law Tiffany has a strange addiction to anything Red Velvet. Until I met her years back, I had never even tasted anything red velvet-ish. Not even once. Truthfully, I still prefer my chocolate cakes, cupcakes and brownies to be a deeper chocolate flavor but I can see the allure that red velvet has for others, so I make it. Don’t get me wrong… I also eat it when I make it lol.

Tiffy unfortunately wouldn’t like this version. Why? Because it has mint and as much as she loves red velvet, she has an aversion to mint. We keep her around even in light of these fatal flaws of heres.

These however are a chocolate/mint/red velvet/ cheesecake/  lovers dream. You get all of these things all mixed up in these brownies. They are a peppermint red velvet brownie swirled with a creamy vanilla cheesecake topping.. Ummm, I think I will manage to eat one or two or eight of these even without being a major fan hehehe.  These are a slightly cakey brownie when they first cool, but if you refrigerate them, they get fudgier and firmer, which is more to my liking. They are also easier to cut that way. These brownies don’t take but a few minutes to throiw together and get into the oven, then they have an approximately half hour bake time. So these are perfect for those “oh crap, I need something for that church Christmas dinner” or just as an easy treat for your family or best yet, as a pretty brownie to put out on your Christmas cookie tray.

These originally came from Southern Living. I made very little in the way of changes, just the type of chocolate used and the amount of cream cheese in the topping and I quadrupled the amount of peppermint extract. The original called for 1/4 teaspoon and first time I made these, I couldn’t taste even a hint of peppermint. Not a bit.

You know the drill….

Red Velvet Peppermint Cheesecake Brownies

  • 2 ounces semi sweet chocolate, chopped
  • 2 ounces unsweetened chocolate, chopped
  • 3/4 cup unsalted butter
  • 2 1/3 cups sugar, divided
  • 1 small (1 ounce) bottle red food coloring
  • 1 teaspoon peppermint extract
  • 1 tablespoon vanilla extract
  • 1 1/2 cups flour
  • pinch salt
  • 6 ounces cream cheese, room temp
  • 2 egg whites
  • 2 tablespoons flour
  • crushed peppermint candies to sprinkle on top (optional)
  1. Preheat oven to 350 degrees. Line a 13×9 inch pan with foil, making sure to have enough to overhang the pan somewhat and then grease the foil.
  2. Microwave the chocolate and butter together in a large bowl at about 60% power for 1 minute. Stir, then do again in 30 second intervals until the chocolate is completely melted.
  3. Stir in 2 cups of the sugar, then add the eggs, one at a time, mixing just until well blended after each one. Add the food coloring, the peppermint extract and 2 teaspoons of the vanilla; mix well. Add in the 1 1/2 cups flour and mix just until the flour is blended in.
  4. Spread batter into the prepared pan.
  5. In a small bowl, combine the cream cheese, 1/3 cup sugar, the remaining vanilla, egg whites and 2 tablespoons flour. Beat well.
  6. Spoon the cream cheese mixture over the top of the brownie batter and swirl in with a butter knife.
  7. Bake at 350 for about 30 to 34 minutes or until a skewer inserted in the middle comes out with just a few moist crumbs. Let cool on a rack in the pan for about an hour, then use the foil to lift the brownies out onto a cutting board. Carefully remove the foil and cut the brownies into bars. Store these tightly wrapped in the fridge.

Copyright Notice: From Cupcakes To Caviar images and original content are copyright protected. Please do not publish these materials anywhere without prior permission.


Lemon Poppy Seed Scones With A Honeyed Glaze

Lemon Poppy Seed Scones With A Honeyed Glaze

Lemon Poppy Seed Scones With A Honeyed Glaze


I’ve mentioned more than once that I was born and raised in Chicago. Right on “Da Sout’ Side” in the neighborhoods you didn’t want to be stuck in alone after dark. I didn’t know enough to be frightened then; it was just home.

One Winter, after my parents were divorced, I think when I was about 7 or so, my dad had us for the weekend. He and my older brother Steve used to play this driving game of sorts. Steve would have his eyes closed while dad drove and when dad pulled in, Steve had to say whether or not we were at our destination. or if dad had pulled in somewhere else. One day, a particularly snowy Chicago early evening, they were playing the game as my sister Sandra and I tittered every time Steve got it wrong. So then dad pulled into a random driveway and stopped the car. Steve guessed whether or not we were home (it escapes me now if he got it correct or not) and opened his eyes. They went through the typical “awwww mannnn” stuff and dad tried to start the car. It didn’t start. He tried again. Still didn’t start. There we were, with it getting dark outside, very gray, dreary and cold, in a strangers driveway, in a broken down car lol I wish I could tell you that the strangers invited us in, we all had hot cocoa and became fast friends, or even better that they came out with an Uzi,  they and dad got into a wild west shootout and we made the WGN news that night, but in truth, I don’t remember what happened. I know dad went to their door to ask to use the phone (WAYYYYYYYY before cell phones here. Remember, I’m old.) but I have no idea how we eventually got home or if dad got his car fixed. Lol. I am willing to bet however, that that game never got played again on a snowy cold night. 😛

Today has been dreary as all git out here in Kentucky. No snow unfortunately which would have made it worth it in my eyes, just very gray skies, cold weather and a ton of rain. I keep trying to tell myself that it is good for the trees we recently planted but I’m not convincing myself very well. So I had a baking therapy session. It’s hard to feel blah when surrounded by the scent of fresh lemon zest and then the scent of baking scones.

These scones are quite yummy if I do say so myself. They are also huge lol. I think next time I make these I will use a square cut and make about 12 of them rather than the 8 wedges. I used wedges out of habit but these are some big arse scones! But it’s easy to eat a whole one which is another reason to make them smaller hehe. They are just lemony enough; not tart but with that lovely lemon peel flavor. They aren’t overly sweet but the glaze adds a nice touch of sweetness to them and a bit of that tart lemon flavor many of us like.

These are simple to make and perfect for Christmas morning breakfast. Nothing can make a Winter day brighter than something citrus.

You know the drill. 🙂

Lemon Poppy Seed Scones With A Honeyed Glaze

  • 3 cups flour
  • 1 cup sugar
  • 4 tablespoons poppy seeds
  • 1 tablespoon baking powder
  • 1 teaspoon salt
  • 1 tablespoon lemon zest
  • 1/2 teaspoon Boyajian Lemon Oil (optional but highly recommended. If you can’t get any, add in an extra tablespoon lemon zest)
  • 2 teaspoons vanilla extract
  • 1 teaspoon almond extract
  • 10 tablespoons unsalted butter, chilled and sliced thin
  • 1 egg
  • 2 tablespoons lemon juice
  • 1 cup heavy cream
  • Glaze-
  • 1/2 cup honey
  • 1/2 cup powdered sugar
  • 1 tablespoon cream (more if you want a thinner glaze)
  • 1 tablespoon lemon juice
  1. Preheat oven to 375 degrees and lightly grease a cookie sheet.
  2. In a large bowl, mix together the flour, sugar, Poppy seeds, baking powder, salt and lemon zest. Make sure to mix well because lemon zest has a tendency to clump.
  3. In a medium bowl, combine the egg, cream, lemon juice, lemon oil and extracts. Set aside.
  4. Using a pastry blender, cut the butter into the flour mixture until it resembles coarse crumbs.
  5. Pour the entire bowl of cream mixture into the flour/butter mix. Use a fork to mix well, until the dough forms a bowl. The dough will be slightly sticky. Don’t be tempted to add more flour.
  6. Dump the ball of dough onto a lightly floured counter or board. Pat down into a circle about 3/4 of an inch thick. Cut the circle into 8 wedges and place next to each other, but not touching, on the prepared cookie sheet.
  7. Bake at 375 degrees until the tops of the scones are lightly browned (the edges and bottoms will look browner than the tops) and firm. Transfer to a rack to cool.
  8. For the glaze, simply mix together the glaze ingredients. Use a pastry brush to brush the glaze over the scones or dip each scone, top side down, into the glaze and let the excess drip off.

Copyright Notice: From Cupcakes To Caviar images and original content are copyright protected. Please do not publish these materials anywhere without prior permission.


Christmas Edition Of Ramblings And Reviews 2013

Hello!!! Have you gotten all your Christmas shopping done? If you haven’t, I’m here to let you know one thing. I have been finished with mine for weeks. It’s ok, you can hate me. I understand. I too used to be one of those people who waited until December 24th to get going. Ok, no I wasn’t. I just said that to make you feel good.

But I know there are some of you out there, avid gourmands all, surrounded by the same, who still need to get some treats for each other. So I, Momma J as I am known to my kid in laws (yeah, the title makes me laugh too; feel free to giggle) am here to help you. So prepare to get hungry.

Twice The Vice sporited chocolates

Twice The Vice spirited chocolates

Recently, I was sent some absolutely wonderful chocolates from a company called Twice The Vice. They make alcohol infused (aka “spirited”) chocolates ranging in price from $28.00 to $44.00 dollars and they are well worth every penny. Yep, you read that right. Booze and chocolate… together. Thus the name, obviously. Is there a woman out there who isn’t totally excited right now though? 😛 As I already said, these are wonderful. I had to force myself not to gorge on them. If you are looking for a splurge, this is it. The outer shell of chocolate is thick and breaks neatly when you bite it. It is rich with no artificial flavor at all, just pure chocolate. The box I got was “The Classic Cocktail Collection” and had four flavors-  Pina Colada, Mint Julep, Margarita and White Russian. The White Russian is my favorite. There is a definite Kahlua “bite” to it. The ganache in all the flavors is smooth, rich and creamy. If you have a chocoholic to buy for (or just love good quality chocolates yourself), go to Twice The Vice. You will NOT be disappointed. This ranks up there in the top two chocolate experiences of my life. And yes, good chocolate IS an experience, not just a dessert. Go to his site asap!

Next up is Raley’s Confectionary. I love this company too. Just looking at the candy takes me back to my childhood. How many of you, every Christmas, had a bowl full of various hard candies sitting there in the livng room, ostensibly for guests when they came over, just waiting to be swiped by you when your mother wasn’t looking?

Raley's Confectionary

Raley’s Confectionary

If you are one of those people, you’ll love this candy. Even if you weren’t, you’ll love this candy. Besides being beautiful to look at, it tastes great. I was sent three bags, each about 3 ounces. That sounds small, but this is hard candy, remember. That three ounces is a good amount of candy and it is so intensely flavored, one or two of the small pieces is sufficient. This candy is true art in its way. On the right, you can see that that is “The Christmas Mix”.  The piece at the middle left spot has the word NOEL in it. Now, this is not imprinted on each piece, it goes all the way through the candy. I’ve seen the technique done before and it is an amazing talent. So many of this type of candy can be bland however. NOT Raley’s Confectionary. Wesley makes sure his candy has a LOT of flavor. The Christmas Mix is my favorite of the three bags I was sent. You open it and a light peppermint scent wafts out but that’s not the only flavor in there, just the most strongly scented. There is also an eggnog flavor, which I loved. It tastes exactly like a glass of eggnog, minus the brandy 😛 The above mentioned Noel is Figgy Pudding flavored. He touches all Christmas bases here lol. The Tutti Frutti is a yummy mix of strawberry, blueberry and banana. This man has so many more flavors I want to try that I can’t even count them, such as Grapefruit, Lime, Kiwi (yes, he has a Kiwi flavor!), Blackberry (one of my all time fave flavors in ANYTHING), Peach and Pumpkin Spice among others. The bags are small enough to give a child for a Christmas stocking stuffer, yet flavored so well that that same small bag will make an adult candy hound quite happy. Go… right now… check out Raley’s Confectionary. You need his candy. Honest.

Next up are some delicious Truffle Bars from Seattle Chocolates sent to me by a lovely lady named Casey. She sent me four bars- Birthday Cake Batter, Candy Cane Crunch, Lemon Ice and San Juan Sea Salt. All of them were fantastic.

Seattle Chocolate Truffle Bars

Seattle Chocolate Truffle Bars

Each of the beautifully wrapped bars is 2.5 ounces and sectioned into 4 nice thick sections, each section a perfect treat, so the 2.5 ounce bar can last quite a while. The San Juan Sea Salt is a milk chocolate bar with sea salt and toffee bits. The salt flavor is mild, just a little tantalizing bit in each bite you take, nothing overpowing as some salted chocolate candy can be. The toffee bits add a nice crunch to the bar and a well rounded caramelly flavor. This was probably my favorite. The Lemon Ice is a white chocolate bar and I love both white chocolate and lemon so I was excited to see this one in the package. When you open the bar, you can smell the lemon; YUM!  The white chocolate is good quality. This isn’t a cheap piece of chocolate. It’s creamy, mildly sweet and milky and the bar has crunchy lemon bits throughout adding a nice tang and texture. The Candy Cane Crunch is a seasonal bar. The first thing you smell is peppermint when you open it, but if you put it up to your nose, you get a wonderful deep dark chocolate scent. This bar smells like Christmas 🙂 The dark chocolate is wonderful; not too dark, which I personally don’t like. This is a fairly mild dark chocolate. The peppermint is JUST enough, not overpowering the chocolate, but not wimpy either. The Birthday Cake Batter was my least favorite. Still delicious, but just not as good as the others in my humble opinions. The chocolate outer shell was still a wonderful quality and flavorful milk chocolate but the birthday cake part was rather bland; just a vague sweet flavor and a touch of crunch. Bottom line though? There is still time to get some of these for Christmas. So go… shoo… get over to Seattle Chocolates and buy some Christmas treats. Feel free to buy me the Rainier Cherry Truffle Bar, the Coconut Macaroon Truffle Bar and the Panoramic Pecan Truffle Bar. And throw in a few of the San Juan Sea Salt- they were my favorite 😀

Now we have is something I tried for the first time this year- Dark Chocolate Covered Peppermint Jo Jos. I know many of you have had these already, but for those who haven’t, nows the time. They won’t be at Trader Joes for much longer this year and then you’re out of luck until next year.
Trader Joe Peppermint Jo JosIf you like a certain brand of chocolate sandwich cookies, you’ll love these. They put the other ones to shame. These are covered in a thick layer of dark chocolate; a mild one here too, which I love as I mentioned. I don’t care for bitter dark chocolate and this is nowhere near that. It is smooth, creamy, not too sweet and downright dangerous to your waistline… aka yummy! The chocolate is covered with crushed peppermint candy- just enough t give it that crunch and a delicious peppermint flavor that mingles with the chocolate, not enough to overpower. The cookie itself is a crunchy chocolate peppermint wafer with a creamy peppermint flavor center. These are well worth the four dollar price tag and would make a cute addition to a cookie tray if you want to cheat and say you made them :-P. I won’t tell if you do.

Last but not least for this Christmas Edition of Ramblings And Reviews are something easily found but delicious. They are a new edition this year to the
Lindt truffle line and in my opinion, one of their best yet. These seem to be exclusive to Wal Mart, in the seasonal aisle.

Lindt Dark Chocolate & Orange Truffles

Lindt Dark Chocolate & Orange Truffles

Lindt makes wonderful budget priced truffles and these are no exception. When you open the bag, you immediately get hit with a wonderful chocolate orange scent. I am pretty sure I spent five minutes with my face practically hidden in the bag. The thin outer shell of the truffle is a mild, sweet dark chocolate. The inner ganache is a sheer melt in your mouth delight. Literally; you bite it and it just melts. The chocolate orange flavor is fantastic. Just one of these is more than enough to satisfy because they are so flavor filled, so a bag should last a while. I bought two bags and fully expect to still have some next Christmas lol. Maybe. If I can control myself.

Well, that’s it for the Christmas edition of Ranblings And Reviews.  I’ll close this with the best Christmas photo ever- Joshie being Santa. Was he adorable or what?

Joshie- ChristmasI wish all of you a Merry Christmas. God Bless and know that every single one of you is in my prayers for a blessed coming year. <3

Ultra Creamy Hot Fudge Sauce

Ultra Creamy Hot Fudge Sauce

Ultra Creamy Hot Fudge Sauce

Back when I was a kid, when dinosaurs roamed the Earth and mankind had a population of about 12, I loved hot fudge sundaes. I remember that, when my father would come to stay with us (my mom had surgery once and he stayed with us, which I loved) or we with him, which I did quite often as I grew, being the daddys girl that I was, he would make us these huge bowls of ice cream (my God, I just wrote the worlds longest run on sentence). And when I say huge, I mean huge. The man had no boundaries when it came to sweets, a trait he kept throughout his life. He would put about 43 scoops of ice cream in a large industrial size vat, then he would cover that with either Hersheys syrup or hot fudge, then add whippped cream, sprinkles and about 309 cookies surrounding it. Needless to say, my brother, sister and I ate every bowl and then licked the vat clean. He usually had to call for the firemen to help us back out of the vat, but it was worth it.

As time went on, I turned my back on my beloved hot fudge for other flavors (*sobs and begs hot fudge to forgive me*) like butterscotch. Now, I still love butterscotch and I will admit to it being my flavor of choice when it comes to ice cream toppings, but I still also have a weakness for a good hot fudge sauce. There are some decent ones you can find at the stores but that’s the key word…. decent. You have not tasted hot fudge untiul you have had homemade hot fudge dripping it’s warm, decadent creamy self (man, is it getting hot in here or is it just me? *fans my face*) down a vat bowl of ice cream. There is just no comparison. This sauce is has a glossy sheen when warm and drips wonderfully over ice cream… or pudding… or a pot roast**… or a marshmallow. But cold, it has definite uses too. Like say, a spoon. You, hot fudge and a spoon. Enough said.

This oringally came from Taste Of Home and is barely adapted; just the brandy and the cooking time.

You know the drill…

Ultra Creamy Hot Fudge Sauce

  • 1 cup heavy cream
  • 3/4 cup unsalted butter, room temp
  • 1 1/3 cups packed light brown sugar
  • 1/4 cup sugar
  • 1/8 teaspoon salt
  • 1 cup unsweetened cocoa powder
  • 1/2 cup plus 2 tablespoons light corn syrup
  • 2 ounces unsweetened chocolate, chopped
  • 1 tablespoon vanilla extract
  • 1 tablespoon brandy (doesn’t add an alcohol taste; just adds depth to the flavor but consider it optional)
  1. In a heavy bottomed saucepot, combine the cream and the butter. Stir over low heat until the butter is melted. Add the brown and white sugars and the salt. Stir and cook over low heat until the sugar is completely dissolved.
  2. Whisk in the cocoa powder and the corn syrup. Cook over low heatr, stirring constantly, until the cocoa is dissolved and blended.
  3. Add in the chopped chocolate. Cook and stir for about 3 minutes, until the chocolate is completely melted. Continue to cook over low heat, simmering this for about 5 minutes (more if you want a very thick sauce but keep in mind that this will thicken as it stands plus even more so in the fridge). Remove frm the heat and add in the vanilla and the brandy if you’;re using it. Let cool, then pour into glass jars. Store in the fridge. (disposable plastic containers work too. Just make sure the sauce is cool first)
  4. This is a wonderful Chrismas gift, put into pretty jars and tied with a holiday ribbon and maybe gifted with some ice cream bowls.

Copyright Notice: From Cupcakes To Caviar images and original content are copyright protected. Please do not publish these materials anywhere without prior permission.


Honey Blueberry Corn Muffins

Honey Blueberry Corn Muffins

Honey Blueberry Corn Muffins

Hello! I hope everyone had a wonderful Thanksgiving? We did here… too much food, then we followed that with some more food and after we were done, we had a little something to eat. Thanksgiving…. the holiday to be grateful for what you’ve got and gain 10 pounds in the process.

While I know no one is going to lose weight between now and the new year (do you believe it will be 2014 in less than a month!!?), I figured I would put up something that while delicious, isn’t quite a decadent as most of what I post. Still baked, still indulgent but not 4000 calories per bite :-D  By the way however, if you DO lose weight between now and the new year, please go away because I don’t like you anymore. Just sayin’ 😛

I have said before that I love cornbread, though I’m not a huge fan of sweet cornbread. So this recipe was right up my alley. It is mildly sweet (I’ll give an idea for making it a bit sweeter in the recipe, if you prefer it that way), tangy from the blueberries and wonderful warm spread with some butter. You also can’t get much easier than these. Five minutes and they are ready to be baked, so these are perfect for a weeknight bread side.

The baking oil from Boyajian I mention below? I was very kindly sent some of their products and I have to say, I love them. Their citrus oils are about as pure an essence of the real fruit as you will come by; no dilution with alcohol, just the fresh scent and taste of the fruit. You have GOT to try them. Trust me on this.

On a side note, am I the only weirdo who sees a dog wearing sunglasses in the top muffin? Lol.

You know the drill… 🙂

Honey Blueberry Corn Muffins

  • 1 1/4 cup flour
  • 3/4 cup cornmeal
  • 1 tablespoon baking powder
  • 1/2 teaspoon salt
  • 1/2 teaspoon lemon oil (use a good brand such as Boyajian. You can’t get much better than their oils and they are well worth the price
  • 2/3 cup milk
  • 1/2 cup honey
  • 1/4 cup sugar (optional; use this if you like a sweeter corn muffin)
  • 1/3 cup oil
  • 1 egg, slightly beaten
  • 12 ounce bag frozen blueberries ( this makes these chock full of berries. If you’d prefer less, just cut the amount in half)
  1. Preheat the oven to 375 degrees and either grease 12 muffin cups or line them with paper liners.
  2. In a large bowl, combine the flour, cornmeal, baking powder, sugar if using and salt. Stir to mix.
  3. In a small bowl, combine the milk, oil, honey, lemon oil and egg.
  4. Pour the liquid into ingredients into the dry ones
  5. Use a fork to combine, mixing just until combined. Overbeating muffin batter will result in tough muffins with tunnels throughout.
  6. Pour the batter evenly into the prepared muffin tin.
  7. Bake at 375 until the tops are light golden brown and a toothpick inserted into the middle of one comes out clean, about 15 minutes.
  8. Turn out onto a rack to cool. Best served warm dripping with butter and drizzled with some more honey. 😀

Copyright Notice: From Cupcakes To Caviar images and original content are copyright protected. Please do not publish these materials anywhere without prior permission.


Pumpkin Spice Cake With A Creamy Mascarpone Swirl

Pumpkin Spice Cake With A Creamy Mascarpone Swirl

Pumpkin Spice Cake With A Creamy Mascarpone Swirl


Back when she was little, my daughter Rachel didn’t like pumpkin pie. For a minute or two each year, I would contemplate sending her to an orphanage a la Oliver Twist style, until she got so hungry that even my pie looked good. Honestly, I think I always just wanted someone to hold a bowl out to me and say (in a cockney accent) “May I have some more, sir?” Though no, I have no idea why they would be calling me sir. I have rather prominent boobs. Hard to mistake me for a guy. But I digress.

Now, she goes back and forth. One year she hates pumpkin pie and then another she’ll like it. Go figure. I think we all know a pumpkin pie hating weirdo though. I’m looking at YOU, Kim, you pepsi swigging pumpkin hater.  So what can you do? Especially since it’s so hard to find an orphanage. Make something ELSE pumpkin flavored and refuse to let them have any stuffing, turkey or cranberry sauce until they eat something pumpkin. WHAT!? It seems reasonable enough to me.

Thursday we will be bringing meals over to the volunteer firefighters who have to work and one of the things I’m bringing is one of these cakes. The recipe makes two and who better to share with than the gentlmen who will come save my home from burning if I drink a bit too much Cabernet while I cook? 😛

This came from the Saveur web site. They are pretty much my favorite cooking magazine and this cake is one of the reasons why. This is moist, not overly sweet, thus perfect after a heavy meal, has a touch of crunch from crispy edges and the pepitas on top. I changed it just a bit. The original called for just plain mascarpone and I know my family well enough to know that unsweetened dollops of a creamy cheese wouldn’t work. I’m glad I changed it. The cake really is NOT that sweet so the mascarpone flavored with a touch of sugar and vanilla was a nice counterpoint to the cake itself. I also added more spice (and deleted the cardamom because I didn’t have any nor the cash to buy any) than they called for and I’m again glad I did. It could use maybe even a bit more than what I added.

You know the drill….

Pumpkin Spice Cake With A Creamy Mascarpone Swirl

  •  3 cups flour
  • 1 teaspoon baking soda
  • 2 teaspoons cinnamon
  • 1 teaspoon cloves
  • 1 1/2 teaspoons ground ginger
  • 1 1/2 teaspoons grated nutmeg
  • 1 teaspoon salt
  • 4 eggs
  • 2 teaspoons vanilla extract
  • 2 cups sugar
  • 1 16 ounce can pumpkin puree (NOT pie filling)
  • zest of one orange (I used 1/2 teaspoon of orange oil)
  • 1 1/4 cups canola oil (I used vegetable and it was fine. I don’t like canola oil)
  • 8 ounces mascarpone cheese, room temp
  • 1/4 cup sugar
  • 1 teaspoon vanilla extract
  • 1 1/2 tablespoons heavy cream or half and half
  • 1/4 cup pepitas
  1. Heat oven to 350. Grease and flour two 8 inch cake pans. I used 9 inch pans and this was still fine; made a nice thick cake.
  2. On a small bowl, combine the mascarpone, 1/4 cup of sugar, 1 1/2 teaspoons cream and 1 teaspoon vanilla extract. Mix well and set aside
  3. In a medium bowl, whisk together the flour, salt, baking soda and spices.
  4. In a large bowl, combine the pumpkin, eggs, sugar, oil, orange zest and canola oil. Mix well.
  5. Add the flour mixture to the pumpkin mixture. Beat well until thoroughly combined. Divide the batter between the two pans.
  6. Dollop the mascarpone mix evenly over the two pans. Use a butter knife to swirl it into the batter lightly. Sprinkle the pepitas evenly over the two cakes.
  7. Bake at 350 for about 35 to 40 minutes or untila wooden toothpick inserted into the middle comes out clean. Let cool in pan for about ten minutes, then turn out of pan to finish cooling.

Copyright Notice: From Cupcakes To Caviar images and original content are copyright protected. Please do not publish these materials anywhere without prior permission