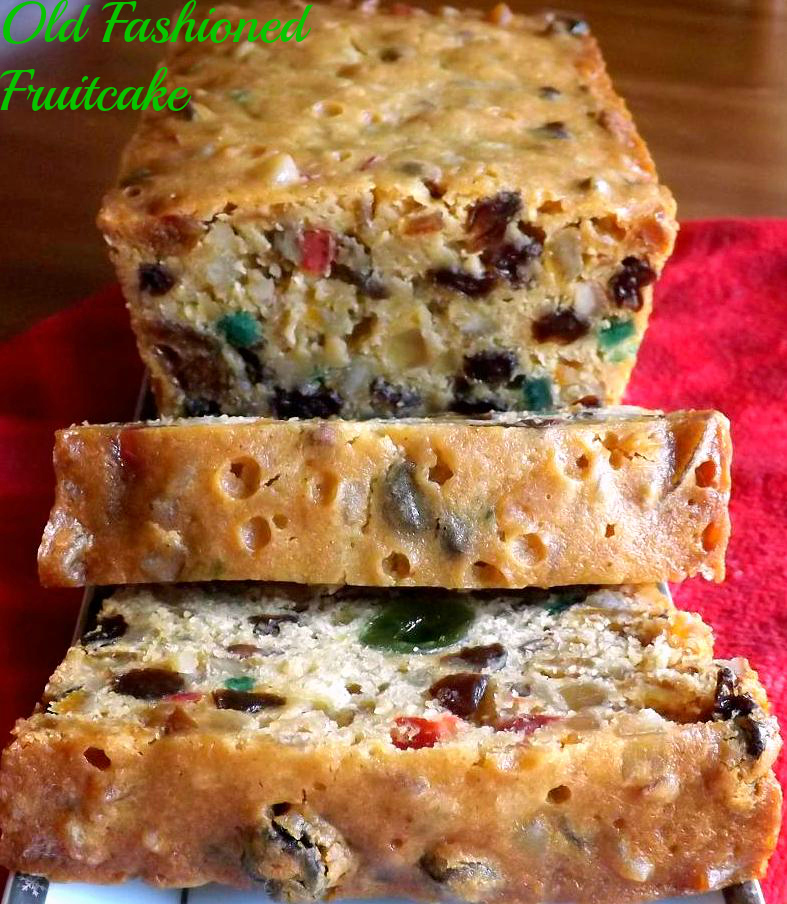
Old Fashioned Fruitcake

A couple of weeks ago, I asked on the blogs facebook page if the readers liked or hated fruitcake. I was fully expecting a lot of “ewwww, I HATE fruitcake!”. But to my surprise, the vast majority of the responses were people saying they either loved it or had at least learned to appreciate it. Yep… fruitcake. Candied peels, unnaturally dyed cherries and pineapple, the whole kit and kaboodle. I was totally tickled since I have always loved fruitcake.
About ten years or so ago, I started making my own. I got the recipe from The New Doubleday Cookbook, one I used to have, but have since lost *sobs* (excellent cookbook btw… if you can find it, get it). Luckily, a few years ago, I was able to find the exact recipe on an about.com site. Yay! This is a typical fruitcake recipe, similar to what one would get at a higher end grocery or through mail order. But even though the fruits are expensive, this is still cheaper than buying one prebaked, plus you know the ingredients going in and the biggest plus, it tastes ten times fresher. ANDDDDDD, you soak this bad boy in a rum or brandy soaked cheesecloth (you can sub apple juice) to up the drunken goodness lol.
This isn’t at all difficult. But you DO need to get this made now for it to be ready for Christmas eating. It is a two day process to make it then it ripens in the soaked cloth for 3 weeks. Could you eat it immediately? I suppose so, but trust me, it tastes far better as it ages. Also, the original recipe calls for making this in a ten inch tube pan. I use two loaf pans; one large, one 8 inch. It works perfectly and that way I have one cake I can soak in rum and one I soak in juice to be kid friendly. Otherwise, I have changed this recipe very little. I add a bit more dried fruit, more vanilla and almond extract, less nuts, no currants and that’s about it. Ok, so maybe I’ve changed it more than I realized lol. Regardless, I’m going to write this as I make it.
You know the drill…. 🙂
Old Fashioned Fruitcake
- Fruit Mixture-
- 1 1/2 lbs fruitcake mix (found this time of year in any grocery store, usually near or in the produce section)
- 8 ounce container candied lemon or orange peels (your preference)
- 8 ounces raisins
- 8 ounces golden raisins (can use a full lb of one or the other if you prefer)
- 8 ounce container candied cherries
- 8 ounces finely chopped pecans or walnuts, toasted
- zest of 2 large lemons (about 2 tablespoons)
- 1/4 cup lemon juice
- 1/2 cup orange marmalade
- 1/4 cup brandy, rum or orange juice
- 2 teaspoons vanilla extract
- 1 teaspoon almond extract
- Cake-
- 2 cups flour
- 1 teaspoon cinnamon
- 3/4 teaspoon nutmeg
- 1/4 teaspoon cloves
- 1/4 teaspoon allspice
- 1 teaspoon baking powder
- 1/2 teaspoon salt
- 1 cup unsalted butter, room temp
- 1 cup sugar
- 6 eggs
- Cheesecloth for wrapping
- Rum, Brandy or Apple Juice for soaking
- Place all the fruit mixture ingredients in a large bowl. Stir well to mix. Cover the bowl and let it sit overnight at room temp.
- The next day, preheat oven to 250 degrees and grease and flour the bottom of either a 10 inch tube pan or two loaf pans. Put a large shallow baking pan filled with boiling water on the bottom rack of your oven.
- In a medium bowl, combine the flour, cinnamon, nutmeg, cloves, allspice, baking powder and salt. Stir to combine.
- In a large bowl, cream together the butter and sugar. Add the eggs, one at a time, beating well after each addition.
- Pour the dry ingredients into the bowl of wet ones. Beat just enough to thoroughly blend. Now, carefull spoon the fruit mixture into the bowl of batter. Stir well to combine and make sure all the fruit is covered well in batter.
- Pours into the prepared pan or pans. Bake at 250 degrees for approximately 4 1/2 hours, until the cake has shrunk slightly from the sides of the pan and/or until a skewer inserted in the middle comes out with only a few moist crumbs on it. MOIST, not liquidy.
- Cool in the pan on a rack for one hour. Loosen the edges with a butter knife then carefully turn out onto the rack to finish cooling. When completely cooled, wrap the cake(s) in a rum, brandy or juice soaked cheesecloth, then wrap tightly in foil. Let ripen for at least 3 weeks. This can be aged even longer. Just make sure to redampen the cheesecloth every three weeks. Just remember, the more you soak this, the more alcohol is getting into it, so don’t eat and drive! 😛
Copyright Notice: From Cupcakes To Caviar images and original content are copyright protected. Please do not publish these materials anywhere without prior permission