Midnight Milky Way Brownies

Midnight Milky Way Brownies (Done up MY way! :-D )

Midnight Milky Way Brownies (Done up MY way! πŸ˜€ )


Is there anything like the smell of something chocolatey baking? Well, maybe baking bread could rival it, but it’s a close call.

Today, here in my part of Kentucky, it’s grey, stormy and just downright perfect for baking. I knew what I’d be making; I gave a small tease about it on the Facebook Page the other day. But I had no idea how yummy it would smell!

When I was a kid, I never cared for the original Milky Way candy bar. Even then, it was just too sweet. I would still eat it of course if it crossed my path. Kid-dom has rules you MUST abide by. It’s the law. But it wasn’t a favorite. When they came out with the Midnight Dark Milky Way though, I had to try it because…well…new…and food….and sweet…and that’s the way I roll. I’ve loved it ever since. Using the more or less dark chocolate on the outside and changing the nougat part made it far less sweet. I love it frozen. πŸ˜€ Frozen caramel for the win!

So when I saw a brownie recipe in the cookbook “The Good Cookie” (excellent cookie cookbook btw… you need to buy it!) using FIVE of them in it, I knew I had t try it. But I did it all for you. Everything I do, I do it for you *cue Bryan Adams* Never in me is there any wish to indulge in gooey, dark chocolate brownies just oozing with chunks of melty Dark Milky Way candy. Not I.

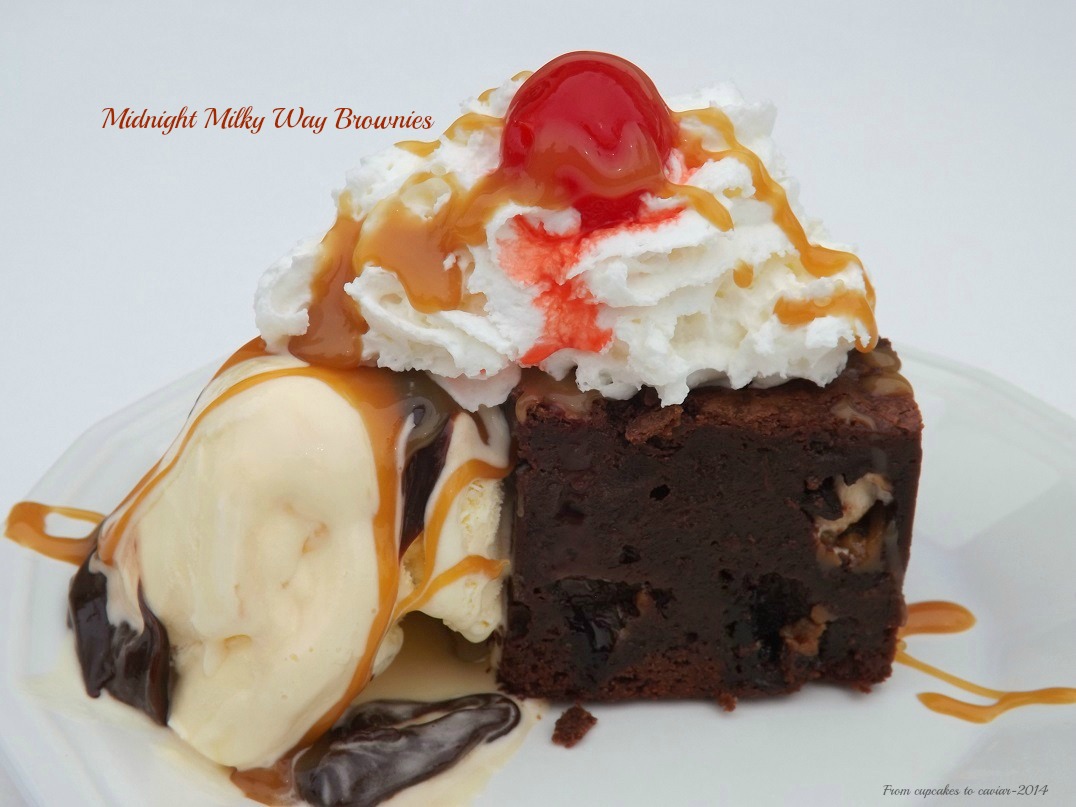
These are ultra rich. Even the batter was rich. I mean, just look at the ingredients! So cut these small. The recipe says to cut into 16 squares and that’s about right and honestly, one of those squares will still go a long way towards curing a chocolate craving…for days. πŸ˜€ But you’ll still find yourself going back and grabbing a bite even though you just ate seven one of them. My advice? Let them cool, except for that one you can’t resist eating while it’s still gooey. Then wrap them each individually, store them in the freezer and take them out as you need some chocolate comfort. Just make sure to label them “raw liver” to keep the kiddos out. πŸ˜›

Not much changed in this. I changed the directions a bit to make it more user friendly and added both 1/2 an ounce more unsweetened chocolate and an extra teaspoon of vanilla.

You know the drill…. πŸ™‚

Midnight Milky Way Brownies

  • 1 1/4 cups flour
  • 1/3 cup unsweetened cocoa powder
  • 1/4 teaspoon baking powder
  • 1/4 teaspoon salt
  • 5 1.76 ounce Milky Way Midnight candy bars, chilled then coarsely chopped
  • 1 cup unsalted butter, sliced thin
  • 5 ounces unsweetened chocolate, chopped (I actually used 5.5 ounces, because it’s what I had & I wasn’t wrapping back up .5 an ounce of chocolate. It worked fine)
  • 5 eggs
  • 2 cups sugar
  • 1 tablespoon vanilla extract
  1. Preheat oven to 325 degrees. Line a 9 inch square baking pan with foil, then lightly grease the foil. Set aside.
  2. Combine the flour, cocoa, baking powder and salt in a small bowl. Whisk to combine. Toss the candy chunks with 1 tablespoon of the mixture and set aside. This help them not sink to the bottom.
  3. In a microwave safe bowl, combine the chocolate and butter. Microwave for one minute at a time, at 50% power, stirring after each minute to help it melt. Mine took 2.5 minutes to melt and become smooth.
  4. In a large bowl, whisk the eggs for about a minute to blend them, then add in the sugar, whisking just until incorporated. Add in the chocolate mixture, whisking just until combined. Then add the flour, again whisking just until combined. It’s ok if there are still a few small dry spots.
  5. Fold in the candy chunks. Then pour the batter into the prepared pan and smooth the top. Try to make sure the candy is all inside. I had a few chunks peeking out and they left pits as they melted.
  6. Bake at 325 until the brownies are puffed and set and a skewer inserted in the middle comes out with just a few moist crumbs on it. Do NOT overcook these. You have to remember that they will continue cooking some as they cool and that there is little worse than a dry overcooked brownie. Err on the side of undercooked and gooey. No one will mind hehe.
  7. Let cool in the pan, then refrigerate until they are firm enough to cut easily, then use the foil to lift the cooled brownies out onto a cutting board, Peel the foil down and use a serrated knife to cut them into 16 squares.

Copyright Notice: From Cupcakes To Caviar images and original content are copyright protected. Please do not publish these materials anywhere without prior permission


Raspberry Amaretto Poundcake

Raspberry Amaretto Poundcake

Raspberry Amaretto Pound Cake


Not a fancy looking cake, is it? Trust me; you won’t care. I’ve never been a huge fan of layer cakes, even with the sweet tooth I have. I make them for birthdays and whenever I get a strange craving for one, which isn’t often. Then I eat one slice and no more, reminded of the fact that I don’t care for them. Too messy, too darn sweet. But give me a pound cake and I can chow down on that bad boy… or girl. I’ve never been proficient at identifying the gender of my pound cakes.

Totally off the subject of pound cakes and gender, I had a…fun…experience the other night. My husband and I were checking the pool the other night (we haven’t yet opened it for the year) because my son Jordan had said that it was full of tadpoles. Went up there with a flashlight and yep, our pool has become a froggie resort. I am pretty sure I heard some lively Caribbean style music and saw one frog with a Mai Tai. Well, we looked, we got sad thinking of all the tadpoles who were going to have to die for the sake of cleaning the pool and then we left. Russ went first down the stairs. No problem. Then me. I got two stairs down the five stair deck, hit the third and “CRAAACCCKKK!!”. Suddenly, I was half airborne. I say half because as I was flying, I was also falling as that crack was the sound of the old poorly made staircase breaking. The stair went down, I followed, my bottom half slamming into the side of the stairs, my top half slamming into the next stair down as I tried to prevent myself from hitting head first into the next stair. Talk….about…pain. My R.N. husband was convinced for a bit that I had broken my leg. But it’s not. I do however have one whopper of a huge bruise on my right thigh and I walk like someone who has been hit by a bus… or a staircase. I feel about 95 years old right now lol.

So what’s my cure? Back to cake πŸ˜€ I had seen an Amaretto Pound Cake on Southern Living and wanted to try it. But I also love using fresh fruit any chance I get this time of year. I have a MAJOR love of Blueberries and Raspberries. Blueberries aren’t quite there yet in the stores; still expensive and still being imported from Chile. Raspberries are looking pretty good, though still not quite up to par in the way of sweetness. Baking takes care of that though (and pigging out on pound cake makes me forget that I am in pain). Baking fruit concentrates the sweetness plus you have the added sweetness of whatever is with it, in this case a moist, love almond scented and flavored pound cake. The raspberries do tend to break down in the batter, leaving holes, but again, you won’t care. This isn’t a fancy party cake, not something to serve to the Queen. This is a homey, comforting sort of cake to have with coffee, tea, as a midnight snack, after school treat, you name it. This is a nice densely crumbed cake, very moist and the almond flavor is wonderful.  Then you run into a nice tart raspberry with that almond flavor and oh my gosh, it’s yummy.

My changes from the original are the almond extract, the Fiori Di Sicilia (which I list as optional), the raspberries and the original called for scattering almond slices on the bottom of the pan before baking, but I didn’t want those, so I skipped it. I also changed the amounts for the glaze as when I made it, it made far too much and a good portion ended up dumped.

You know the drill…. πŸ™‚

Raspberry Amaretto Poundcake

  • 1 1/4 cups unsalted butter, room temp
  • 3 ounces cream cheese, softened
  • 2 1/2 cups sugar
  • 3 tablespoons Amaretto
  • 1 tablespoon vanilla extract
  • 1 1/2 teaspoons almond extract
  • 1/2 teaspoon Fiori Di Sicilia flavoring (optional)
  • 2 1/2 cups flour
  • 6 eggs
  • 2 cups fresh raspberries
  • Amaretto Glaze-
  • 1/2 cup sugar
  • 3 tablespoons butter
  • 3 tablespoons Amaretto liqueur
  • 1 tablespoon water
  1. Preheat oven to 325. Grease and flour a 12 cup Bundt pan and set aside.
  2. In a large bowl, combine the butter and cream cheese. Beat at medium speed until creamy, scraping down the bowl once if needed.
  3. Gradually add the sugar, beating at medium speed until light and fluffy. Add the Amaretto and the extracts, beating well afterward. Gradually add the flour to the mixture, keeping the speed at low speed so you don’t end up looking like Casper The Ghost. Beat just until blended.
  4. Add the eggs, one at a time, beating just until blended after each one. GENTLY fold in the raspberries. You can’t avoid crushing some, but you can minimize the damage. Gently spoon batter into the prepared pan. When you have it in the pan, firmly bang the pan on a countertop to help remove any air bubbles.
  5. Bake at 325 for 65 to 95 minutes or until a skewer inserted in the middle comes out clean.
  6. When the cake is almost done, make the glaze- in a small pot, combine the glaze ingredients. Bring to a boil over medium heat and set aside until the cake is finished.
  7. Set the cake on a rack. Spoon the glaze over the top, a little at a time, letting it soak in each time. Use about half the glaze. Let the cake cool completely on the rack, then turn out onto a serving dish. Reheat the glaze and spoon the rest of it over the cake, again letting it soak in each time before adding more.

Copyright Notice: From Cupcakes To Caviar images and original content are copyright protected. Please do not publish these materials anywhere without prior permission.

Orange Chicken

Orange Chicken

Orange Chicken


My family and  are still on a quest for a good Chinese restaurant. It has to have a buffet, because, for one, we’re feeding two teenage boys, who are simply walking hormonal stomachs. And two, I tend to be a picky and poor eater and I do better if I have variety. So far though, all the ones we’ve tried range from “omg, this sucks”, to the point where I actually left a bad review for it on Yelp and I’m not the type to do that normally, up to “ehhh, it was ok, but I wouldn’t pay for it again.” We aren’t asking much…. just food that is fresh and not sticking to the warming dishes because it’s older than my husband, food that hasn’t been salted to the point where you could use it as a salt lick to lure animals in when hunting and a decent variety of dishes.

One of my husbands favorite things from a buffet is the Orange Chicken. I’m a General Tsos kind of a gal myself, but I do enjoy a good Orange Chicken. Good being the operative word. And that’s hard to find. So I gave up for now and decided to make it myself. I have to admit, I’m rather glad I did. No, we didn’t have the variety of 17 different kinds of (Americanized) Chinese foods to choose from, but the one dish was fresh, had an amazing orange flavor that was real, not like a cook poured a bottle of orange extract in it to flavor it and I could eat lying in bed watching bad TV. Hey, don’t judge… I wasn’t feeling well yesterday. That I even MADE dinner is to my credit :-p

This is fairly easy to make. As I’ve told you many times before and will many times more, do your prep work ahead of time. have all the ingredients cut and measured, oranges zested and juice squeezed, etc, etc, etc. Doing this saves so much time and hassle. You don’t get to a certain step and suddenly realize “Oh, crap, forgot to do this or that!” and have to put everything on hold. Do. Your. Prep. Work. And you’ll breeze through this.

You know the drill… git to cooking. πŸ™‚

Orange Chicken

  • For chicken-
  • 2 pounds boneless, skinless chicken breasts, chopped into bite sized cubes
  • 1 egg
  • 1 teaspoon salt
  • 1/2 teaspoon ground black pepper
  • 1 tablespoon vegetable oil
  • 1/2 cup cornstarch
  • 1/4 cup flour
  • oil for frying
  • For the sauce-
  • 2 tablespoons minced ginger *
  • 2 cloves garlic, minced
  • 1 1/2 teaspoons red pepper flakes (use less if you prefer less spicy)
  • 1/3 cup thinly sliced green onions
  • 1 tablespoon rice vinegar, divided
  • 1 teaspoon sesame oil
  • 1 teaspoon vegetable oil
  • 1/4 cup warm water combined with a tablespoon cornstarch
  • 1/3 cup soy sauce (low sodium is a good idea if you have it)
  • 1/3 cup sugar
  • zest of 2 large oranges
  • juice of 3 oranges
  • sesame seeds and extra sliced green onion for garnishing
  • rice and broccoli to serve with the chicken
  1. Preheat your oven to 200 degrees.
  2. Combine the cubed chicken with the egg, salt and pepper. Stir well to combine. Dump in the cornstarch and flour and stir to combine. A wooden spoon works well here. Pour enough oil in a medium pot to go up two inches. Heat the oil to 350 degrees, then fry the chicken in batches of about 8 to 10 pieces at a time, until golden brown and cooked through, about 8  minutes. Set onto a paper towel lined oven safe plate or bowl. When all the chicken is cooked, set into the oven to keep warm while you make the sauce.
  3. In a medium saucepot, combine the sesame oil, tablespoon of vegetable oil, garlic, green onions, rice vinegar and ginger. Stir fry over medium high heat until the onion is wilted and everything is fragrant, about 3 minutes.
  4. As that cooks, combine the soy sauce, sugar, orange zest and orange juice in a measuring cup. Add them to the stir fried green onion mixture. Bring to a boil, then pour the water/cornstarch mixture into it. Stir until the mixture comes back to a boil and thickens up, stirring constantly.
  5. Toss the chicken in the sauce mixture (Or serve the side on the side if you have some people who only like a little bit of sauce and others who like more.), and serve with Basmati or Jasmine rice and steamed broccoli.

*NOTE- For an easy way to peel and grate ginger, just get out a spoon and a fork. Use the edge of the spoon to scrape the peel off; so much easier and much less waste. And then lay the peeled part of the ginger down on a small plate, holding the other end with your free hand. Use a fork to scrape across the ginger. It grates it quite nicely and you can use the edge of the fork to mash/slice up any bits that come off too large.

Copyright Notice: From Cupcakes To Caviar images and original content are copyright protected. Please do not publish these materials anywhere without prior permission.


Savory Filled Breads- (Pepperoni Cheese & Sun Dried Tomato/Basil)

Pepperoni Cheese Bread and Tomato/Basil Bread

Pepperoni Cheese Bread and Tomato/Basil Bread


I think we’ve come to the conclusion by now that one of my baking loves is yeast bread, be they Sweet or Savory or Let’s do sweet again. I just love homemade yeasty, soft, fluffy breads or baked goods. Store bought ones rarely are as good, though I admit to trying them to find out when I need a ‘fix”. Wal-Mart carries a pepperoni cheese bread that is sufficient when I am craving that type, but I always just KNEW I could do better. Theirs isn’t suitable for sandwiches because it’s fairly flat and it always had this slightly off sourish taste, like it was a confused sourdough bread with an attitude problem. I had made filled breads in the past but usually more in a calzone sort of a way, as a meal not as a sandwich bread with a filling. SO I had to try. Of course. And I am pretty pleased with it.  I needed to roll it a bit tighter, but otherwise, it’s really yummy. Somehow, I doubt it’s going to make it to sandwiches though. Between two teen boys, my husband and our five year old, both loaves are almost gone. But that’s ok; it gives me an excuse to make more.

This is easy as can be if you’ve made yeast bread even a couple of times before. If not, this is still a recipe that’s easy enough for a beginner. I just took my basic honey white bread recipe and changed it enough to make it more savory. The main tip? Make sure you roll TIGHTLY or you will end up with loaves that have a hole going through them as you see in mine. Still tasty as all git out, but not as pretty or as useful for sandwiches. Also, if these filling ideas don’t work for you, play around. Just don’t use anything too wet and don’t fill with too much or it will burst as it bakes. And if you don’t have a stand mixer, you can always do the mixing and kneading by hand. It can be fun to do it the old fashioned way. πŸ™‚ And have your ingredients ready to go. I have been known to have an overflowing cup of blooming yeast because I am waiting on the milk I forgot to heat up to finish cooling.

You know the drill… πŸ™‚

Savory Filled Breads- (Pepperoni Cheese & Sun Dried Tomato/Basil)

  • 1/2 cup warm water (about 110 degrees or so; up to 115 is fine)
  • 2 packages dry yeast
  • 1 teaspoon sugar
  • 1 1/2 cups milk (NOT skim), heated and then cooled down to between 110 and 115 degrees
  • 6 tablespoons unsalted butter, melted and cooled
  • 1 tablespoon honey
  • 2 egg yolks
  • 5 to 6 cups all purpose or bread flour (amount needed will vary- I used 5 cups for this recipe in a hot, humid house)
  • 2 tablespoons dried Italian Seasoning, crushed in your hand to release the flavors
  • 1 tablespoon garlic powder
  • 1 1/2 tablespoons salt
  • For the pepperoni cheese-
  • 4 ounces sliced pepperoni
  • 4 ounces shredded Mozzarella or Fontina cheese
  • 2 ounces shredded Parmesan cheese
  • For the Sun Dried Tomato/Basil-
  • 1 cup of julienned fresh basil
  • 4 ounces of dry sun dried tomatoes (if you use the kind packed in oil, dry them thoroughly)
  • 4 ounces Fontina cheese
  • 3 ounces shredded Parmesan
  • To top both breads-
  • Shredded Parmesan and/or Fontina
  1. Grease 2 9×5 inch loaf pans. Preheat oven to 350 degrees.
  2. Add the yeast and sugar to the 1/2 cup of warm water. Stir and allow it to sit for about five minutes to activate the yeast.
  3. To the bowl of your stand mixer, with the paddle attachment on, add the milk, honey, butter and yeast. Mix on low speed just until blended.Change over to the dough hook. Add 2 cups of the flour, the Italian seasoning, garlic powder, salt and egg yolks. Mix on low speed for five minutes.
  4. Keeping the mixer on low, add two more cups of flour. Turn the mixer off and scrape the sides of the bowl down. Raise the mixer speed to 3 and let the hook work it until the dough comes away form the side of the bowl. Feel the dough and if it’s still sticky, add more flour, 1/2 cup at a time. You do NOT want a stiff, hard dough.
  5. Knead on the speed of 2 for 6 to 8 minutes, until you have a nice glossy, just slightly tacky dough.
  6. Dump the dough into an oiled bowl, turn it to make sure both sides of the dough have oil on them, then cover with a towel or loose plastic wrap and let rise until doubled, about 45 minutes to an hour.
  7. When doubled, punch the dough down and divide into two equal pieces. Take one out and leave the other covered until you are done with the first. Dump the one onto a very lightly floured board and knead just to get it into a ball.
  8. Roll the dough out into a rectangle, approximately 8×12 inches. Sprinkle your fillings (for whichever you’re doing first) evenly over the top of the dough. For the pepperoni, lay it out on the dough, don’t just toss it on there πŸ˜› .
  9. From the short end of the dough, roll it up, slowly and tightly. Pinch the seams shut with your fingers, using a LITTLE bit of water to help seal them if you need to. Fold the ends of the bread under lightly, seal them also and place in one of the prepared pans.
  10. Now do the same with the other half, also sprinkling on the fillings and rolling tightly.
  11. Let the dough rise until about an inch over the top of the pan, which should take about 45 minutes. Brush each loaf with olive oil or butter and sprinkle with shredded cheese.
  12. Bake at 350 until the loaves are golden brown and firm on top, about 35 to 40 minutes.
  13. Turn the bread out onto a rack and let cool completely, or as long as you can handle it until you just have to cut one of them πŸ˜›

Copyright Notice: From Cupcakes To Caviar images and original content are copyright protected. Please do not publish these materials anywhere without prior permission.


Chocolate Malted Milk Mousse

Chocolate Malted Milk Mousse

Chocolate Malted Milk Mousse


When I was 13, I worked at a small ice cream shack (shack is a fairly fitting word, too) called “Frosty Hut”, also called Frosty Slut, but we won’t go there. I worked there for a dollar an hour. I had had to get a work permit to even work at that age and I guess the owner, Mr. A, figured a buck an hour was sufficient even though minimum wage was $3.35. One of the perks of the job was, of course, the free ice cream. Since this was privately owned and we were paid slave wages, there was no “you have a 30 minute lunch break and can eat one small thing from the menu” rule. Nope, my sister and I (she also worked there…we were the full line up of employees that Summer) ate like pigs lol. One of my favorite things to do was work my shift, then make 2 of what were called Boston Shakes, one for me and one for my brother Steve. These were HUGE shakes that also had a about 73 pints of soft serve on top of them. I have absolutely NO idea how I didn’t weigh 500 pounds by the end of that Summer. Mine was the same each time; a chocolate malt with extra malt syrup. The flavor is still a favorite. I don’t drink shakes often but when I go to say, Sonic and get one, it’s still chocolate malt with extra malt. I’m a creature of habit πŸ™‚

Since I also love Whoppers Candy; they are malt flavored after all, I was tickled to find this recipe in the same Better Home And Garden Cookbook/magazine (it’s one of those they keep on the shelves for a few months, then retire) that my last post came from. I am slowly working my way through all the recipes in there that I have tabbed. It was a good find; a cookbook that you actually want to make multiple recipes from. I have about a dozen pages tabbed and plan to get to them all.

This is a perfect Spring dessert; it’s rich yet light and not overwhelming. Mind you, it would also be great for a Christmas dessert or heck, any time of year lol. I don’t want to limit it. But Easter is tomorrow and if you still need just one more dessert, this would work wonderfully. It can be ready to go in less than 90 minutes and that includes chilling time. The mousse itself is sweet and creamy with a nice malted milk flavor. The topping is only very lightly sweetened and a wonderful foil to the sweeter mousse. And the crushed malted milk balls in the mousse and the topping add a nice light crunch.

You know the drill…. πŸ™‚

Chocolate Malted Milk Mousse

  • 2/3 cup malted milk balls (plus extra for garnishing)
  • 3 cups heavy cream
  • 4 ounces milk chocolate, coarsely chopped
  • 3 ounces bittersweet or semisweet chocolate, coarsely chopped
  • 1/3 cup chocolate malted milk powder (I actually used the plain kind, not the chocolate kind)
  • 2 tablespoons amaretto, chocolate liqueur or cream (I used Kahlua cause I’m just a rebel :-p )
  • 1 1/2 teaspoons vanilla, divided
  • 1 tablespoon unsweetened cocoa powder
  • 1 tablespoon sugar (this is for the topping. Don’t be tempted to add more sugar. The small amount of sweetening is excellent against the sweet mousse)
  1. Put the malted milk balls in a large bag and crush them using a rolling pin…or a hammer…or a neighbors head, whatever works for you; no judgment here. Set aside.
  2. In a small saucepot, combine the chopped chocolates and 1/4 cup of the cream. Over low heat, stirring constantly, heat until all the chocolate is melted and the mixture is smooth. Add 1 teaspoon of the vanilla, the malted milk powder and the liqueur (or cream) Cool to room temp. Stirring speeds this up.
  3. Meanwhile, in a large bowl, whip 1 3/4 cup of the cream until stiff peaks form. Stir 1/2 cup of the cream into the cooled chocolate mixture. gently fold the rest of the cream into the chocolate. Then gently fold in the crushed malted milk balls. Spoon the mousse into either small dessert glasses or a 1.5 to 2 quart glass serving bowl. Cover and chill for one hour at least and up to 24 hours.
  4. When ready to serve, whip the remaining one cup cream with 1/2 teaspoon of vanilla, 1 tablespoon of sugar and the 1 tablespoon of cocoa powder until stiff peaks form. Spoon the topping onto the mousse and garnish with more malted milk balls.

Copyright Notice: From Cupcakes To Caviar images and original content are copyright protected. Please do not publish these materials anywhere without prior permission.


Lemon Layer Cake With Lemon Cream Cheese Frosting

Lemon Layer Cake With Lemon Cream Cheese Frosting

Lemon Layer Cake With Lemon Cream Cheese Frosting


I could have SWORN Spring was here. The calendar says so, the Farmers Almanac says so, the fact that I had (key word…had) pretty Hyacinths blooming said so. But obviously God and Mother Nature are a wee bit confused. That or they were bored and figured playing a practical joke on all of us would be a good way to pass the time. I guess eating chocolate and watching reruns of House aren’t popular up there when you’re bored. Here in Kentucky, we had to cover all our budding fruit trees and plants in the hopes that the low temps of mid twenties we are supposed to get tonight won’t kill them. My Hyacinths were a lost cause though. The cold of last night already got them *sobs*

I was all prepared for warm weather baking however. Yes, I know that many of you think baking is insane in warmer weather but 1) I’m kind of warped that way and 2) it’s kind of my job… I can’t go on hiatus from April till October πŸ˜› So I still bake… I just change the theme. Pumpkin goes away (well, off the blog anyway. I love it so I still use it here at home), cranberries stay in the freezer and citrus, fresh herbs, and lighter foods (relatively speaking… I’m still me, after all) get made. So I had my mind set on lemon and I’ll be darned if I change it because God didn’t want to watch House or maybe play Rummy with Gabriel.

This is one yummy cake. The recipe in it’s original form comes from a Better Homes And Garden magazine I have. I didn’t change much, just added vanilla, almond and lemon extracts to both the cake and two of those to the frosting, used my own lemon curd recipe (theirs called for a cornstarch custard and to me, that’s just not the same) and didn’t do the caramelized lemons they called for. I just used sugared lemons. Easier, still deliciously edible if one swings that way and did I mention easier?

You know the drill…. πŸ™‚

Lemon Layer Cake With Lemon Cream Cheese Frosting

  • Cake-
  • 1 batch of Lemon Curd or one cup of store bought lemon curd (but I’ll cry if you use store bought. There is NO comparison.)
  • 1 cup unsalted butter, room temp
  • 4 eggs
  • 2 1/3 cups flour
  • 1/2 tablespoon baking powder
  • 1/2 baking soda
  • 1/4 teaspoon salt
  • 2 cups sugar
  • 1 tablespoon lemon zest
  • 2 teaspoons vanilla extract
  • 1/2 teaspoon almond extract
  • 1/2 teaspoon Boyajian Lemon Oil (or an equivalent amount of lemon extract)
  • 1 cup buttermilk
  • Frosting-
  • 8 ounces softened cream cheese
  • 1/2 cup unsalted butter, room temp
  • 4 to 5 cups powdered sugar
  • 1/2 tablespoon lemon juice
  • 1 teaspoon vanilla extract
  • 1/4 teaspoon Boyajian Lemon Oil
  • 1 teaspoon lemon zest
  • Garnish (optional)-
  • 2 thinly sliced lemons
  • 1 cup sugar (you won’t use it all, but it clumps from the moisture of the lemons so you need extra. The leftovers go great in tea.)
  1. Preheat oven to 350 degrees. Grease and flour 3 9 inch cake pans. Set aside.
  2. In a medium bowl, whisk together the flour, baking powder, baking soda and salt. Set aside.
  3. In a large bowl, beat the butter until creamy. Add in the sugar, extracts, lemon zest and lemon juice. Beat until well combined. Add in the eggs, one at a time, beating well after each one, scraping the bowl as needed.
  4. Alternate adding in the flour and the buttermilk, starting and ending with the flour (flour, buttermilk, flour, buttermilk, flour), beating just until combined after each addition. Divide the batter between the 3 prepared pans.
  5. Bake at 350 for 25 to 28 minutes. The tops should be golden brown and spring back when touched. Cool in the pans for ten minutes, then carefully loosen with a butter knife and invert onto a rack to cool completely.
  6. While cake cools, make frosting- Combine the cream cheese and butter in a large bowl. Beat well until smooth and creamy, scraping the bowl as needed. Add the extracts and beat until combined. Add in the powdered sugar, a cup at a time (unless you fancy looking like you just drove through a sand storm), beating well after each addition. Add just enough to get a good spreading consistency. When done, stir in the lemon zest.
  7. To assemble, lay one cake layer on your serving plate. Spread it with 1/2 cup of the lemon curd. Top with another layer; again spread with 1/2 cup of curd. Carefully place the top layer on, pressing down LIGHTLY to hold them together. Frost the top and sides of the cake with the frosting.
  8. For the garnish, JUST before serving (the sugar starts to melt and drip after while, so don’t do it until ready to serve), toss the lemon slices with the sugar until lightly coated. Do a few at a time or the sugar clumps and you get too thick of a coating on the lemon slices. Arrange them on the top of the cake. Serve.

Copyright Notice: From Cupcakes To Caviar images and original content are copyright protected. Please do not publish these materials anywhere without prior permission.


Fudgy Brownies With Mini Peanut Butter Cups

Fudgy Brownies With Mini Peanut Butter Cups

Fudgy Brownies With Mini Peanut Butter Cups


We all know I am NOT a fan of peanut butter. Well, to qualify again, not “normal” peanut butter. I do have a soft spot for Peanut Butter & Company’s Cinnamon Raisin Peanut Butter and Jifs new Salted Caramel Hazelnut is pretty amazing as peanut butter type spreads go. You’ll notice I did NOT say it was “to die for”. I believe I’ve mentioned before that that is one of those phrases that makes me want to gouge my eardrums out with a spoon. That one along with “EVOO” and “Sammy”. Damn you for your evil influence, Rachael Ray, damn you. But back on tangent, as much as it possible for me, no “to die for”…. I will only die for medium rare ribeyes and roasted brussel sprouts. I have my standards.

But every once in a while, cause I love you all so much (“I just cain’t quit you” πŸ˜› ), I have to make something peanut buttery for all of you. I realize how peculiar I am with my dislike of PB.  I realize how peculiar I am for many reasons and that that is but one of many, but lets not go there.

I was actually pleasantly surprised with these. Yes, they have a strong peanut buttery taste so those of you into that will love that aspect, but they are also fudgy/chewy enough and of course, chocolatey enough, that even I enjoyed them. They have a perfect, shiny crackly top crust, which I personally love. I found myself, after cutting off the edges, picking up stray bites here and there. Sooo chewy and yummy. πŸ˜€ Oh yeah, just for good measure, I threw in a bag of Heath Chips, so that added yet another level of crunchy, salty/sweet goodness. You can thank me later. πŸ˜€

You know the drill… πŸ™‚

Fudgy Brownies With Mini Peanut Butter Cups

  • 1 cup (2 sticks) unsalted butter
  • 12 ounces semisweet chocolate
  • 1/2 cup flour
  • 1 1/2 teaspoons baking powder
  • 1/2 teaspoon salt
  • 3 eggs, lightly beaten (use a large bowl)
  • 1 tablespoon vanilla extract
  • 1 1/4 cups sugar
  • 8 ounces mini peanut butter cups (I used Trader Joes Brand)
  • 1 bag (12 ounces) Heath Bar chips
  1. Preheat oven to 350 degrees. Grease an 11×7 glass pan (I used a standard Pyrex) or a 13×9 inch pan. If you use the 13×9, be more aware of your cooking time as these will cook quicker.
  2. Melt your butter in a medium pot over medium high heat. Add the chocolate, stir once, then remove the pot form the heat. Let it sit for five minutes then stir for about 2 minutes to finish melting the chips.
  3. Combine the flour, baking powder and salt in a small bowl and whisk to blend.
  4. Slowly pour the chocolate mixture over the beaten eggs, whisking the whole time. Add the sugar and vanilla extract and beat well.
  5. Pour in the flour and beat JUST until combined. Fold in the peanut butter cups and heath chips.
  6. Spoon into the prepared pan. bake at 350 for approximately 40 minutes or until the top is shiny, firm and crackly looking and inserting a skewer in the center shows only a few moist crumbs, not a loose or liquidy batter.
  7. Let cool in the pan on a rack until thoroughly cool before cutting. You cut them before this and you will get goop. Tasty goop, but goop nonetheless. If you have these room temp, they are creamier and silkier in texture. If you chill them, they take on more of a candylike fudge texture. try it both ways to see which you prefer. πŸ™‚

Copyright Notice: From Cupcakes To Caviar images and original content are copyright protected. Please do not publish these materials anywhere without prior permission.

Cherry Browned Butter Crumb Cake

Cherry Browned Butter Crumb Cake

Cherry Browned Butter Crumb Cake


I haven’t made a foodie confession in a while, so I guess it’s time for a new one. Well, I did mention to a friend the other day that I like Spam, but since he is from Hawaii, where they very wisely love the canned meat, it didn’t really phase him as it would have many other food bloggers πŸ˜›

On to the confession. It’s no secret that I used to love Twinkies and Ho-Hos when they were owned by the original company. Now however, they are pretty bad. I’m still mourning and have been blocked from the Hostess site because of my insistence on periodic candlelight vigils lamenting the passing of the REAL Hostess products. One other thing I loved? Those horrid, dry, overly sweet crumb cakes. I can’t recall if they were Hostess or Dolly Madison. All I know is that every couple of months, I had to go to a convenience store and grab a pack. We won’t discuss how I also would buy a Little Debbie Brownies that was topped with fake M&Ms.

But, me being me, when Hostess became “Hostess Wanna Be” (and yes, I’m astute enough to realize they weren’t exactly gourmet in the first place), and they AND Dolly Madison products disappeared, I knew it was time to make my own goodies. I never really got around to the Twinkies and Ho-Hos, but I CAN make a killer crumb cake. Does it taste like theirs? No and this is a good thing lol. The one I make is better. The original recipe is from Food And Wine and while it was good, it was rather plain. I wanted to give it some flavor and I think I succeeded quite nicely.

You know the drill… πŸ™‚

Cherry Browned Butter Crumb Cake

  • Crumb Topping-
  • 1/2 cup unsalted butter, chilled and sliced thin
  • 1/3 cup sugar
  • 1/2 teaspoon cinnamon
  • 1 cup flour
  • 1/2 teaspoon baking soda
  • 1/2 teaspoon salt
  • Cake-
  • 1 1/2 cups unsalted butter, room temp
  • 2 cups flour
  • 1 1/2 teaspoons baking powder
  • 1/4 teaspoon baking soda
  • 1/2 teaspoon salt
  • 1/2 teaspoon nutmeg
  • 1 1/2 teaspoons cinnamon
  • 1/2 teaspoon cardamom
  • 1 cup sugar
  • 3 eggs
  • 1 egg yolk
  • 1 tablespoon vanilla extract
  • 1/2 cup sour cream
  • 1 1/2 cups good quality cherry preserves
  1. Make your topping first- combine the flour, baking soda, sugar, salt and cinnamon in a medium bowl. Use a pastry blender to cut the chilled butter into the flour mixture until it resembles small crumbs. Then get in there with your fingers and smoosh together the mix between your fingers to heat it up a bit and make larger pieces. Refrigerate while you make the cake batter
  2. Preheat oven to 350 degrees. Spray a 9 inch springform pan well with baking spray (the kind with both flour and oil in it) and put the pan on a baking sheet. This will protect the bottom of your oven from possible leakage. Put the butter into a medium pot and cook over medium heat until it has turned a golden brown color and has a nutty scent. Do NOT turn away form it as it begins to color as it can go from browned and delicious to burned and garbage very quickly. Pour into a bowl and set in the freezer for 15 minutes.
  3. In a large bowl, combine the flour, baking powder, salt, cinnamon, nutmeg and cardamom.
  4. In another bowl (remember, always have someone nearby who has dish duty πŸ˜€ ), beat together the butter and the sugar until light and fluffy. Add in the vanilla extract, eggs and egg yolk and beat until well combined.
  5. Alternating the flour and the sour cream (start and end with the flour mixture) add them to the butter/egg mix. Beat just until combined after each addition.
  6. Pour half of the batter into the prepared pan. Spread to the edge of the pan. Cover with dollops of the cherry preserves and spread them to within a half an inch of the edge of the batter. Top with the other half of the batter and spread it carefully to the edges. Sprinkle the chilled crumbs over the top of the batter.
  7. Bake at 350 for 45 -60 minutes or until it is golden brown and a skewer inserted in the middle comes out clean, with a few moist crumbs, but no loose batter.
  8. Cool on a wire rack, still in the pan. When completely cool, open outside of pan carefully then gently slide a butter knife under the bottom of the cake to loosen it and carefully lift it off of the bottom of the pan and transfer to a plate.

Copyright Notice: From Cupcakes To Caviar images and original content are copyright protected. Please do not publish these materials anywhere without prior permission.


Toasty Browned Butter Oatmeal Raisin Cookies

Toasty Browned Butter Oatmeal Raisin Cookies

Toasty Browned Butter Oatmeal Raisin Cookies


My husbands favorite cookie is a plain old fashioned oatmeal raisin cookie. While I like them, they aren’t my favorite and because of that and cause my husband is diabetic yet would eat every single cookie made, I don’t make them often. But I had been craving some the last week or so and decided to see what I could do to change them up a bit. I love using browned butter in baking so that was one thought. It adds such a delicious nutty flavor to foods. But then I decided to take the nuttiness one step further and I toasted the oats for these cookies.

These turned out wonderfully. They have a yummy, toasty, almost butterscotch flavor due to the browned butter and toasted oats. The edges have that sought after crispness with nice soft chewy middles. I was rather tickled with myself on how these turned out and can’t think of anything I would change next time I make them. I wasn’t sure what to name them so I asked my facebook readers to help me. Unfortunately, though they made some awesome suggestions, none quite resonated with me so the above name is what we ended up with.

You know the drill… πŸ™‚

Toasty Browned Butter Oatmeal Raisin Cookies

  • 1 cup unsalted butter
  • 2 cups flour
  • 1/2 cup wheat germ (I used the honey crunch flavored type)
  • 2 teaspoons baking soda
  • 1/2 teaspoon salt
  • 3 eggs
  • 1/2 cup raisins
  • 1/2 cup dried cranberries (you can obviously sub out all of one or the other if you prefer)
  • 1 tablespoon vanilla extract
  • 1 tablespoon orange zest (optional)
  • 1 cup dark brown sugar
  • 3/4 cup sugar
  • 2 cups oats
  1. Preheat the oven to 350.
  2. Place the butter in a medium pot. Over medium to medium high heat, let the butter melt and cook, swirling the pot periodically, until the butter is a dark golden brown and has a nutty scent. Do NOT turn our back on it once it starts to color. This can go from browned to a smelly burned mess quickly. When done, set it aside to cool.
  3. While this cools, toast your oats. Pour the oats onto a cookie sheet and shake to settle them into a single layer. Toast them until they are a light brown color, stirring and spreading again a couple of times,  about 20 minutes. Cool for about ten minutes.
  4. Meanwhile, combine the eggs, orange zest if using and vanilla and beat well. Dump the raisins and cranberries in there and just let it sit while the butter cools. This gives the fruits time to soften a bit.
  5. In a large bowl, combine the cooled butter and the two sugars. Beat well to combine. Add in the flour, wheat germ, baking soda and salt. Beat on medium speed to combine. Add in the egg/fruit mix and beat just until combined.
  6. Fold in the oats. Make balls of dough about 2 inches in diameter (you can make smaller or larger but adjust the cooking time accordingly) and place on an ungreased cookie sheet about 8 to a sheet.
  7. Bake at 350 until the tops are firm and cookies are a medium golden brown, about 13 to 15 minutes, depending on size. Let cool on pan for a minute then transfer to a rack to finish cooling.

Copyright Notice: From Cupcakes To Caviar images and original content are copyright protected. Please do not publish these materials anywhere without prior permission.

Cherry Garcia Pudding

Cherry Garcia Pudding


I love ice cream. It’s my go to treat on nights when I allow myself dessert. Well, sometimes I’ll mix it up with something else, but 99% of the time, it will still resemble ice cream in that it will have a creamy texture. I’m one of those people whose downfall is creamy and rich, whether it’s something sweet or something savory. Creamy is my friend. But Ben & Jerry are even better friends. Have any of you tried their new “Core” flavors? I tried the salted caramel one (of course) and I have to admit it, I was rather disappointed. It was….boring. The best part was the little chunks of Blondie but even that wasn’t enough to make it worth the calories.
I DO however, love many of their other flavors. My favorite will always be Phish Food. It used to be that running a close second was Cherry Garcia, but now for strangely personal reasons, I don’t eat it anymore. It brings back memories I prefer to forget because they make me mentally queasy; one of those “omg, did I really get involved with someone that disgusting” memories. Yep… from an ice cream lol. I’m strange that way. Doesn’t take much; a smell, a flavor, a sound and I’m transported to other times, some good, some bad.
But I still love the flavor combo, that creamy texture, the cherries, the chocolate and that slight almondy background. I eat other brands of ice cream with it and have *gasp* even found brands that are better than Ben & Jerry’s. But I also love a dessert I began making about 9 years ago that has the same flavor profile. I usually call it “Cherry Garcia Wanna-Be” mousse. But for the sake of brevity, Cherry Garcia Pudding works also lol.

This is a cinch to make. The most time consuming part is chopping the chocolate and cherries and that’s still pretty quick if you have a decent knife. You can have this knocked out and chilling inside of 20 minutes. Then you just let it chill and serve it. This is oh so good. Creamy and rich with all those lovely flavors meshing into puddingish (yes, that too is now a word) perfection.

You know the drill…. git to cooking πŸ™‚

Cherry Garcia Pudding


  • 8 ounces semi sweet chocolate, finely chopped
  • 16 ounce jar Maraschino Cherries, drained, syrup reserved, cherries coarsely chopped (redrain and pat dry the cherries after chopping as they will let off more liquid)
  • 1 can sweetened condensed milk
  • 1 tablespoon lemon juice
  • 1  teaspoon vanilla extract
  • 1/2  teaspoon almond extract (I love the almond flavor so I tend to use more)
  • 1 cup heavy cream, whipped
  • 1 8 ounce container Cool Whip (you can sub sweetened whipped cream, but this is one of those rare cases where the flavor and texture of cool whip works)
  1. In a large bowl, on low speed, beat together the sweetened condensed milk, 3 tablespoons of the maraschino cherry juice (You don’t need any more of it, but it makes an awesome cherry coke, thus why I said to reserve all of it πŸ˜› ), the lemon juice, vanilla extract and almond extract
  2. Gently fold in the cool whip and whipped cream, then the chopped chocolate and chopped cherries.
  3. Cover, then put the mixture into the fridge and chill until thickened, at least 3 hours.
  4. Pour the filling into individual glasses. You can then lightly cover it with plastic wrap and refrigerate it until ready to serve or serve now. Garnish with some extra cherries and chopped chocolate.

Copyright Notice: From Cupcakes To Caviar images and original content are copyright protected. Please do not publish these materials anywhere without prior permission.