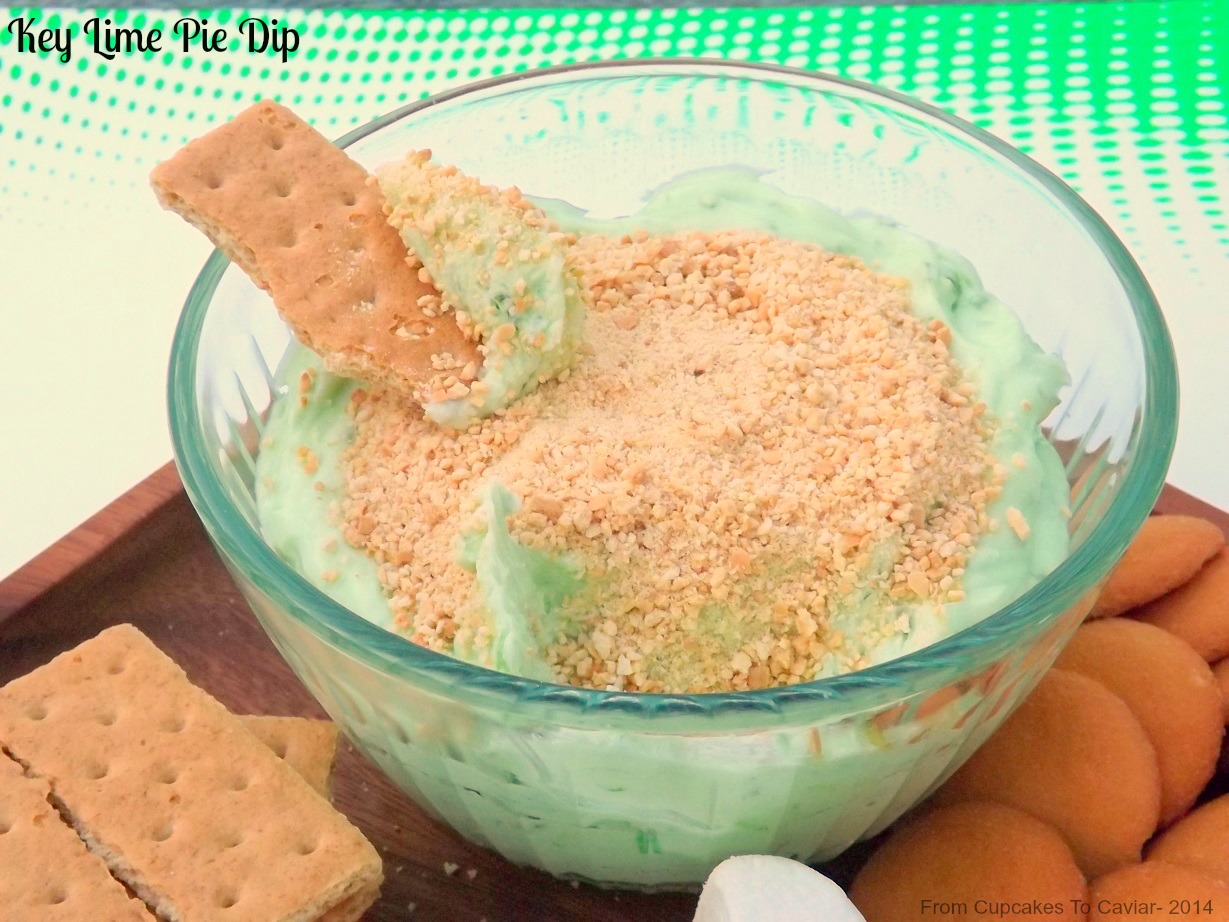
Key Lime Pie Dip

Key Lime Pie Dip

Key Lime Pie Dip


I say yet again…. weird, weird weather. May in Kentucky and it’s in the mid 50’s and we had to turn the heat on last night! Some of our area got frost and it attacked my Basil the other night and killed off the tips of all the leaves. I am pretty sure we can give up on the idea of fruit from our trees AGAIN this year due to the weather. Le Sigh.

But I will (she says yet again) NOT give up on warm weather cooking and eating. I have always said that I was a person who didn’t cook according to the season, that if I wanted pumpkin in July, I was having pumpkin in July and enjoying it. And while this is true, I am coming to realize that even I, much as I hate to be normal :-p, do tend to cook according to the seasons. Maybe it’s genetically hardwired in us to do that, since we were all hunter-gatherers at one time. We have the luxury of doing what we want cooking wise, because we were blessed to be born into bodies living in developed countries, but there is still something that makes us want to use that fresh stuff while it’s there.

Ok, enough waxing philosophical. Let’s get to the food.

I have a thing for limes. I absolutely HATE fake lime flavor, such as that found in candy, but I love the flavor and scent of real lime. When I use it, I’m convinced it’s my favorite citrus. But then again, I do the same when I use lemons or oranges hehe.

This dip is awesome. My husband, who has some sort of sensory issue with creamy foods, couldn’t stop eating it. He totally loved it. I did also of course…. it’s lime, it’s rich, it’s creamy and I’m me; need I say more? 😀 The kids loved it too, so this was a hit all around. This is simple to make. Just beat, beat more, spoon into a serving bowl and there ya go. You can serve this with whatever dippers you want; I used vanilla wafers, graham crackers and sliced up marshmallows. Let it sit out at room temp for a bit to soften. It’s fine cold but harder to scoop up.

You know the drill…. 🙂


Side Note! Don’t forget to go to the post preceding this one (GIVEAWAY) and enter my giveaway! You could win a 6 Speed Hamilton Beach Stand Mixer AND a 6 Speed Hamilton Beach Hand Mixer! Just for entering. I don’t have a bazillion entries so your chances are actually pretty good of winning!

Key Lime Pie Dip

  • 8 ounces cream cheese, room temp
  • 6 tablespoons unsalted butter, room temp
  • zest of 5 key limes (or 2 regular; about 2 tablespoons zest)
  • 2 tablespoons key lime juice (or 3 tablespoons regular lime juice)
  • 1/2 teaspoon lime oil (optional, but adds a nice zing)
  • 1/2 teaspoon lemon lime kool-aid (again; optional, but it adds the cute green color and a good amount of tang and c’mon, it costs 20 cents at wal mart :-p )
  • 1 1/2 cups powdered sugar
  • 1/2 cup graham cracker crumbs


  1. In a medium bowl, combine the cream cheese and butter. Beat at medium speed until it is smooth and creamy.
  2. Add in the zest, juice, lime oil and kool aid. Beat well.
  3. Add the powdered sugar and beat at low speed until mixture is fluffy.
  4. Spoon into a serving bowl. Top with the graham cracker crumbs. Chill for about 45 minutes minimum. It can be chilled longer, but make sure you let it sit out for 30 minutes or so just to soften a little bit.
  5. Serve with dippers of choice.

Copyright Notice: From Cupcakes To Caviar images and original content are copyright protected. Please do not publish these materials anywhere without prior permission


Chocolate Malted Milk Mousse

Chocolate Malted Milk Mousse

Chocolate Malted Milk Mousse


When I was 13, I worked at a small ice cream shack (shack is a fairly fitting word, too) called “Frosty Hut”, also called Frosty Slut, but we won’t go there. I worked there for a dollar an hour. I had had to get a work permit to even work at that age and I guess the owner, Mr. A, figured a buck an hour was sufficient even though minimum wage was $3.35. One of the perks of the job was, of course, the free ice cream. Since this was privately owned and we were paid slave wages, there was no “you have a 30 minute lunch break and can eat one small thing from the menu” rule. Nope, my sister and I (she also worked there…we were the full line up of employees that Summer) ate like pigs lol. One of my favorite things to do was work my shift, then make 2 of what were called Boston Shakes, one for me and one for my brother Steve. These were HUGE shakes that also had a about 73 pints of soft serve on top of them. I have absolutely NO idea how I didn’t weigh 500 pounds by the end of that Summer. Mine was the same each time; a chocolate malt with extra malt syrup. The flavor is still a favorite. I don’t drink shakes often but when I go to say, Sonic and get one, it’s still chocolate malt with extra malt. I’m a creature of habit 🙂

Since I also love Whoppers Candy; they are malt flavored after all, I was tickled to find this recipe in the same Better Home And Garden Cookbook/magazine (it’s one of those they keep on the shelves for a few months, then retire) that my last post came from. I am slowly working my way through all the recipes in there that I have tabbed. It was a good find; a cookbook that you actually want to make multiple recipes from. I have about a dozen pages tabbed and plan to get to them all.

This is a perfect Spring dessert; it’s rich yet light and not overwhelming. Mind you, it would also be great for a Christmas dessert or heck, any time of year lol. I don’t want to limit it. But Easter is tomorrow and if you still need just one more dessert, this would work wonderfully. It can be ready to go in less than 90 minutes and that includes chilling time. The mousse itself is sweet and creamy with a nice malted milk flavor. The topping is only very lightly sweetened and a wonderful foil to the sweeter mousse. And the crushed malted milk balls in the mousse and the topping add a nice light crunch.

You know the drill…. 🙂

Chocolate Malted Milk Mousse

  • 2/3 cup malted milk balls (plus extra for garnishing)
  • 3 cups heavy cream
  • 4 ounces milk chocolate, coarsely chopped
  • 3 ounces bittersweet or semisweet chocolate, coarsely chopped
  • 1/3 cup chocolate malted milk powder (I actually used the plain kind, not the chocolate kind)
  • 2 tablespoons amaretto, chocolate liqueur or cream (I used Kahlua cause I’m just a rebel :-p )
  • 1 1/2 teaspoons vanilla, divided
  • 1 tablespoon unsweetened cocoa powder
  • 1 tablespoon sugar (this is for the topping. Don’t be tempted to add more sugar. The small amount of sweetening is excellent against the sweet mousse)
  1. Put the malted milk balls in a large bag and crush them using a rolling pin…or a hammer…or a neighbors head, whatever works for you; no judgment here. Set aside.
  2. In a small saucepot, combine the chopped chocolates and 1/4 cup of the cream. Over low heat, stirring constantly, heat until all the chocolate is melted and the mixture is smooth. Add 1 teaspoon of the vanilla, the malted milk powder and the liqueur (or cream) Cool to room temp. Stirring speeds this up.
  3. Meanwhile, in a large bowl, whip 1 3/4 cup of the cream until stiff peaks form. Stir 1/2 cup of the cream into the cooled chocolate mixture. gently fold the rest of the cream into the chocolate. Then gently fold in the crushed malted milk balls. Spoon the mousse into either small dessert glasses or a 1.5 to 2 quart glass serving bowl. Cover and chill for one hour at least and up to 24 hours.
  4. When ready to serve, whip the remaining one cup cream with 1/2 teaspoon of vanilla, 1 tablespoon of sugar and the 1 tablespoon of cocoa powder until stiff peaks form. Spoon the topping onto the mousse and garnish with more malted milk balls.

Copyright Notice: From Cupcakes To Caviar images and original content are copyright protected. Please do not publish these materials anywhere without prior permission.


Fudgy Brownies With Mini Peanut Butter Cups

Fudgy Brownies With Mini Peanut Butter Cups

Fudgy Brownies With Mini Peanut Butter Cups


We all know I am NOT a fan of peanut butter. Well, to qualify again, not “normal” peanut butter. I do have a soft spot for Peanut Butter & Company’s Cinnamon Raisin Peanut Butter and Jifs new Salted Caramel Hazelnut is pretty amazing as peanut butter type spreads go. You’ll notice I did NOT say it was “to die for”. I believe I’ve mentioned before that that is one of those phrases that makes me want to gouge my eardrums out with a spoon. That one along with “EVOO” and “Sammy”. Damn you for your evil influence, Rachael Ray, damn you. But back on tangent, as much as it possible for me, no “to die for”…. I will only die for medium rare ribeyes and roasted brussel sprouts. I have my standards.

But every once in a while, cause I love you all so much (“I just cain’t quit you” 😛 ), I have to make something peanut buttery for all of you. I realize how peculiar I am with my dislike of PB.  I realize how peculiar I am for many reasons and that that is but one of many, but lets not go there.

I was actually pleasantly surprised with these. Yes, they have a strong peanut buttery taste so those of you into that will love that aspect, but they are also fudgy/chewy enough and of course, chocolatey enough, that even I enjoyed them. They have a perfect, shiny crackly top crust, which I personally love. I found myself, after cutting off the edges, picking up stray bites here and there. Sooo chewy and yummy. 😀 Oh yeah, just for good measure, I threw in a bag of Heath Chips, so that added yet another level of crunchy, salty/sweet goodness. You can thank me later. 😀

You know the drill… 🙂

Fudgy Brownies With Mini Peanut Butter Cups

  • 1 cup (2 sticks) unsalted butter
  • 12 ounces semisweet chocolate
  • 1/2 cup flour
  • 1 1/2 teaspoons baking powder
  • 1/2 teaspoon salt
  • 3 eggs, lightly beaten (use a large bowl)
  • 1 tablespoon vanilla extract
  • 1 1/4 cups sugar
  • 8 ounces mini peanut butter cups (I used Trader Joes Brand)
  • 1 bag (12 ounces) Heath Bar chips
  1. Preheat oven to 350 degrees. Grease an 11×7 glass pan (I used a standard Pyrex) or a 13×9 inch pan. If you use the 13×9, be more aware of your cooking time as these will cook quicker.
  2. Melt your butter in a medium pot over medium high heat. Add the chocolate, stir once, then remove the pot form the heat. Let it sit for five minutes then stir for about 2 minutes to finish melting the chips.
  3. Combine the flour, baking powder and salt in a small bowl and whisk to blend.
  4. Slowly pour the chocolate mixture over the beaten eggs, whisking the whole time. Add the sugar and vanilla extract and beat well.
  5. Pour in the flour and beat JUST until combined. Fold in the peanut butter cups and heath chips.
  6. Spoon into the prepared pan. bake at 350 for approximately 40 minutes or until the top is shiny, firm and crackly looking and inserting a skewer in the center shows only a few moist crumbs, not a loose or liquidy batter.
  7. Let cool in the pan on a rack until thoroughly cool before cutting. You cut them before this and you will get goop. Tasty goop, but goop nonetheless. If you have these room temp, they are creamier and silkier in texture. If you chill them, they take on more of a candylike fudge texture. try it both ways to see which you prefer. 🙂

Copyright Notice: From Cupcakes To Caviar images and original content are copyright protected. Please do not publish these materials anywhere without prior permission.

Cherry Browned Butter Crumb Cake

Cherry Browned Butter Crumb Cake

Cherry Browned Butter Crumb Cake


I haven’t made a foodie confession in a while, so I guess it’s time for a new one. Well, I did mention to a friend the other day that I like Spam, but since he is from Hawaii, where they very wisely love the canned meat, it didn’t really phase him as it would have many other food bloggers 😛

On to the confession. It’s no secret that I used to love Twinkies and Ho-Hos when they were owned by the original company. Now however, they are pretty bad. I’m still mourning and have been blocked from the Hostess site because of my insistence on periodic candlelight vigils lamenting the passing of the REAL Hostess products. One other thing I loved? Those horrid, dry, overly sweet crumb cakes. I can’t recall if they were Hostess or Dolly Madison. All I know is that every couple of months, I had to go to a convenience store and grab a pack. We won’t discuss how I also would buy a Little Debbie Brownies that was topped with fake M&Ms.

But, me being me, when Hostess became “Hostess Wanna Be” (and yes, I’m astute enough to realize they weren’t exactly gourmet in the first place), and they AND Dolly Madison products disappeared, I knew it was time to make my own goodies. I never really got around to the Twinkies and Ho-Hos, but I CAN make a killer crumb cake. Does it taste like theirs? No and this is a good thing lol. The one I make is better. The original recipe is from Food And Wine and while it was good, it was rather plain. I wanted to give it some flavor and I think I succeeded quite nicely.

You know the drill… 🙂

Cherry Browned Butter Crumb Cake

  • Crumb Topping-
  • 1/2 cup unsalted butter, chilled and sliced thin
  • 1/3 cup sugar
  • 1/2 teaspoon cinnamon
  • 1 cup flour
  • 1/2 teaspoon baking soda
  • 1/2 teaspoon salt
  • Cake-
  • 1 1/2 cups unsalted butter, room temp
  • 2 cups flour
  • 1 1/2 teaspoons baking powder
  • 1/4 teaspoon baking soda
  • 1/2 teaspoon salt
  • 1/2 teaspoon nutmeg
  • 1 1/2 teaspoons cinnamon
  • 1/2 teaspoon cardamom
  • 1 cup sugar
  • 3 eggs
  • 1 egg yolk
  • 1 tablespoon vanilla extract
  • 1/2 cup sour cream
  • 1 1/2 cups good quality cherry preserves
  1. Make your topping first- combine the flour, baking soda, sugar, salt and cinnamon in a medium bowl. Use a pastry blender to cut the chilled butter into the flour mixture until it resembles small crumbs. Then get in there with your fingers and smoosh together the mix between your fingers to heat it up a bit and make larger pieces. Refrigerate while you make the cake batter
  2. Preheat oven to 350 degrees. Spray a 9 inch springform pan well with baking spray (the kind with both flour and oil in it) and put the pan on a baking sheet. This will protect the bottom of your oven from possible leakage. Put the butter into a medium pot and cook over medium heat until it has turned a golden brown color and has a nutty scent. Do NOT turn away form it as it begins to color as it can go from browned and delicious to burned and garbage very quickly. Pour into a bowl and set in the freezer for 15 minutes.
  3. In a large bowl, combine the flour, baking powder, salt, cinnamon, nutmeg and cardamom.
  4. In another bowl (remember, always have someone nearby who has dish duty 😀 ), beat together the butter and the sugar until light and fluffy. Add in the vanilla extract, eggs and egg yolk and beat until well combined.
  5. Alternating the flour and the sour cream (start and end with the flour mixture) add them to the butter/egg mix. Beat just until combined after each addition.
  6. Pour half of the batter into the prepared pan. Spread to the edge of the pan. Cover with dollops of the cherry preserves and spread them to within a half an inch of the edge of the batter. Top with the other half of the batter and spread it carefully to the edges. Sprinkle the chilled crumbs over the top of the batter.
  7. Bake at 350 for 45 -60 minutes or until it is golden brown and a skewer inserted in the middle comes out clean, with a few moist crumbs, but no loose batter.
  8. Cool on a wire rack, still in the pan. When completely cool, open outside of pan carefully then gently slide a butter knife under the bottom of the cake to loosen it and carefully lift it off of the bottom of the pan and transfer to a plate.

Copyright Notice: From Cupcakes To Caviar images and original content are copyright protected. Please do not publish these materials anywhere without prior permission.


Cherry Garcia Pudding

Cherry Garcia Pudding


I love ice cream. It’s my go to treat on nights when I allow myself dessert. Well, sometimes I’ll mix it up with something else, but 99% of the time, it will still resemble ice cream in that it will have a creamy texture. I’m one of those people whose downfall is creamy and rich, whether it’s something sweet or something savory. Creamy is my friend. But Ben & Jerry are even better friends. Have any of you tried their new “Core” flavors? I tried the salted caramel one (of course) and I have to admit it, I was rather disappointed. It was….boring. The best part was the little chunks of Blondie but even that wasn’t enough to make it worth the calories.
I DO however, love many of their other flavors. My favorite will always be Phish Food. It used to be that running a close second was Cherry Garcia, but now for strangely personal reasons, I don’t eat it anymore. It brings back memories I prefer to forget because they make me mentally queasy; one of those “omg, did I really get involved with someone that disgusting” memories. Yep… from an ice cream lol. I’m strange that way. Doesn’t take much; a smell, a flavor, a sound and I’m transported to other times, some good, some bad.
But I still love the flavor combo, that creamy texture, the cherries, the chocolate and that slight almondy background. I eat other brands of ice cream with it and have *gasp* even found brands that are better than Ben & Jerry’s. But I also love a dessert I began making about 9 years ago that has the same flavor profile. I usually call it “Cherry Garcia Wanna-Be” mousse. But for the sake of brevity, Cherry Garcia Pudding works also lol.

This is a cinch to make. The most time consuming part is chopping the chocolate and cherries and that’s still pretty quick if you have a decent knife. You can have this knocked out and chilling inside of 20 minutes. Then you just let it chill and serve it. This is oh so good. Creamy and rich with all those lovely flavors meshing into puddingish (yes, that too is now a word) perfection.

You know the drill…. git to cooking 🙂

Cherry Garcia Pudding


  • 8 ounces semi sweet chocolate, finely chopped
  • 16 ounce jar Maraschino Cherries, drained, syrup reserved, cherries coarsely chopped (redrain and pat dry the cherries after chopping as they will let off more liquid)
  • 1 can sweetened condensed milk
  • 1 tablespoon lemon juice
  • 1  teaspoon vanilla extract
  • 1/2  teaspoon almond extract (I love the almond flavor so I tend to use more)
  • 1 cup heavy cream, whipped
  • 1 8 ounce container Cool Whip (you can sub sweetened whipped cream, but this is one of those rare cases where the flavor and texture of cool whip works)
  1. In a large bowl, on low speed, beat together the sweetened condensed milk, 3 tablespoons of the maraschino cherry juice (You don’t need any more of it, but it makes an awesome cherry coke, thus why I said to reserve all of it 😛 ), the lemon juice, vanilla extract and almond extract
  2. Gently fold in the cool whip and whipped cream, then the chopped chocolate and chopped cherries.
  3. Cover, then put the mixture into the fridge and chill until thickened, at least 3 hours.
  4. Pour the filling into individual glasses. You can then lightly cover it with plastic wrap and refrigerate it until ready to serve or serve now. Garnish with some extra cherries and chopped chocolate.

Copyright Notice: From Cupcakes To Caviar images and original content are copyright protected. Please do not publish these materials anywhere without prior permission.


Southern Style Buttermilk Biscuits & The Times, They Are A’Changin’

Southern Style Buttermilk Biscuits

Southern Style Buttermilk Biscuits


It occurred to me earlier today that I have been cooking for about 40 years now. I’m not quite sure whether to be proud of that fact or to go get my walker and economy size bottle of Geritol. I look back to when I was first starting when I was about ten and it amazes me how much grocery stores have changed. Back when I was a kid, you could still find a fair amount of mom and pop stores that carried the basics and a lot of cheap candy but not much else. Then you had the chain stores, which in the case of where I lived, were Jewel and Dominicks. You could fit two or three of those quite neatly into say, a Super Wal-Mart. They sold more than the mom and pop stores but the variety back in the ’70’s just was NOT what it is now. We take it all for granted and just blithely walk through huge grocery stores without batting an eye, but those of us who are older (as well as those who have lived in other countries that don’t have mega marts like we do) remember it being much different back in the days of the dinosaurs :-P  Stores had about ten aisles and if you wanted something fancy, you’d better have access to a large city with small gourmet shops.

Now however, you can go to any large chain grocery store and get gourmet cheeses, artisan breads, fancy meats and some even sell a good variety of decent wines. One of my favorite things about the here and now is the variety of ice cream hehe. When I was a kid, you got vanilla, chocolate, strawberry, Neapolitan, butter pecan, rocky road and that was about it. My favorite then was Neapolitan , my sisters was Butter Pecan and my brothers was vanilla. He was the boring one 😛 NOW however, I can easily spend 20 minutes in the ice cream aisle choosing from gourmet gelatos and ice creams of every flavor under the sun.

Another thing that has changed is biscuits. You know those four packs of the canned biscuits that make biscuits with very little flavor and that are the size of a silver dollar? That was IT as far as the selection went. Those and *shudders* the prepackaged “Brown N Serve” rolls. My mom got those every holiday and I hated them. Even then I knew there had to be better out there somewhere. And now you can get some pretty good biscuits in the frozen section. But even then, they aren’t homemade. It took me literally years to learn to make a good buttermilk biscuit. Mine were….edible… but rather too hard and dense, to say the least. Now, if I do say so myself, I make some darn good biscuits. I’ve even taught my daughter and one other family member (who prefers not to admit they were schooled by me 😛 ) how to do so. Now I’m writing it down for the rest of you. They are NOT difficult. The main thing to remember with biscuits? A light touch and don’t overwork your dough. It took me forever to figure that out. I used to knead it about a dozen times the way some recipes said to do. Now, I just dump the dough out, press it into shape, fold it a couple of times, press again and cut them. That’s it. Overworking is the death of a biscuit. Plus, as counter intuitive as it sounds, too much fat in the dough will make for a tougher, flatter biscuit. Stick to the ingredients and ratios here and you’ll have great biscuits. It may take a few times to learn to work the dough properly so if these don’t look like my photo right away, don’t sweat it. They will. I promise.

This makes about ten LARGE biscuits. If you want smaller and aren’t feeding an army, you may want to cup the recipe in half. If not, freeze the leftovers, securely wrapped.

You know the drill… 🙂

Southern Style Buttermilk Biscuits

  • 4 cups self rising flour (please, if you have access, use  White Lily brand flour. If you can’t find it, then Martha White is a decent substitute.)
  • 1 teaspoon baking powder (yes, even though the flour is self rising)
  • 1/2 teaspoon salt
  • 1/2 cup unsalted butter, refrigerator cold and sliced thin
  • 1/2 cup solid shortening, chilled and sliced thin
  • 1 1/2 cups buttermilk (use whole milk buttermilk if you can find it. It makes a far better biscuit and really, low fat milk in a biscuit is a waste of time calorie wise)
  1. Preheat the oven to 425 degrees, Grease a large baking sheet.
  2. In a large bowl, whisk together your flour, baking powder and salt.
  3. Drop the butter and shortening into the bowl of flour. Use a pastry blender to cut the butter and shortening into the flour until it resembles pea sized crumbs.
  4. Make a well in the center and pour in the buttermilk, all at once, Use a fork to stir and combine the milk with the flour until you have a cohesive dough. Dump the dough onto a lightly floured board or counter top. Pat it down into a flat circle. Fold it into thirds like you’re folding a letter to fit into an envelope. Pat it down again, fold it one more time. Finally, pat it into a rough circle of about 1 inch to 1 1/4 inches high.
  5. Cut out as many biscuits as you can get, laying them right next to each other in the baking pan if you want soft sided biscuits or about an inch apart if you want crisp sided biscuits.
  6. Bake at 425 for about 20 to 24 minutes, until they are firm on top and golden brown. Take off the pan and serve piping hot, preferably with some nice fresh homemade butter (in the background of my photo and yes, it will be a later post) and good quality jam, preferably something like my homemade Apple Pie Jam because homemade is always better 😀

Copyright Notice: From Cupcakes To Caviar images and original content are copyright protected. Please do not publish these materials anywhere without prior permission.


Lemony White Chocolate Double Berry Bread Pudding

Lemony White Chocolate Double Berry Bread Pudding

Lemony White Chocolate Double Berry Bread Pudding


When we get to this part of Winter, that time when you have some warm days then Winter has a hissy fit, backpedals and becomes cold again, I start having major cravings for fresh fruits. Citrus is always a good bet since it’s still in season, but I want berries, darn it! Problem is, what I can find in stores around here, besides being outrageously expensive, has been shipped either from the other side of the U.S. or from another country altogether. So it’s no longer very fresh and it just doesn’t have the flavor that in season berries have. So I compromise. I buy frozen berries. Believe it or not, they are a damned good substitute. With any company worth buying from, the berries are frozen within hours of being picked so you are still getting something that is extremely close to fresh. You may not be able to use it in ALL the same ways you can fresh ones, but in baking, so long as you remember the rule of thumb to use it still frozen, not thawed, you can use it in a LOT of recipes.

You may know I love bread pudding. I used to hate it, but have come to love it since I began making it myself and realized it didn’t always have to be an insipid nursery food with no flavor. Like I mentioned to my husband the other day, I like foods with strong flavors and that includes in bread pudding. This one definitely satisfies. I have made bread pudding enough now that I have no need of a recipe; I just change up the basics to go with whatever add ins I’m doing. This one turned out wonderfully. You have a mild lemon tang and peel taste in the pudding with a bit of smooth white chocolate in there. Then practically every bite, you get some nice tangy berries. It’s bright and fresh tasting and perfect for this time of year. I loved this both warm and chilled. Warm, it’s softer and the flavors are more intense. Chilled it has the texture of a firm mousse, which I love. So far I’ve had it only with some cream poured over it, but I can see this going quite nicely with a berry sauce or custard sauce.

You know the drill… 🙂

Lemony White Chocolate Double Berry Bread Pudding

  • 6 cups cubed Kings Hawaiian Bread (about 12 ounces or 3/4 of a 16 ounce round loaf)
  • 11 ounces good quality white chocolate, chopped
  • 3 cups heavy cream
  • 6 eggs
  • 1/2 cup sugar
  • 2 tablespoons vanilla extract
  • zest of two lemons (about 3 tablespoons zest)
  • 1/3 cup fresh lemon juice
  • 1 1/2 cups frozen blackberries
  • 1 1/2 cups frozen raspberries
  • boiling water for the water bath
  1. Preheat oven to 325 degrees. Butter a 4 quart baking dish or 2 2 quart ones. I used 2 2 quart souffle dishes. Place the baking dish/dishes into a large pan. An 11×15 works well.
  2. Place the bread cubes in a large bowl and set aside.
  3. Put your chocolate and lemon zest into a medium bowl. Heat the cream up in the microwave until very hot, but not boiling. Pour cream over the white chocolate in the bowl, stir once, then let sit for five minutes. Stir well to combine the cream and chocolate and complete the melting process.
  4. In a large bowl (I know; lots of bowls. Have your kids, neighbors, stranger off the street or husband or wife do the dishes 😛 ), beat together the 6 eggs and the vanilla until frothy. Add in the 1/2 cup sugar and beat well.
  5. Slowly pour the warm cream into the egg mixture. Make sure you spoon out any lemon zest that may have sunk to the bottom and get it in there too. Beat in the lemon juice.  Let this mixture sit for about an hour so the bread can soak up the custard. When ready to bake, carefully fold in the frozen berries.
  6. Pour the pudding mix into the buttered dish and place it in the middle of the oven. Pour boiling water in the outer dish to reach about a third of the way up the sides of the dish the pudding is in. Carefully push the oven shelf back in to avoid sloshing.
  7. Bake at 325 degrees for about 75 minutes or until the top is nicely browned and a knife inserted into the center of the pudding doesn’t come out liquidy and no liquid wells up in the hole left behind.
  8. Cool the pudding at room temp for about an hour. Then you can either serve it warm or chill it for later.

Copyright Notice: From Cupcakes To Caviar images and original content are copyright protected. Please do not publish these materials anywhere without prior permission.


Cinnamon Roll Pound Cake With Cream Cheese Frosting

Cinnamon Roll Pound Cake With Cream Cheese Frosting

Cinnamon Roll Pound Cake With Cream Cheese Frosting


I remember the first time I tried Cinnabon Cinnamon Rolls. It was at a mall in Louisville Kentucky. I immediately loved them. I also started to buy them far too often. We went bankrupt, had to live in a cardboard box on a street corner with me holding a sign that said, “please help support my Cinnabon habit. Oh yeah, and help us get a new home too.”  My husband wasn’t pleased with me. But I was happy with all the nice people who dropped Cinnabon money in my tin cup. We eventually got a new place to live. Unfortunately, it was nowhere near a Cinnabon store. The closest one was across the state. So I had to learn to make my own. Which I did. And yes, I’ll post those someday too. So when the idea occurred to me to mix one of my favorite desserts, pound cake, with cinnamon rolls, I ran with it. Of course, upon googling it, I found that a lot of other people had also run with the idea lol, but that’s ok. I’ve come to realize that it is very hard to have a totally original idea in cooking anymore. All you can do is put your own spin on it. And that I have done. I used my favorite pound cake recipe, turned half of it into a cinnamon flavored cake and covered it all with half a batch of the icing I use on cinnamon rolls. This is far from my prettiest photo ever. The light stunk, I was having a crap photo taking day and I’m still sick. But you know what? The cake tastes good. 😛 It has that nice crispy crust that is so good on a pound cake,  a delicate vanilla flavor in half the cake and a tasty cinnamon flavor in the rest. All of that is smothered in a thick cream cheese frosting. All in all, this is a good rendition of a cinnamon roll that had a sex change operation and became cake.

You know the drill…. 🙂

Cinnamon Roll Pound Cake With Cream Cheese Frosting

  • Cake-
  • 3 cups cake flour (yes, it makes a difference)
  • 1 1/2 cups unsalted butter, room temp
  • 2 12 cups sugar
  • 2 tablespoons vanilla extract
  • 6 eggs, room temp
  • 2 tablespoons cinnamon
  • Frosting-
  • 4 ounces cream cheese, room temp
  • 1/4 cup unsalted butter, room temp
  • 2 teaspoons vanilla extract
  • 1 teaspoon lemon juice
  • 1 1/2 cups powdered sugar
  1. Preheat oven to 325 degrees. Spray a 10 cup bundt cake pan with a flour and oil non stick baking spray.
  2. In a large bowl, on medium speed, beat together the butter, sugar and vanilla extract. Add the eggs, one at a time, and beat well after each addition.
  3. Add the flour in and beat on LOW speed just until thoroughly combined.
  4. Pour half the batter into the prepared pan and smooth the top. Add the cinnamon to the other half of the batter and beat well to combine. Spoon the cinnamon batter on top of the plain batter and smooth it also.
  5. Bake at 325 until a skewer inserted in the middle comes out clean with no loose crumbs and the top is a nice golden brown, about 75 to 85 minutes.
  6. Let cool in the pan on a rack for ten minutes, then carefully turn the cake out onto the rack to finish cooling.
  7. Meanwhile, make your frosting- combine all the frosting ingredients in a medium bowl and beat until light and fluffy.
  8. Spread over the cooled cake. You can also thin it down some with cream or milk and drizzle it over the cake.

Copyright Notice: From Cupcakes To Caviar images and original content are copyright protected. Please do not publish these materials anywhere without prior permission.


Triple Lemon Bars

Triple Lemon Bars

Triple Lemon Bars


There are times when you just need comfort, usually in the form of some sort of food or drink. Whether your idea of that is a bag of chips and a beer and old reruns of Andy Griffith, some chicken & dumplings and a cold glass of milk, sitting under a warm blanket reading Little Women while you sip at some tea or anything involving chocolate, or downing a bottle of Smirnoff, going clubbing dressed in only a thong and high heels and then spending the night over a toilet (which btw, if that’s your form of comfort, I have some numbers you may want to call for help 😛 ) you just have to have some form of comfort. For me, it always involves baking and usually not something new, but something tried and true, something that brings back good memories, which for me would mean when my kids were little. One of the things I baked often then was lemon bars. I mean, who (other than my 17 year old and he’s strange) doesn’t like lemon bars? Well, except for (also) those strange people who just don’t like lemon desserts at all. personally, I think they are aliens come to destroy our world. but I also watched War Of The Worlds last night so I may still be caught up in bad 1950’s movie effects.

Lemon Bars have always been one of those quintessential “you need to know how to make these” sort of recipes to me. SO when I realized that after almost 3 years of blogging, I hadn’t yet posted my go to lemon bar recipe, I knew I needed to change that. These are the ones I have been making for about 20 years, though with some changes form the original, which came from (again) one of those monthly Pillsbury cookbooks. You will notice however, the addition of Boyajian Lemon Oil . I have always added either lemon extract (back in the day) or lemon oil (when I realized it was better than extract) but it’s just been in recent months that I have gained an extreme fondness for their specific brand. Give it a try. You can omit the lemon oil but it does definitely add to the overall flavor.

These have a lemony crust, a tart lemon filling and a glaze that I make using lemon zest and lemon oil, but very little lemon juice so that it can offset the tartness of the filling. These have been worked on over the years to make, what I think is, the best lemon bar around. These make a nice thick bar so cut the pieces small unless you’re trying to send everyone, even your healthy friends, into a diabetic coma 😀

You know the drill… 🙂

Triple Lemon Bars

  • Crust-
  • 2 cups flour
  • 1/2 cup powdered sugar
  • 1 cup unsalted butter, room temp
  • 1 tablespoon lemon zest
  • 1 tablespoon water, if needed for crust to come together
  • Filling-
  • 6 eggs, lightly beaten
  • 3 cups sugar
  • 2 tablespoons lemon zest
  • 1 1/2 teaspoons vanilla extract
  • 1/4 teaspoon Boyajian Lemon Oil  (if you don’t have it, these will be almost as delicious without it; just not quite as lemony)
  • 1/3 cup flour
  • 1 1/2 teaspoons baking powder
  • 3/4 cup fresh lemon juice (use room temp lemons to get the most juice)
  • Glaze-
  • 1 1/2 cups powdered sugar
  • 1 tablespoon lemon juice
  • Few drops of lemon oil
  • 1 teaspoon lemon zest
  • 3 to 4 tablespoons milk
  1. Heat oven to 350 degrees. Line a 13×9 inch baking pan with non-stick foil. That is of course optional, but I highly recommend it.
  2. In a large bowl, using a hand mixer on low speed, combine all the crust ingredients until mixture is crumbly and holds together when pressed in your hand. if you need to add more water, add a little at a time to get it crumbly and not dry.
  3. Press the mixture into the bottom of the prepared pan and then bake at 350 for about 20 minutes or until the crust is a light golden brown.
  4. Meanwhile, make your filling- combine the eggs, sugar, lemon zest, vanilla extract, lemon oil, flour and baking powder in a large bowl. Beat on low speed until thoroughly combined. Add in the lemon juice.
  5. When the crust is browned, pour the lemon mixture over the warm crust. Return to the oven and bake at 350 for 35 to 45 minutes, or until the filling is firm, lightly browned and set. If you insert a skewer halfway to the center, it should come out just moist, not liquid, rather like a thick lemon curd. It will set up more as it cools.
  6. Cool the bars completely before glazing. For the glaze, simply whisk all the glaze ingredients together in a small bowl, then pour over the cooled bars and spread gently.
  7. Cut these into small squares or triangles and you can either store them, covered, on the counter for a day or two, or in the fridge for about a week. The fridge is a better bet because they become quite soft and hard to handle when left out.

Copyright Notice: From Cupcakes To Caviar images and original content are copyright protected. Please do not publish these materials anywhere without prior permission.

Blood Orange Curd

Blood Orange Curd

Blood Orange Curd


I may have mentioned once or twice that I absolutely love citrus fruits. The plethora of lemon posts on the blog shows how much I love them, but my heart really lies with oranges. Back when I was young, eating an orange if you lived in most of the U.S. meant a navel orange. While those are good and I still love them, now, with the world so much smaller in many ways thanks to good methods of transportation, they are just the tip of the proverbial iceberg. Now, this time of year, you can get in season citrus of so many varieties it boggles the mind. Cara Cara, navel, Sweet lemons, Myer lemons, Mandarins. Tangelos, Pummelos, Kumquats, Clementines and so many others. But my favorite, one that is only around for a couple of short months, is the Blood Orange. Such an ick name for such a tasty fruit. In case you don’t know what it is, a blood orange is a somewhat smallish variety of orange with a reddish-orange rind and a medium to dark red flesh. The flavor is similar to a “regular” orange, but with a bit of a raspberry or even a somewhat winey flavor to it. The scent is intense and a bit more floral. They are absolutely delicious oranges. You can usually find them at any decently stocked grocery store these days.

Since they are in season for such a short time, after I get my fill of eating them, I like to do things with them that keeps around the house for a while longer. This curd is one of those things. It’s made like a basic lemon curd, but obviously subbing in the blood oranges. I personally add in the zest and juice form one lemon because otherwise, the flavor can be a bit one dimensional and flat since oranges are sweeter than a lemon. I also add in a few drops of orange oil at the end of cooking, but that is entirely optional, though I DO recommend it. It adds just a but more of that orange zest flavor and brings it out in the curd itself.

As yummy as this is, hold on to a good portion of it because we’ll be using it in something else that will be utterly delicious in a few days. So resist the temptation to just stand in front of the fridge with the bowl and a spoon. Or just make two batches. 😀

You know the drill… 🙂

Blood Orange Curd

  • Zest from 3 Blood Oranges (about 3 to 4 tablespoons. If there is more, use it)
  • Zest from one lemon (about 1 tablespoon. Again, use it all)
  • 1/2 cup unsalted butter, room temp
  • 6 eggs
  • juice from the oranges and the lemon (you should end up with just about 2/3 a cup of juice)
  • 1 1/2 teaspoons vanilla extract
  • 1/8 teaspoon Boyajian Orange Oil (optional)
  • 1/8 teaspoon salt
  1. In a large bowl, cream the butter until smooth. Blend in the citrus zest and the sugar.
  2. Beat in the eggs, one at a time, just until combined.
  3. Add in the blood orange/lemon juices, the vanilla and the salt. Blend well.
  4. Pour the mixture into a medium saucepot. Over medium heat, cook, stirring constantly, until the mixture reaches a temp between 170 and 175. Do NOT let this boil. It should take about ten minutes.
  5. Remove from the heat and strain through a fine mesh strainer to get rid of all the zest and any lumps of eggs that may have cooked too fast.
  6. Pour into a container and store in the fridge. The curd will keep for about a month or so. But we’ll be using some of it up here this week. 😀

Copyright Notice: From Cupcakes To Caviar images and original content are copyright protected. Please do not publish these materials anywhere without prior permission.