Ham, Cheddar And Herb Scones

Ham, Cheddar & Herb Scones

I’m feeding my inner Brit today…and my inner Scot… and my inner whatever other ethnicity likes scones. The thing is, in real life, I have not a drop of Brit or Scot in me as far as I know.  Lots of German, some French, a touch or two of Irish (I think it’s the good at bull**** part of me), some Native American and some African American. I am the quintessential mutt.

I like pretending I’m Scottish though. There is little more fun than going into a store and loudly talking in a Scottish accent. People gawk big time. One would think they had never seen a Scot walking around Wal-mart before. Ok, so maybe they haven’t. An Indian accent is fun too since I’m light haired and extremely light skinned and don’t fit the genetic mold of what one would expect from a person speaking with a thick Indian accent.

Most fun however is Russian. My husband is fluent or close to it in a few languages and we have a habit of going shopping and somewhere, ineveitably, he will begin speaking Russian, usually very loudly and usually pretending to be irate over something silly done by Americans.

I, not knowing a lick of Russian, end up as his straight man, using a thick Russian accent to tell him that he is in America now and to speak English and not act like he just came over from the old country. We are American now and he needs to speak the language! Again, the looks are priceless hehehe.

We don’t have very exciting lives.

And I am fairly sure we need to be institutionalized

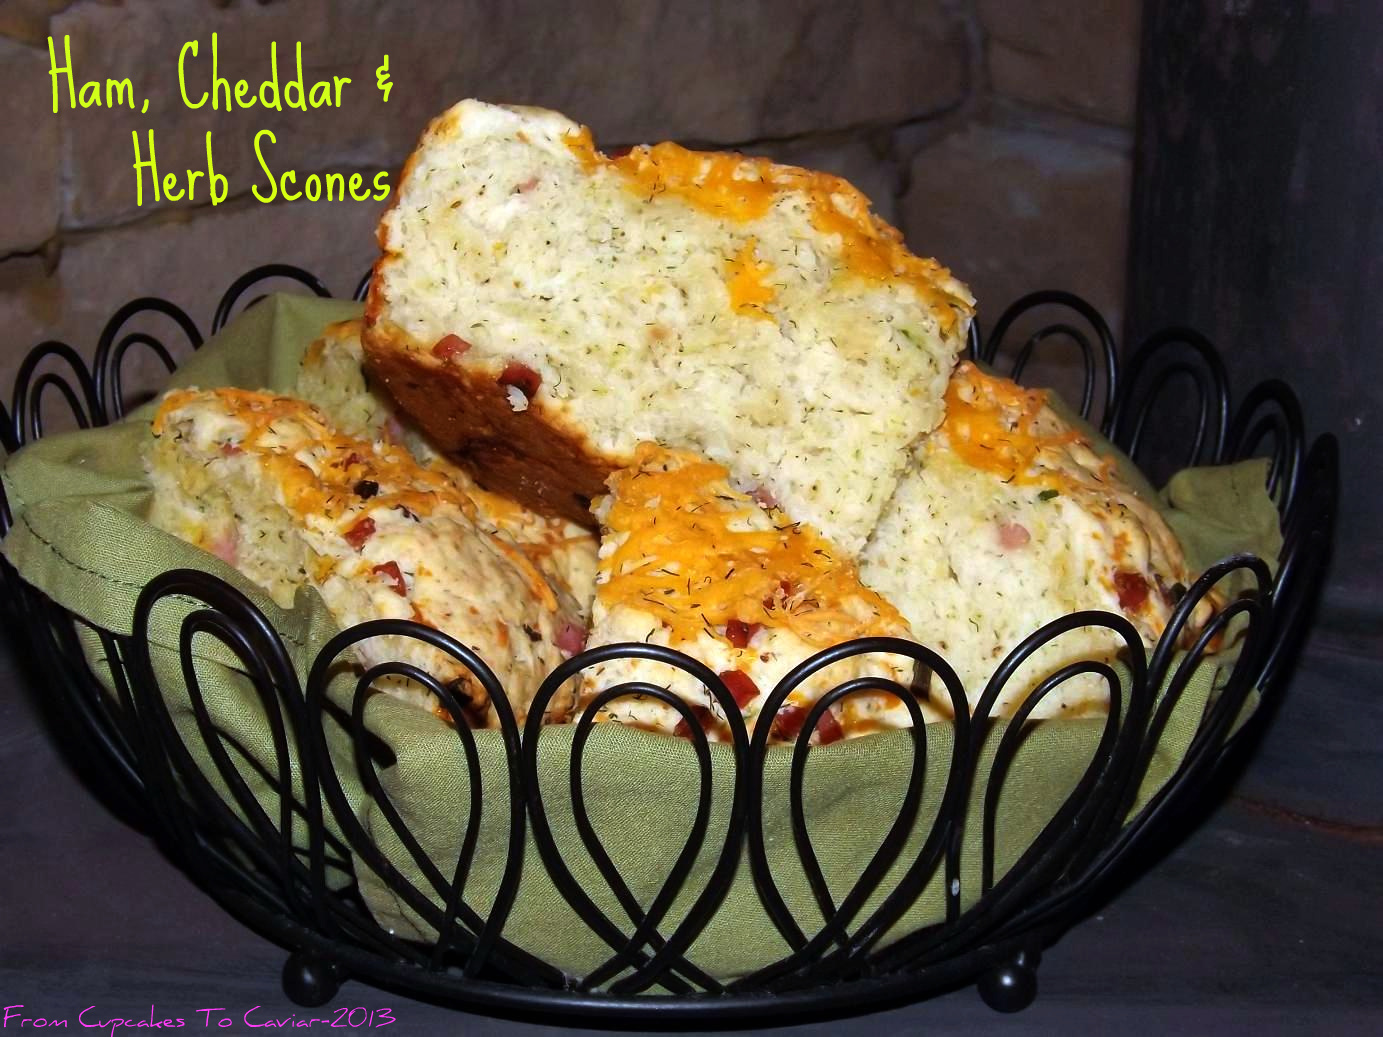
But before that happens, I want to share this scone recipe (do you say scone rhyming with cones or scones rhyming with cons? I’m a cones person myself) with you. As much as I love sweet scones, savory ones have a larger portion of my heart and my waistline. This one is chock full of cheddar cheese, diced ham, some garlic, some green onions and some dried dill. These smell amazing as they cook and they taste even better than they smell. There is nothing like a fresh, warm scone drowning in butter… unless it’s a fresh warm scone drowning in butter, served with a cup of tea. My idea of Heaven involves both those things. It also involves   ice cream, whipped cream and Morgan Freeman and Ed Harris hand feeding me peeled grapes but that’s another story.

Ham, Cheddar And Herb Scones

  • 3 cups bread flour
  • 1 tablespoon sugar
  • 2 tablespoons baking powder
  • 1/2 teaspoon salt
  • 2 1/2 cups heavy cream
  • 1 cup diced ham
  • 1 cup shredded sharp cheddar cheese plus more for sprinkling on top
  • 1/2 cup sliced green onions
  • 1 tablespoon dried dill weed
  • 1/4 teaspoon garlic powder
  1. Grease the bottom of a nine or ten inch round cake pan. Preheat oven to 350.
  2. Stir together the flour, salt, baking powder, dill weed and garlic powder.
  3. Make a well in the center and pour in the ham, cheddar cheese and green onions. Mix lightly.
  4. Pour in the cream and using a wooden spoon, stir the dough just until evenly moistened and you have no dry flour left in the bottom of the bowl.
  5. Pat the dough down evenly into the prepared cake pan.
  6. Score them almost all the way through into 8 to ten wedges
  7. Bake at 350 degrees until the top is a nice golden brown and a wooden skewer comes out clean. When done, turn the oven off and sprinkle a little bit (or a lot) more cheese on the top of the scones. Put back in the oven just long enough to melt the cheese.
  8. Turn out of pan onto a wire rack and let cool at least ten minutes before cutting. Cut the scones into wedges using the score marks as your guide.
  9. Serve warm with butter. These can be reheated by nuking for about 20 seconds.


Print Friendly and PDF

Caramel Apple Snack Cake

Caramel Apple Snack Cake-001

…Or dessert cake, or breakfast cake, or eat this when the kids aren’t looking cake, or late night snack cake or..well, you get the idea. I mean it has apples in it so it can be for ANY meal, right? So what if the apples are really a can of pie filling and they are surrounded by ooey gooey bits of caramel!

I know I’ve mentioned before that I have never been one to cook by the seasons. If I want Pumpkin Bread in July, I’m having pumpkin bread. If I want to grill out in January, I grill out. Hey, I never claimed sanity. So when I decided to make something appley  (what? Appley is a word… honest it is!) for my husband because he loves apple desserts, I didn’t give a darn that according to blogger standards, the time for apple desserts is in the Autumn. I’m a rebel! A rebel I say!!! Or something like that.

Right away,  I knew what I wanted to do. I have a recipe from Food.com that I use often for Chocolate Covered Cherry bars  that my husband loves. So I played around with it and changed it to apple. I then added a healthy disgustingly large dose of caramel and a bag of cinnamon chips. I have to admit, this is really good. Not fancy by any means but so darn yummy! It’s moist, filled with apples and caramel and cinnamon chips. The edges are slightly crispy and sticky from the caramel and you never get the same bite twice. this one has apples, this one caramel, this one both and so on. This is a great family dessert and one I know I’ll be making again…probably tomorrow 😀

Caramel Apple Snack Cake

  • 3/4 cups butter, room temp
  • 2 eggs
  • 1/2 cup sugar
  • 1/4 cup brown sugar
  • 2 teaspoons vanilla extract
  • 2 cups flour
  • 1 teaspoon baking soda
  • 1 can apple pie filling
  • 1 bag cinnamon chips
  • 1 bag caramels, cut into quarters
  1. Preheat oven to 350 degrees. Grease and then line a 13×9 inch pan with parchment paper. Grease the parchment paper well.
  2. In a large bowl, combine the butter, sugars, vanilla and eggs. beat well
  3. Combine the flour & baking soda in a small bowl. Combine with the butter mixture.
  4. Fold in the apple pie filling, cinnamon chips and caramel pieces.
  5. Spoon into the prepared pan. Bake at 350 for about 35 to 40 minutes or until top is nicely golden brown and a wooden skewer inserted in the middle comes out clean.
  6. This is good warm, served with ice cream or room temp..or cold..or frozen stiff..or boiling hot..or…or..or..


Print Friendly and PDF

Homey? Decadent? Homey? Decadent?

Maple Buttermilk Pudding Cake

Maple Buttermilk Pudding Cake


Usually those two words don’t go together. You have your decadent foods, which can be tasty and other times can be what some restaurants consider tasty but is actuality just snobby and the only thing decadent is the price. There are the truly decadent foods however that deserve the title and the love they get. Think Creme Brulee, Lobster and drawn butter, a thick porterhouse steak (ribeye in my case… would be on the menu for my last meal along with roasted brussel sprouts and seasoned potato wedges) All of those qualify as decadent in their way.

Then you have your homey comfort foods; the casseroles made with cream of emu soup that your mother made, the mac and cheese made with 14 pounds of velveeta and not a drop of real cheese in sight, the pot roast that your family had every Sunday,  the fried chicken that gramma made that you still can’t seem to duplicate no matter how many times you try. All oh so bad for you, half the time made with more sodium and fat than you need in a week, but sooo tasty, so comforting and simply reeking of hominess.

So I’m not sure what to call the dessert I made today. The same dessert btw, that I ate an entire serving of after photographing and that has made me now have absolutely no interest in eating dinner. Ummm…oops? Moving on though… I’m not sure what heading this one qualifies for. It’s a pudding cake, which is the very definition of a homey dessert. Yet it uses a butt ton of real maple syrup, which is decadent both in taste and price. And the flavor is both homey and comforting at the same time that it is rich and decadent.

I’m so confused!!! My taste buds don’t know what to think!!

So I’m just gonna give you the recipe and let you decide.  But be warned. This is one awesome dessert. I know, I know, all us bloggers say that. But this really is. I told my husband that this is now going on my list of favorite desserts. It is very rich… I mean, the bottom of this is literally just maple syrup and butter. And pretty? No; not so much. But there is something downright decadent AND homey about it and that’s not a mix you come across often with foods. The edges get all cripsy with caramelized syrup and the bottom is almost like a pancake drenched in syrup while the top is a light cake. I will be making this again…and again…and again.

This recipe originally came from Food and Wine. I barely changed it but did make a couple of very small alterations.

Maple Buttermilk Pudding Cake

  • 1 1/3 cups maple syrup (the real stuff, not Mrs. Butterworths and preferably Grade B as it’s darker and more mapley <yes, mapley is now a word; I said so.> )
  • 1/2 cup plus 3 tablespoons unsalted butter, room temp
  • 1 cup all purpose flour
  • 2 teaspoons baking powder
  • 1/2 teaspoon salt
  • 1/4 teaspoon nutmeg
  • 1/2 teaspoon cinnamon
  • 1 egg
  • 1 egg yolk
  • 1/3 cup buttermilk
  • 2 teaspoons vanilla extract
  • 2/3 cup sugar
  1. Preheat the oven to 350 degrees. Lightly butter and 8×8 pan then line it with parchment paper, then butter again.
  2. In a medium saucepan, boil the syrup until it is reduced down to about a  cup. And no, you can’t just start with a cup of syrup and skip the reducing. You get a more condensed flavor plus, when making pudding cakes, the textural differences are helped by having a hot layer mixed with a cold layer. When reduced, whisk in the 3 tablespoons butter and pour the mixture into the bottom of the prepared pan.
  3. In a small bowl, whisk together the flour, baking powder, salt, cinnamon and nutmeg.
  4. In ANOTHER (I know, I know but it’s worth the dishwashing later) bowl, whisk together the egg, egg yolk, buttermilk and vanilla.
  5. In another bowl (shush… just go get a bowl) beat the 1/2 cup butter with the sugar at medium speed until light and fluffy.
  6. At low speed, beat in the dry ingredients, alternating with the liquid in two batches.
  7. Dollop spoonfuls of the batter over the syrup. bake the pudding for about 35 minutes or until the top is golden brown with syrup all bubbly at the sides and a wooden skewer inserted in the middle comes out clean. Let stand for a few minutes before serving then scoop portions into a bowl and serve with a puddle of heavy cream or some creme fraiche.


Print Friendly and PDF

The Most Important Meal Of The Day

Blueberry Cornmeal Pancakes

Blueberry Cornmeal Pancakes


I always thought that was either dessert or cocktail time, but according to those in the know (who btw are the same ones we refer to when we say “they say”. Who ARE “they” anyway?! Should I be frightened? Wearing a tin foil hat? Anticipating uncomfortable probes and personal questions about my junk food habits?)

Sorry… had a “Ooo, shiny thing” moment there. Erhmmm, where was I? Oh yeah. According to those in the know, dessert really isn’t the most important meal of the day. Would you believe it’s not even considered a MEAL!? Obviously, “they” have never been in a room full of food bloggers. Supposedly, breakfast is the most important meal of the day. Fuels you for the rest of the day, stops you from eating too much later, blah blah blah. I still want chocolate cake. I don’t LIKE breakfast. When I get up, I just want a cup of strong tea and Pachebels Canon In D to wake me up soothingly. Otherwise, it’s not pretty.

I DO however like breakfast for dinner. Back in the day, when I was a waitress at Shoneys (many many moons ago) I used to love their breakfast buffet. Every Friday, Saturday and Sunday night at 10pm, down went the salad bar and up went the breakfast bar. Sausage, eggs, bacon, pancakes, those sliced strawberries in that neon red probably carcinogenic glaze…ahhh, fatty heaven on a plate.

So every once in a great while, I make my family Breakfast For Dinner (yes, you must capitalize those words. It’s the law. THAT’S how big a deal it is). It involves copious amounts of greasy meat, enough syrup to put an elephant into a diabetic coma, eggs, biscuits and pancakes. Gotta. Have.Pancakes. Also the law. Honest.

But today I didn’t want regular pancakes. So I looked around and found one for Blueberry Cornmeal Pancakes in my King Arthur Whole grains Cookbook. But… it required whole wheat pastry flour. Not something I keep around and not something I was willing to buy just for this. So I looked around online and what I have here is an amalgamation of about 3 recipes. These are light and fluffy but with a slightly different texture due to the cornmeal and also with a nice blueberry tang as well as a touch of zip from the lemon zest. Add in a touch of cinnamon and some vanilla and the result was some darn yummy pancakes. So g’wan… get out the syrup.

Blueberry Cornmeal Pancakes

  • 1 1/4 cup flour
  • 3/4 cup cornmeal (NOT cornmeal mix, just plain cornmeal)
  • 1 teaspoon salt
  • 1 1/2 teaspoon baking powder
  • 3/4 teaspoon baking soda
  • 1 tablespoon sugar
  • 3 eggs, separated
  • zest from one lemon
  • 1 1/2 teaspoons vanilla extract
  • 1 teaspoon cinnamon (more or less to taste)
  • 2 cups buttermilk
  • 3 tablespoons melted butter
  • 1 6 ounce container fresh blueberries, rinsed and gently patted dry
  1. In a large bowl, mix the dry ingredients together.
  2. Beat the egg yolks until well mixed then add the buttermilk to them. Add the melted butter, vanilla and lemon zest.
  3. Pour the wet ingredients into the bowl of dry ingredients.
  4. Beat the egg whites until stiff then fold into the flour mixture.
  5. Gently fold in the blueberries.
  6. Cook the pancakes until they are golden brown on both sides on a hot griddle that you liberally greased with butter.


Print Friendly and PDF

Playing Favorites

Almond Pecan Praline Bread

Almond Pecan Praline Bread


You know how your parents always said that they didn’t have any favorites among their kids and they loved you all equally? They lied. We ALL play favorites. Not intentionally, not maliciously, but we do it anyway. It’s human nature. With people (your kids or whoever), you can love them all just as MUCH, but there are always people you click with differently..better..on a deeper level somehow. That’s the same reason you end up with a spouse or partner. You…just…click.

It’s no different with foods. Everyone has favorites. Foods or flavors that just click with you. Most of us (the normal ones anyway) love chocolate and will use any excuse to eat it. Others love vanilla anything. Put something with lemon or other citrus in front of yet another person and they will devour it. What’s one of mine? Other than all of the above lol?

Almond. Not so much the actual nut To me, they tend to be rather flavorless and I don’t like the texture, though slivered or sliced and toasted is a whole different story. but no, I mean things flavored with almonds. be it almond extract, almond paste, almond filling, marzipan, whatever, I absolutely love anything with almond flavoring. And I add it to as many things as I can think of that it will go with.

One of almonds favorite places to call home is in my stomach in baked goods. Cookies, yeast breads, coffee cakes, muffins and on and on. It’s yummy in all of them. My favorite way is in a quick bread. We love quick breads here anyway (keep my husband away from my Chocolate Chip Banana Bread or nobody else will get any.) so making one with almond flavoring in it was a natural for me. But I couldn’t leave well enough alone and added some praline pecans to this one.

This is just a basic quick bread. The fun comes from the almond flavoring and the pecans. They totally make this bread. Spread this bread, still slightly warm from the oven, with raspberry, cherry or apricot jam and you will be in heaven. Those fruits are so complementary to almond. This is great for dessert, breakfast, a snack or just cause you’re darn cute and deserve a slice or twelve.

Almond Pecan Praline Bread With An Almond Glaze

  • 3 cups flour
  • 1/2 teaspoon salt
  • 1 1/2 teaspoons baking powder
  • 2 14 cups sugar
  • 1 1/4 cups vegetable (or canola) oil
  • 1 1/2 cups milk
  • 2 teaspoons almond extract
  • 2 teaspoons vanilla extract
  • 6 ounces praline pecans
  • GLAZE-
  • 1 cup powdered sugar
  • 1 teaspoon almond extract
  • 3 tablespoons milk (more or less as needed to make drizzling consistency)
  1. Grease and flour 5 mini loaf pans. You can also use cooking spray. Preheat oven to 350 degrees.
  2. In a large bowl, mix together all your dry ingredients, except for the pecans
  3. In another bowl or a large measuring cup, combine your wet ingredients.
  4. Make a well in the middle of the dry ingredients and dump in the wet ones.
  5. Mix JUST until combined. As I’ve said before, don’t overbeat quick breads and muffins. You will end up with tough tunneled bread.
  6. Fold in the pecans, then spoon or scoop the batter into the prepared pans.
  7. Bake at 350 until golden brown and a skewer inserted into the middle comes out clean.
  8. Let cool in pans on wire rack for about ten minutes if you plan on then turning them out or just leave them in the pan on the rack until completely cool if giving them away… though I’m not sure why you’d do that.
  9. To make the glaze, just combine everything in a small bowl. Drizzle it over the cooled breads.
  10. Eat. Say Yum!


Print Friendly and PDF

Now It’sThai(m) For Something Completely Different


I'm never going to be a world class photographer but what my photos don't show is that the food I make is darn good :-)

I’m never going to be a world class photographer but what my photos don’t show is that the food I make is darn good 🙂

Sorry. I couldn’t help myself there. I managed to find a way to mix one of my favorite shows (Monty Python) with a really really… no, I mean REALLY bad pun based on one of my favorites types of food.

It was “snack night” here in the Cupcakes household. We have that far more often than I’d like to admit to. But most of you can probably identify with it. You have every intention of cooking but this pesky thing called life gets in the way. Today life meant Wal Mart. Jordans homebound teacher was here and then we had to go to Wal-Mart to get his meds so by the time we got home, it was too late to make the wings I had planned on making. So frozen pizza came to the rescue. The problem with that is that while the guys like frozen pizza, I’m not a fan. Not of it or of fast food which is the other snack night staple. So I usually end up making myself a Lean Cuisine; preferably Salmon With Basil or eating junk food which I know is bad for me.

But tonight at Wally World, I saw a reduced chub of ground turkey that was calling to me, saying “Janet… Jannnnnetttttt, take me homeeeeee. Cook meeeeee… you know you want meeeee.” I wasn’t sure whether to be frightened or aroused so I grabbed it and hid it in the cart under the Oreos. Then came figuring out what to do with it. As hubby and I walked to the car (God; I once said I would never refer to my husband in print as “hubby” and look at me. How the mighty have fallen.) I was reeling off possible ingredients to use to make meatballs from it, at which point he told me he hated me because I was able to visualize a dish in my mind without a recipe whereas he can barely do that WITH a recipe. I don’t think he was appeased when I said that maybe I could do that, but I sure couldn’t chop wood the way HE could. Go figure.

So in the end, I decided to try to make a version of sauced Thai meatballs from it. If I do say so myself, it turned out pretty darn good. The eating parties were torn only about whether I should omit the lime zest from the sauce with me saying it needed to go and my husband saying it was yummy as it was. So I’m going to put the lime zest as optional. All in all though, I was pleased with these. The meatballs were tender and flavorful; the sauce was sweet, hot, sour and salty all in one, which is a combo that can’t be beat. How authentically Thai they are I couldn’t tell you. Call them Americanized Thai. Whatever you call them, try them. They’re yummy! Now to see if I can remember the ingredients correctly hehe.

Saucy Thai Turkey Meatballs

      • MEATBALLS-
      • 1 pound ground turkey
      • 3/4 cup panko bread crumbs
      • 1 egg yolk
      • 2 green onions, finely minced
      • 1 stalk celery, finely minced
      • 1 1/2 tablespoons sesame oil
      • 2 tablespoons sesame seeds
      • 2 cloves minced garlic
      • 1 teaspoon ground ginger
      • 1 teaspoon salt or to taste
      • 2 tablespoons Spice Hunters Thai Seasoning Blend (I wish I could give some sub if you don’t have it but it has some ingredients not readily available at the grocery store. Just trust me and go buy some. This stuff has SO many uses it’s worth getting some just because)
      • 1 teaspoon fish sauce (Nam Pla… you can’t taste the fishiness. I promise)
      • 2 teaspoons orange zest
      • 1/4 cup Thai Sweet Chili Sauce
      • SAUCE-
      • 1/4 cup honey
      • 1/4 cup hoisin sauce
      • 3 tablespoons soy sauce
      • 2 cloves minced garlic
      • 1 teaspoon fish sauce
      • 1 teaspoon grated lime zest (optional)
      • 1 teaspoon grated orange zest
      • 1/4 cup sweet Thai chili sauce
  1. Meatballs- easy peasy, all those other weird ways of saying it doesn’t take much to do this. Preheat oven to 375 degrees and Just get a large mixing bowl and using your hands or a large wooden spoon if you’re squeamish, mix everything together.
  2. Shape into golf ball sized meatballs (you can do them smaller, but this is what I chose. I got 14 meatballs out of this) and put onto a foil lined, greased baking sheet.
  3. Bake at 350 for about 25 minutes or until an instant read thermometer stuck into one reads at about 160 degrees. If you remember, turn them once during cooking so they brown evenly. If you don’t it isn’t that big of a deal.
  4. Sauce- while meatballs cook, prepare your sauce.
  5. In a medium saucepan, combine all sauce ingredients. While stirring, bring to a boil. Turn off and remove from heat..
  6. When  sauce is done, you have the option of straining it to get rid of the garlic pieces. Personal choice. I wanted it smoother looking so I did but if you really want the little bits of garlic and don’t mind the look of them, keep them in there. Otherwise, strain through a fine mesh strainer. Then set side until the meatballs are done.
  7. When meatballs are done, toss them GENTLY in the sauce.  Sprinkle with more minced green onions and sesame seeds.Serve over a bed of rice (preferably Basmati) or rice noodles.


Print Friendly and PDF

Best.Brownies.Ever

Cocoa Brownies With Browned Butter And A Raspberry Swirl

Cocoa Brownies With Browned Butter And A Raspberry Swirl

Now you all know me. I am not prone to rhapsodizing foods as the “best ever” (suddenly hopes that there are no posts I’m forgetting that say something is the best ever). That of course doesn’t count Cheetos and Twinkies *has a moment of silence for Twinkies…as I do each day*

But these brownies really are the best ever. At least the best I’VE had. And c’mon folks, I’m 48 years old… that’s a lot of brownie eating years to cover. I’ve had boxed prepackaged brownies, Little Debbie brownies (to which I admit having a soft spot for even though I am fairly sure that there is not even ONE real food in them), mix brownies, so called gourmet brownies, burned to a crisp brownies (don’t ask… it wasn’t pretty.) brownies made with chopped chocolate, brownies made with cocoa, blondies, brownies red headed step child and so on and so forth. I’ve eaten a lot of brownies.

I was always convinced that I preferred ones made with unsweetened chocolate blocks or something like that as opposed to ones made with cocoa. I’m not sure why really; just that the one seemed richer than the other I guess and in my mind, that equated to better brownies. So when I first saw this recipe, I wasn’t sure about them since they use cocoa powder. But the idea of using browned butter intrigued me and man oh man, am I ever glad I did. These are hands down my favorite brownie now. And my husband agrees with me. I don’t count the kids because they’re kids… they would eat chocolate flavored cat littler if I served it. But yes, they liked these too. The ones here count as the third time I’ve made them since before Christmas. Point there being that this time, I was ready to experiment a bit beyond the regular recipe. Not much however. Just added about 1/3 of a cup of raspberry preserves to them (swirled on) before baking and I didn’t use the walnuts this time. But I would seriously suggest making these plain and as per the recipe the first time. One, just to get the hang of it, two, to enjoy these in all their pure chocolatey goodness. After that though, this recipes would lend itself to many variations… and I plan on trying them many ways hehe

Another wonderful thing about this recipe? You don’t need a bowl. This all gets mixed right in the saucepan. Can’t beat that… amazing taste AND easy.

Cocoa Brownies With Browned Butter And A Raspberry Swirl

  • 10 tablespoons unsalted butter
  • 1 1/4 cups sugar
  • 3/4 cup unsweetened powder (NOT drink mix)
  • 1 1/2 teaspoon vanilla extract
  • 1/4 teaspoon salt
  • 1 1/2 teaspoons instant coffee (optional; my addition. You can’t taste it, it just rounds out the chocolate flavor)
  • 2 teaspoons water
  • 2 large eggs, cold from the fridge
  • 1/3 cup plus 1 tablespoon flour
  • 1 cup walnut pieces
  • 1/3 cup raspberry preserves or jam (optional)
  1. Position oven rack in the bottom third of oven and preheat to 325 degrees.
  2. Lightly butter an 8×8 square baking pan and then line with parchment paper. Lightly butter the paper or spray with cooking spray.
  3. Melt the butter in a medium saucepan over medium heat. Cook until the butter isn’t foaming anymore and there are browned bits on the bottom of the pan. Stir often and keep an eye on this. It can go from lovely browned butter to a smelly burned mess in no time flat. This will probably take about 5 minutes or so.
  4. Remove from the heat and immediately add in the cocoa, sugar, water, vanilla and salt. Stir well.
  5. Let cool five minutes. Add the cold eggs to the hot mixture, one at a time, beating well (by hand) after each addition. When the mixture is thick and glossy, add in the flour. Beat for 60 strokes.  I won’t tell anyone however if you do it 61 or even 59. It’s ok. We’re a flexible crowd.
  6. Stir in nuts if using. Spread batter into the prepared pan. This would be the time to swirl in jam if you wanted to do that.
  7. Bake at 325 for about 25 minutes or until a skewer inserted in the center comes out almost, but not quite, clean. Cool the pan on a rack then lift out by the edges of the paper. Cut into 16 squares. Or just leave it in the pan, ladle whipped cream on top, get a spoon and get gloriously ill. Your choice.

Simple Doesn’t Always Mean Simplistic

Fudgy Brownies With Peanut Butter Mousse

I may have ranted mentioned before my irritation with people who are constantly talking about how they would never do this or never do that or “omg, how can you USE this when you cook?!” when it comes to cooking and ingredients. You know the ones I am talking about? The who claim that a preservative has never ever passed their lips, that everything they cook with, feed their family and/or eat is organic, humanely raised, home made down to growing the ingredients themselves, even the wheat. And God forbid they were to ever eat something made with a prepackaged mix. Mind you, these are also the same people who, were a world crisis to happen, would be the first to uphold all of Darwins theories about survival of the fittest because they are too entrenched in one way of cooking and eating. Though, mind you, I am personally convinced that 98% of them frequently hide in their closets and eat Hershey bar or Little Debbie snack cakes, but I’ll admit that I may be projecting a bit there 😛 The other 2 percent just scare me.

But the people who supposedly live by this credo would be missing out when it comes to these brownies. Why? because they are made with *GASPS LOUDLY* a boxed mix. The recipe comes from one of those Pillsbury monthly books. I used to buy them all the time and I have had this one for over 20 years. I’m not even sure they make these cookbooks anymore actually which is a shame because they helped me a LOT in my early years of cooking for a family.

When I first decided to use this recipe, I considered improvising and using a homemade brownie recipe for the base of these. It was a case of wanting to look good and not wanting readers or other bloggers to roll their eyes at me. But then I remembered that when I MADE this blog, one of the things I promised myself and any readers I would get in the future was that I would NOT be someone full of pretense. I would blog the way I cooked. And while I rarely use boxed brownie mix, it has been known to be made in my household. It’s easy, they taste good, it’s a good way to get kids into cooking and it’s quick.

Many of you know that I’m not a peanut butter fan for the most part. But every once in a while I still use it because my family enjoys it. And I have to admit… I really really like these. The brownie is nice and chewy and the creamy topping is rich with a slight tang from the cream cheese. Add in the ganache topping and I would happily wager that they could convert many a boxed mix hater (and peanut butter hater like me). There is nothing about these that screams “boxed mix”. They are also pretty darn attractive and would make a good addition to any cookie tray, be it for the holidays or a Summer bbq… whatever. So go on… go buy a box of brownie mix. G’wan.

Fudgy Brownies With A Creamy Peanut Butter Mousse

  • One box brownie mix, batter prepared according to directions (or make homemade if the spirit moves you)
  • 1 package peanut butter chips, 1/2 cup reserved
  • 3 cups powdered sugar
  • 1/2 cup creamy peanut butter
  • 1/4 cup unsalted butter, softened
  • 4 ounces cream cheese, softened
  • 3 tablespoons milk or cream
  • GANACHE-
  • 6 ounces semi sweet chocolate chips
  • 3/4 cup cream
  1. Preheat oven to 350 degrees. Butter a 13×9 baking pan. Line it with parchment paper then butter the bottom only of the paper. Trust me… use the paper. it’s not expensive and it will be nearly impossibly to get the brownies out neatly otherwise.
  2. Prepare brownie mix according to package directions, stirring the peanut butter chips into the batter (not the reserved 1/2 cup)
  3. Bake according to box directions, using the lowest cookie times so the brownies are fudgy and not hard. (I’m not putting specific times here because different brands may call for different times)
  4. Cool in pan set on wire rack until completely cooled.
  5. When cool, make the mousse. In a large bowl, combine the peanut butter, the butter and the cream cheese. Mix until smooth and creamy. Slowly add in the powdered sugar. beat until you have a spreadable creamy mixture. Eat a few spoonfuls hehe.
  6. Spread the mousse mixture over the top of the brownies.
  7. Refrigerate while you make the ganache.
  8. To make the ganache,  put the semi sweet chocolate in a small bowl. Scald your cream then pour it over the chips. Let it sit for about 3 minutes or so then stir. the heat should have melted the chips quite nicely. Stir until smooth and shiny.
  9. Let the ganache come to room temp. Do NOT pour over the mousse when warm or you’ll melt the mousse.
  10. When it’s at room temp, slowly pour the ganache over the peanut butter mousse. Use it all. When it’s poured, refrigerate the pan to let the ganache set up.
  11. When chilled, cut into squares… or circles… or hexagons if that makes you happy.

Print Friendly and PDF

Reinventing The Wheel

And what a lovely reinvention it was. This is one that I know a lot of you have seen all over the ‘net but yep, it was MY turn darn it! I’m all for fair play and cool stuff like that. Except in Yahtzee. I’ve been known to turn the die to whatever number I needed when my opponent wasn’t looking. But that will be our little secret, right? That and that I may or may not have  added a few extra children pegs once when I played “Life”. Like I of all people needed to add more kids, considering I have six in real life, huh?

Like I said, this has been all over the ‘net. But as far as I can tell, the first place it showed up was on the blog Six Sisters Stuff . I love their blog. Good homey food, a close knit family and did I mention the good homey food? So I wanted to give the credit there since theirs was the oldest recipe I could find.

I did these almost exactly like theirs with the only change being that I added quite a bit more spice. If you know me, you already knew that was coming though. I about tripled the cinnamon and also added some ginger and cloves to the flour mixture and used butter instead of margarine. I also didn’t chill the dough. Not sure if that was the reason my cookies never flattened out. They stayed in balls. Mind you, they still tasted awesome but they were cakier. Could also be I didn’t measure my flour well enough. Again though, they were still good. I think next time however, I will do these the typical snickerdoodle way and use just baking soda and cream of tartar as the leavening and see if that makes them flatter and chewier. 😀 Most of the dough got frozen to make closer to Christmas so we’ll see if that makes a difference in the final product. But if you still aren’t ready to give up Pumpkin, this is a good one to try.

Pumpkin Snickerdoodles

  • 1/2 cup unsalted butter, room temp (or margarine)
  • 1/2 cup shortening
  • 1 cup sugar
  • 1/2 cup light brown sugar
  • 3/4 cup pumpkin puree
  • 1 egg
  • 3 1/4 cups flour
  • 2 teaspoons baking powder
  • 1 teaspoon baking soda
  • 1/2 teaspoon salt
  • 1 1/2 teaspoons cinnamon (original was 1/2 teaspoon)
  • 1/2 teaspoon ginger (optional-my addition)
  • 1/2 teaspoon cloves ( optional-my addition)
  1. Preheat oven to 400 degrees.
  2. In a large bowl, mix together the butter, shortening, sugars, pumpkin and egg. Beat until light and fluffy.
  3. In a small bowl, combine the dry ingredients and then mix into the wet ones. Beat until well blended.
  4. Chill the dough for about 30 minutes, then shape into small balls.
  5. In a bowl, combine about 1/2 cup of sugar with 1/2 teaspoon cinnamon and 1/4 teaspoon ginger (more or less according to taste.. I of course used more hehe)
  6. Roll the balls in the sugar mix then place on ungreased cookie sheets. Bake at 400 degrees for 7 to 9 minutes, or until light brown and set but not hard.
  7. Let cool in pan for a minute or so, then finish cooling on a rack.

Print Friendly and PDF

Oh SNAP! Gingersnap That Is

I’ve never understood that phrase. But then again, I’m old and don’t get a lot of the lingo from say, the past 20 years or so. I like to delude myself and say “self… it’s not that you’re out of touch and totally backwards like your kids (and everyone else who knows you) say. Honest, it isn’t. It’s just that you have been far too busy with motherhood, doing good works to save the world, writing the “Great American Novel” and raising awareness of causes like “Save The One Toed Green Eyed Purple Sloth” (that cause failed btw… all the one toed green eyed purple sloths are gone now) to worry about mundane things like hip phrases (does anyone use the word hip now or did I just verify my…well… unhipness?)”

The above could be why my older brother Steve, who was always far less cool and with it than I, had to explain to me what the letters LFMF meant (means “Learn From My Fail” for you other backward folk). He, in his doddering old age, knew more than I, in my youthful hipness… or is that hippiness in my case? Gotta cut down on the cookies. Oh well.

I mentioned before that every year I make cookies. More cookies than can be eaten by a small country. I make some of the same every year and some new ones every year, which might or might not go into the yearly traditions. Well, one that has been in there for about 20 years now are gingersnaps. WAIT A MINUTE! Get back here! This is NOT like those completely disgusting ones that you get in bags at the supermarket. I hate those myself. But I always liked the IDEA of them which is why I tried these years back. Verdict? They’re fantastic. These are chewy, full of the spices that just scream Christmas (no.. really… they do. Spices talk to you too don’t they?) and one that always disappears from my cookie tray at Christmas. That may or may not be due to my oldest son and I hogging them but I prefer to think that everyone gets their fair share. HA! Yeah right. Back away from the Gingersnaps.

Chewy Gingersnaps

  • 1 cup sugar
  • 3/4 cup unsalted butter, softened
  • 1/4 cup molasses
  • 1 egg
  • 2 1/4 cups flour
  • 2 teaspoons baking soda
  • 1 teaspoon cinnamon (I tend to go far heavier on the spices)
  • 1/2 teaspoon ginger
  • 1/2 teaspoon cloves
  • 1/4 teaspoon nutmeg
  • 1/2 teaspoon salt
  • 1/4 cup sugar
  • 1 teaspoon cinnamon
  1. In a large bowl, beat together the butter, sugar, molasses and egg.
  2. In a small bowl, mix together the flour, baking soda, salt and all spices other than the last teaspoon of cinnamon (and the last 1/4 cup sugar)
  3. Mix the dry ingredients into the wet ones.
  4. Wrap the dough in plastic wrap and refrigerate for about an hour (can be frozen at this point for later use) to firm it up.
  5. When chilled, preheat oven to 350 degrees.
  6. Shape dough into mediumish (about 1 inch) balls. Combine the sugar and cinnamon in a small bowl then roll each cookie ball in it.
  7. Bake at 350 degrees for about 10 minutes ( I make my cookies a bit bigger. If you do, just remember to increase your cooking time). They will puff up at first, then flatten out. Generally speaking, about a minute after they flatten out in the oven is when they are done. They should be firm and set on the top but not crispy looking.
  8. Cool for about a minute on the pan then transfer to a wire rack to finish cooling. Make sure to eat one, two… awww, what the heck, make it 12, while still warm. I won’t judge.


Print Friendly and PDF