Berry Peachy Sangria

Berry Peachy Sangria

Berry Peachy Sangria

Someday we will actually get Summer weather here. Is it just here that has had extremely strange weather? I know I brought this up before but man, it’s freaky! Kentucky in June should NOT have rain and temps in the low 70’s. We should be sweltering even with the A/C on and lying buck naked in swimming pools while drinking fun drinks…. ummm, not public pools, people. And no, not me. I don’t want to scar psyches for life.

BUT…! I’m preparing for Summer. I’ve mentioned before that I’m not a huge alcohol person. Been there, done that in my younger wilder days. But I do like some softer hard drinks. Honest, that really does make sense. That means I’ll drink a wine cooler type thing or regular wine. Sometimes I even have the hard stuff but not often because I end up a giggling fool within two sips. With the softer stuff, it takes at least 4 sips.

One thing I love is Sangria. I remember drinking the bottled cheap stuff in my younger days and it was even pretty good. But I decided I wanted to play with something homemade and made with white wine rather than red. This took about 90 seconds to throw together and I’m kind of proud of it since it DID take 90 seconds and it was all done on a whim. The Peach Schnapps adds a bit of bite but you can’t taste it as alcohol per se just a peachy flavor so be careful. Then the sweet sparkling wine and the Sprite and the fruit… well, suffice it to say that this comes together nicely. It can pack a punch though if you’re not a drinker so like I said, be ready. This has a full bottle of wine plus a cup of schnapps but all you taste is a wonderful peach taste.

You know the drill. Get to cookin’…erhmmm, pouring.
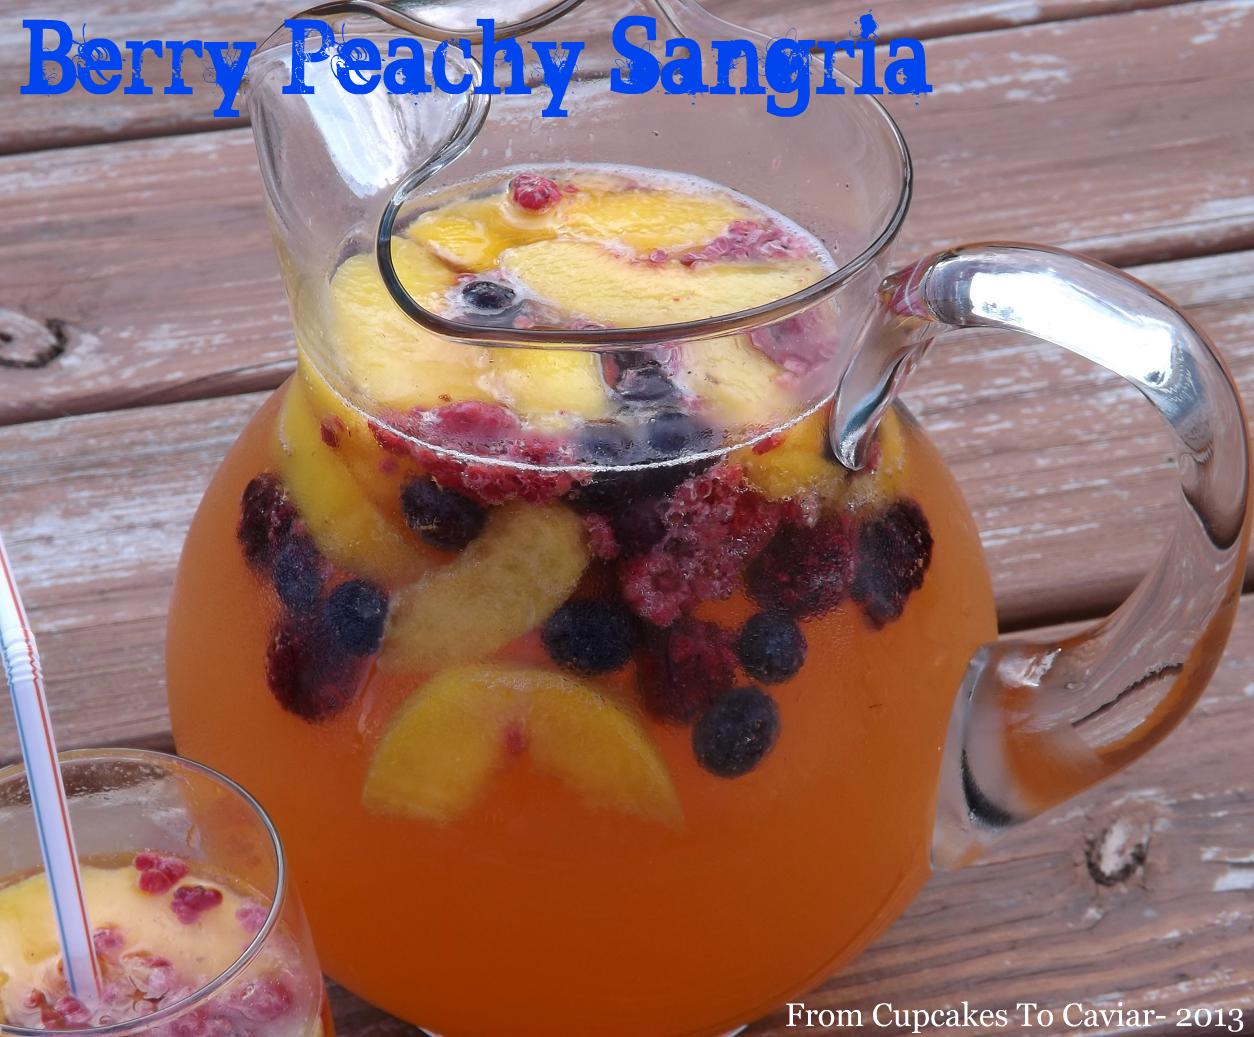
Berry Peach Sangria

  • 1 750 ml bottle of Moscato wine (you could use a white zin if you prefer- just don’t use a dry wine or this will be too tart)
  • 1 cup peach schnapps
  • 1 can peach nectar (can be found in the grocery store in the ethnic aisle usually)
  • 3 cups Sprite or 7-up
  • 1 cup frozen peaches
  • 1 cup frozen mixed berries
  1. Drop your frozen fruit down into the bottom of your pitcher. Pour the peach nectar over, then the schnapps, Then slowly pour in the wine and follow up with the soda. Give it all a gentle stir. You can serve immediately or refrigerate it to let the flavors blend. I suggest letting it sit. It was good right after being made but it was outstanding an hour later when it blended.
  2. See how easy that was? I just added this direction because I felt stupid only having one direction up.

Copyright Notice: From Cupcakes To Caviar images and original content are copyright protected. Please do not publish these materials anywhere without prior permission.


Peanut Butter & Jelly Chocolate Whoopie Pies

Peanut Butter & Jelly Chocolate Whoopie Pies

Peanut Butter & Jelly Chocolate Whoopie Pies


I have mentioned more than once that generally speaking, I don’t care for peanut butter. never have, never will. Strangely, while five of my six kids like peanut butter, one of my sons has never liked it either. That is so weird to me! You don’t think of food liking as being in any way genetic, but with six kids, I have learned that they really do seem to be in some cases. That same son hated bananas for many years. His father, whom he hadn’t lived with since an extremely young age, also hated bananas. Go figure.

But every once in a while, I get a strange (strange because well… I don’t LIKE pb so it’s akin to a rabid vegetarian suddenly craving steak tartare) craving for something peanut buttery. Usually I just have a peanut butter sandwich and that’s that; I’m done for 6 months or so. But today I was working on a blog post anyway. It was supposed to be chocolate whoopie pies with chocolate filling (I hear some of you sobbing out there because I changed it lol) but the peanut butter and jelly sandwich craving hit (twice a year, like clockwork πŸ˜› ) and my 4 watt mental light bulb went off and I thought to myself “self ( I call myself self when I’m not calling myself somewhat obscene names), why not make a peanut butter filling for these instead?! The you can use that bag of mini reeses cups you bought and never ate!” Then I had another flash of brilliance and decided to add some raspberry jam in them pies. Raspberry goes well in PB&J sandwiches and it definitely goes well with chocolate so… voila, Peanut Butter & Jelly Chocolate Whoopie Pies were born. Well, born in my household anyway. I’m sure that at some point they were born somewhere else already lol.

I then congratulated myself for being a genius, made myself a cup of tea and had some chocolate as a reward for being so brilliant and got started. The end result is pretty yummy if I do say so myself. Mind you, my whoopie pies aren’t flat and tiny like most. Why you ask? Because I’m lazy. It was much easier to put the cookie batter in my muffin top pan than to spoon out each individual cookie and make sure it was shaped nicely. The benefits of this is that you also get these cool crispy edges as well as some HUGE arse whoopie pies hehe. But I will write the directions as written in the cookbook (aptly called “Whoopie Pies” by Sarah Billingsly). Just know that you CAN do these in a muffin top pan too. You’ll just get less but bigger pies and they will be thicker.

You know the drill… get to cookin’!

Peanut Butter & Jelly Chocolate Whoopie Pies

  • Whoopie Pie-
  • 1 2/3 cup flour
  • 2/3 cup unsweetened cocoa powder
  • 1 1/2 teaspoons baking soda
  • 1/2 teaspoon salt
  • 4 tablespoons butter, room temp
  • 4 tablespoon shortening, room temp
  • 1 cup dark brown sugar, firmly packed
  • 1 egg
  • 1 teaspoon vanilla extract
  • 1 1/4 cup milk
  • Peanut Butter Filling-
  • 3/4 cup peanut butter (I used crunchy)
  • 6 tablespoons unsalted butter, room temp
  • 3/4 cup powdered sugar
  • about 1/3 cup raspberry jam (or whatever flavor you prefer)
  • 1 2.5 ounce bag mini Reeses Peanut Butter Cups (find at the check out lanes in the grocery store), each cup cut in half
  1. Preheat the oven to 375. Line 2 baking sheets with parchment paper.
  2. Sift together the flour, cocoa powder, baking soda and salt onto a large piece of waxed paper.
  3. In the bowl of a stand mixer (can use a hand mixer if you need to),  beat the butter, brown sugar and shortening on low speed until combined. Scrape down the sides of the bowl, increase the speed to medium and beat for about 2 minutes until smooth and creamy.
  4. Add the egg and vanilla extract and beat on low speed just until combined. Turn off and scrape down the bowl again. Add half of the flour mixture and half of the milk and beat on low until combined. Add the remainder of the flour and milk and again, beat on low until just combined.
  5. Spoon batter, about a tablespoon at a time, onto the prepared baking sheets. Bake for about 10 minutes at 375 degrees or until the cookies spring back when touched gently. Let them cool on the pan for about 5 minutes, then remove to a rack to cool completely.
  6. Make your filling- In a medium bowl, combine the peanut butter and butter. Beat at medium speed until smooth & creamy. Add in the powdered sugar and beat on low until combined, then turn the mixer up to medium and continue beating until it is creamy and fluffy looking.
  7. Fold in the chopped reeses cups.
  8. Spread a good sized dollop of the peanut butter filling on the flat side of half of the cooled cookies. Top with another good sized dollop of jam. Top each cookie with another of the unfilled cookies, flat side inwards. Magically, your cookies are no longer just cookies, but are now Whoopie Pies. Enjoy!! πŸ™‚

Copyright Notice: From Cupcakes To Caviar images and original content are copyright protected. Please do not publish these materials anywhere without prior permission.

Mascarpone Lemon Cheesecake & Berry Parfaits

Mascarpone lemon Cheesecake & berry Parfaits

Mascarpone lemon Cheesecake & Berry Parfaits


Wow, that recipe name was a mouthful. But I wanted to get the gist of it across. I could have just said cheesecake parfaits but beyond the fact that that sounds completely boring, it doesn’t talk about the mascarpone and we all know that mascarpone creates a totally different cheesecake and mouth feel (hehehehe… I said mouth feel…{insert Beavis and Butthead voice here } yes, I am really 12 years old ) than plain cream cheese so it needed mentioning. And of course you see the berries but you can’t SEE the lemon so I had to mention it too lol.

Other bloggers know how difficult it can be to come up with a name for something you’ve made if it doesn’t already have one. I have seen some that are so ridiculously long that it turns me off of even wanting to make the dish. Fictitious example- “Lamb Burgers With a Garlic Emu testicle Aioli, Caramelized And Bruleed Llama Toenails And  Sauteed Red peppers Served On A Tapioca Flour Spelt Bun On A Bed Of Spicy Arugala”. If you read recipes, you KNOW what I’m talking about there. Then on the other extreme you have ones that give you no idea of what it is. You’ll see a photo that obviously has a handful of different components but all it will say is “Llama Rice”. But…but…but…WAIT!!! I see what looks like pine nuts there and sparrow wings and dried fruit and and and isn’t that a brioche it’s resting in???

Thus why I tried to be somewhat concise here. Because Mascarpone No Bake Lemon Cheesecake With a Graham Cracker Crumble, Lemon Curd And Berries made me cringe as a title. And Lemon Cheesecake doesn’t do this justice.

I was quite proud of this when I tried the final dessert. I had already tried a bit 75 spoonsful of each separate part and they were all fantastic. I could and possibly do eat lemon curd as my dessert just off the spoon. I may have made a double batch for this dessert just so that I would have a lot of leftovers hehe. The cheesecake filling was simple yet tasted rich and creamy. The graham cracker crumble was a wonderful sweet textural counterpoint to the creaminess of the dessert. And the berries?? Well, they’re berries… in season…with raspberry jam. What else can I say? πŸ˜€

This comes together easily but it is a little time consuming as you are layering it all. It also makes enough for 12 servings so either make this for a large gathering (think cookout, pot luck or picnic) or cut it in half. Whatever you do, enjoy and… git to cookin’.

Mascarpone Lemon Cheesecake & Berry Parfaits

  • Cheesecake-
  • 1 8 ounce package cream cheese, room temp
  • 1 8 ounce package mascarpone cheese, room temp
  • 1 14 ounce can sweetened condensed milk
  • 1/4 cup fresh lemon juice
  • zest of one lemon
  • 1 teaspoon vanilla extract
  • Lemon Curd-
  • My recipe for lemon curd is here
  • Graham Cracker Crumble
  • 1 1/4 cups graham cracker crumbs
  • 1/4 cup sugar
  • 1/2 cup unsalted butter, melted
  • Berries-
  • 3 pints mixed berries (I used raspberries and blueberries)
  • 3 tablespoons raspberry jam (GOOD QUALITY)
  • 1 teaspoon orange zest


    1. Make your lemon curd first so that it can chill. When made, cover bowl and refrigerate for about 2 hours.
    2. Make the cheesecake which couldn’t be easier as this is no bake. In a medium bowl, combine the cream cheese and mascarpone cheese. Beat at medium high speed with a hand mixer until smooth and creamy. Pour in the condensed milk and beat until mixture is again smooth and creamy
    3. Add in the lemon juice, lemon zest and vanilla. Beat at low speed just until combined. Pour mixture into a tupperware-ish bowl and refrigerate for about 2 hours.
    4. Make your berries- In a medium bowl, combine the berries (make sure to pick off all the pesky leftover stems). Add in the jam (melt it a little and cool it if it is a very thick jam. You don’t want to have to stir so hard to mix that you crush all the berries) and stir to combine. Again, refrigerate for about 2 hours to give the flavors time to meld.
    5. Make your graham cracker crumble- Preheat oven to 350 degrees and line baking sheet with foil.
    6. In a small bowl, combine the graham cracker crumbs and sugar.
    7. Mix in the melted butter into the crumbs and stir well until is is all combined.
    8. Pour crumbs onto baking pan and bake at 350 for ten minutes or until the crumbs look dry and lightly toasted, stirring once halfway through cooking. Remove from oven and set aside to cool.
    9. When the other ingredients have chilled, get out 12 4 ounce glasses (4 ounce canning jars work well if you don’t have a lot of glasses and they come in handy with the current trend towards desserts in jars plus it makes them portable if taking them out of the house)
    10. Layer the ingredients in whatever order strikes your fancy. I did it with cheesecake filling, crumbs, lemon curd, berries and then repeated one time.
    11. Chill parfaits until serving time.

Copyright Notice: From Cupcakes To Caviar images and original content are copyright protected. Please do not publish these materials anywhere without prior permission.


Maple Creme Brulee For Two

Maple Creme Brulee

There are some things in life that can only be called dangerous and dangerous with good reason. Bungee jumping? Dangerous. I understand that whole adrenaline rush idea but jumping off of a 300 mile high surface into mid air connected to only a piece of frayed yarn (yeah yeah I may be exaggerating just a bit here but not much) isn’t my idea of a woohoo good time. Though I admit to a strange hankering to sky dive, which is the exact same thing, only from a moving plane this time. holding a plastic grocery bag over your hand and hoping it expands enough to keep you from becoming part of the scenery.

Race car driving? Dangerous. Again; I can see the appeal. Hell, I see people in my own town driving like bad versions of Mario Andretti and I’ve been known to have a lead foot at times when I am sure I am *ahem* not being watched she says tactfully.  But getting into a large chunk of metal with an engine that is about 2 inches in front of you and hoping that you can drive well enough to where said engine doesn’t end up in your lap whilst only being protected by a helmet and a body suit that is NOT made of titanium or something good like that? Yeah. Dangerous.

For me personally? Having a full bag of gummy candy near me? Dangerous. A pint of Haagen Dazs Sea Salt Caramel Gelato sitting in front of me? Dangerous. It will soon be empty and I will be smacking myself upside the head for being a glutton at the same time that I’m sticking my face down in the carton sucking up the last drips. Creme Brulee? Dangerous. Any flavor whatsoever. But this one was particularly so with my love of all things maple. Thank God that it only makes 2 servings. Because if it made more, I would have eaten more than the one I had. Creme Brulee is, contrary to what many think, an extremely easy dessert to make. It tastes like it took you all day but in reality if you can hold a whisk in your hand and separate eggs, you’re good to go. Just don’t eat this thinking it is low calorie. It’s more like enough calorie to keep you alive for say, a week. So as I always say… git to cookin’.

Maple Creme Brulee (For Two)

  • 3 egg yolks
  • 1 cup heavy cream
  • 1/3 cup maple syrup (the real thing, not Mrs. Butterworth)
  • 1/4 teaspoon maple flavoring (can be found with the vanilla extract in stores)
  • 1/8 teaspoon salt (USE the salt… it brings out flavor)
  • 2 to 3 tablespoons of either maple sugar or demarara sugar
  1. Preheat the oven to 300 degrees. Place 2 8 ounce ramekins or custard cups into an 8 or 9 inch square pan.
  2. In a large measuring cup (makes it easier to pour later), whisk together all the ingredients except the maple sugar. That will be your crackly topping later. Pour the liquid evenly between the two ramekins.
  3. Place the pan with the ramekins into the 300 degree oven then carefully pour very hot water into the pan to where it goes about halfway up the sides of the ramekins.
  4. Bake at 300 for about 45 minutes or until the top has only a slight jiggle in the very middle when you gently shake it.
  5. Take the ramekins out of the hot water so they don’t keep cooking and set them aside to cool to room temp, then place in the fridge until serving time.
  6. When ready to serve, sprinkle half the sugar onto each creme brulee and either use a kitchen torch or the broiler to caramelize the sugar. if doing it under the broiler, make sure your ramekins are broiler safe. Not all of them are.


Berry Mascarpone Cheesecake Bars

Mascarpone Berry Cheesecake Bars-001

I have decided to build an ark. Yep. An ark. Because I am pretty sure it is never ever going to stop raining here in my part of Kentucky. Usually here in mid May, we are hovering around the 80’s and already worrying about drought. This year however, it has rained almost every day for almost 2 weeks and the temp, while pleasant, is most certainly not hovering near the 80’s. Right now it’s 62.

But!!! Being me, I will not be filling my ark with two of every animal. Nope. Noah already did that and I don’t want to be a copycat. There will be animals of course. I’ll have monkeys. I like monkeys. And cats. And platypus for comic uses. But no elephants unless one of you wants to offer poop scooping services. And you’d darn well better believe I’m leaving mosquitoes behind. And centipedes. Those things ick me out. They have got to be the most prehistoric bug ever. If some director wanted to make a killer horror movie, he/she would only need to have a few scenes with centipedes crawling over the tied up heroine. *shivers*

So what will my ark be filled with? Duhhhh man, this is ME. What do YOU think? CANDY!! Twelve (why stop at two) of every kind of chocolate, lemonheads and of course my current craze, fruity gummi candy. I may also throw some cheetos on the ark just cause.

But, if you’re one of those weirdos who wants their fruit with no preservatives and actually *gasps* REAL, try these cheesecake bars. I based them off of the ubiquitous blackberry pie bars that you can find everywhere online, including right here on my blog . The pie bars originally came from The Pastry Queen cookbook. These cheesecake bars are based on that recipe. They use the same crust but the filling is changed up. These are quite yummy. The crust is sweet and buttery and the filling is creamy, tangy and sweet all at the same time. Plus- they have crumbs on top. Butter, fruit, mascarpone and crumbs. Need I say more? They couldn’t be any easier to make so you know the drill… get to cookin’!

Berry Mascarpone Cheesecake Bars

  • Crust and crumbs-
  • 3 cups flour
  • 1 1/2 cups sugar
  • 1/4 teaspoon salt
  • 1 1/2 cups unsalted butter, cold
  • Filling-
  • 4 eggs
  • 2 cups sugar
  • 1/2 cup sour cream
  • 8 ounces mascarpone cheese, room temp
  • 8 ounces cream cheese, room temp
  • 3/4 cup flour
  • 1/2 teaspoon almond extract
  •  1 1/2 teaspoons vanilla extract
  • 1 16 ounce bag frozen raspberries, thawed and drained well
  • 1 16 ounce bag frozen blackberries, thawed and drained well
  • Fresh berries to scatter on top (optional)
  1. Preheat oven to 350 degrees. Butter a 13×9 inch pan then line it with parchment paper and butter the paper.
  2. Combine the 3 cups flour, 1 1/2 cups sugar and the salt in a large bowl. Using a pastry blender, cut in the cold butter until the mixture resembles fine crumbs. Set aside 2 cups of the mixture. Press the rest into the bottom of the prepared pan.
  3. Bake crust at 350 degrees for about 15 minutes or until it is golden brown. Let rest while you prepare the filling.
  4. In a large bowl, using a hand mixer, together the mascarpone, cream cheese and sour cream. Add the sugar and beat just until well combined. Add the eggs, vanilla extract and almond extract and beat well. Mix in the flour. Gently fold in the drained berries.
  5. Spoon the mixture over the prepared crust. Sprinkle evenly with the crumbs that you held back earlier.
  6. Bake at 350 degrees about 55 minutes. You want the top to be firm but still to have a little jiggle in the center third of the bars, just like with any other cheesecake. The crumbly top will be a nice light golden brown. This will firm up as it cools so don’t overcook it.
  7. Let this cool for at LEAST an hour or so before cutting, but it’s preferable to cover it and let chill overnight. Use a sharp serrated knife that you’ve heated under hot water if you want to get clean cuts.

Double Ginger Citrus Pear Bread

Double Ginger Citrus Pear Bread

Double Ginger Citrus Pear Bread


I mentioned this bread on my facebook page a week or so ago when I gave the choice between it or scones. The scones won. πŸ˜› But I finally got around to making the bread yesterday.

I wish now that I’d waited until today to make it. Mother nature seems to be confused as to month and it’s rainy, chilly and totally ICK here right now. I think we MIGHT have made it up to 50 degrees. And while I know that that would still seem balmy to some in May and would have to me too had I stayed in my hometown of Chicago, here in Kentucky, high 40’s in May is COLD darn it! So having the oven on and baking sounds like a great idea.

I wasn’t sure about this bread when I first made it yesterday. You know how it goes… you make a quick bread, tell yourself to let it cool so it will slice better, then end up cutting it when it’s warm anyway because you just can’t resist. This however is one of those quick breads that NEEDS to meld for a day. yesterday, it seemed rather bland and boring and I wasn’t even sure I would blog about it. After sitting overnight however, I tried a piece and it was was quite good. It’s moist and dense; almost pound cakeish in texture, plus the ginger flavor is more pronounced as is the pear. Make sure though, that you use ripe flavorful pears in this.  And I think that next time I make this I will add about a 1/2 teaspoon of fresh nutmeg. It just needs a bit of spice.

Make sure you actually grease and flour your pan. With the pear and crystallized ginger in it, you’ll end up with parts sticking to the bottom if you just use cooking spray.

Double Ginger And Pear Quick Bread

  • 3 ripe pears, chopped (I left the peel on; your choice)
  • 3 tablespoon freshly grated ginger
  • 1/4 cup finely chopped crystallized ginger
  • 1/3 cup buttermilk
  • 1 tablespoon vanilla extract
  • 1 tablespoon lemon juice
  • zest of one lemon
  • zest of one orange
  • 2 cups flour
  • 1 teaspoon baking powder
  • 1/2 teaspoon baking soda
  • 1/4 teaspoon salt
  • 1/4 cup unsalted butter, room temp
  • 1/4 cup vegetable oil
  • 1 cup sugar
  • 2 eggs
  1. Preheat oven to 350 degrees. Grease and flour a nine inch loaf pan.
  2. Stir the pears, ginger and zests together in a small bowl.
  3. Mix together the buttermilk, vanilla and lemon juice in a measuring cup.
  4. In a medium bowl, mix your dry ingredients.
  5. In yet another bowl (I know I know πŸ˜› ) beat together your butter, oil and sugar. Beat in the eggs, one at a time, beating well after each.
  6. Add the flour mixture, alternating with the buttermilk mixture, beating on low speed, just until combined. Fold in the pear/ginger mixture.
  7. Pour the batter (it’s a fairly thick batter) into the prepared loaf pan.
  8. bake at 350 for about 50 to 60 minutes or until the top is a golden brown color, firm to the touch and a skewer inserted in the middle of the loaf comes out clean.
    Cool on a wire rack in the pan for about five minutes, then carefully run a knife around the edges to loosen. Turn out onto the rack to finish cooling.
  9. Now you can wrap it, wait a day and try it after flavors have blended or cut it now…but seriously, I advise the days wait. It’s delicious after the rest period πŸ™‚

Print Friendly and PDF

Sweet And Sour Pork

Sweet And Sour Pork-001

When I was young, my mom was a waitress. Heck, when I grew up, my mom was still a waitress. She was the typical divorced woman of her generation. She was undereducated yet street smart from years of living on the south side of Chicago. That in itself was rather a feat considering she was a child of the depression who grew up in very rural Alabama. She never had a “good” job but always managed to keep us fed. It may have been mayo sandwiches or ketchup sandwiches at times, but we ate. The restaurant she worked at for over 20 years was fairly popular and well known in the Chicago area. It was named the Tropical Hut and was known for it’s Polynesian food, which was a big thing back in the 60’s as people were expanding their foodie taste buds beyond burgers and baked potatoes. Thing is, other than a duck dish they had that I loved (we of course went there for every family event. Why do people do that anyway? Work someplace and then go back then when NOT working? :-P) the main food I recall from there was their club sandwich. Mom would bring it home cold at night to eat but half the time it ended up going to one or the other of us kids. I loved them.

Point being, when I was young, my main experience with food from other cultures was a club sandwich from a Polynesian restaurant in the Midwest. Go figure. While my taste buds have grown a bit more sophisticated as I’ve aged, I have to confess that I still love all the Americanized versions of Asian foods, from which some of the Polynesian foods can branch off. One that I love that you will never find on the menu of any authentic Chinese restaurant is Sweet & Sour Pork. Deep fried pork thrown together with an overly sweet yet tangy sauce with pineapple in it, then put on rice. Sounds rather gross, ehh? But in reality, it’s soooooo darn yummy. I mean, the words deep fried should tip you off right away. I’ve said before; you could probably deep fry a shoe and it would taste good.

This is the version I’ve been making for years. Authentic? Nope. Just mine. Though like I said, what is authentic with this dish ANYWAY? Back when I first started making it, I honestly didn’t even know there WAS such a thing as sweet and sour pork lol. I just took the sauce recipe from some meatballs I loved, chopped up some pork, battered it, fried it and thought it seemed Asian enough to deserve rice as the base. Isn’t it amazing what we come up with, thinking we are so original only to find out later (or sooner now that you can google a recipe in 3 seconds) that many others have been making it for years?

This is a good version, mine though it may be. Nothing weird, nothing unusual, fairly standard as it goes. But I wanted to post it for those who may be thinking that this is a hard dish to make. It’s not. If you can fry food and combine sauce ingredients, you can make Sweet And Sour Pork.

Sweet And Sour Pork

  • Batter-
  • 2 eggs 1 egg yolk
  • 3/4 cup cornstarch
  • 3/4 cup flour
  • 1/4 teaspoon baking powder
  • 1 cup milk
  • 2 teaspoons soy sauce
  • 3 pounds boneless pork loin, cubed into about 1 inch pieces
  • about 4 cups canola or vegetable oil, heated to 355 degrees
  • Sauce-
  • 1 20 ounce can pineapple chunks in juice, undrained
  • 1 8 ounce can pineapple chunks in juice, undrained
  • 1 cup brown sugar
  • 2 tablespoons cornstarch dissolved in 3 tablespoons water
  • 2 tablespoons soy sauce
  • 2/3 cup vinegar
  • 2/3 cup chopped green pepper
  • 2/3 cup chopped onion
  • 1/2 teaspoon red pepper flakes (optional)
  • 3 cups cooked rice (I like this served with Jasmine or Basmati but use your favorite)
  1. Start your sauce first- In a large pot, combine the pineapple with it’s juice, brown sugar, vinegar, soy sauce and cornstarch mixture. Bring to a boil, then cover, reduce the heat to low and simmer for about 15 minutes, stirring frequently.
  2. Add the green pepper and onions and simmer covered for another five minutes. Set aside and keep warm
  3. Start your oil heating while you prepare the batter, which is easy peasy.
  4. Combine the dry ingredients in a medium bowl. Whisk in the eggs, egg yolk, milk and soy sauce.
  5. While your oil heats (large pot), take about half the pork cubes and put them into the batter. Stir around to get them well coated.
  6. When the oil has reached 355 degrees, carefully toss in (make sure your hands are fairly close to the oil… tossing from far up because it seems safer actually isn’t. It will just make the oil splatter all over you.) pieces of the pork. Do about 12 pieces at a time. You don’t want to overcrowd or the oil temp drops and you end up with greasy pork.
  7. Cook for about 4 minutes or until a nice dark golden brown. You’ll probably have to stir them around to get both sides browned.
  8. Using a wide slotted spoon or even better, a metal skimmer, lift out your pork and lay in a paper towel lined bowl.
  9. Keep cooking until it’s all done then you can either toss it with the sauce or, as I prefer to do, serve all the components separately so everyone can fix it the way they like it. Like here, my daughter loves a lot of sauce, I prefer less.
  10. Garnish with sliced green onions and serve with soy sauce

Print Friendly and PDF

Creamy Coconut Flan

Creamy Coconut Flan

No long winded story and bad jokes tonight. I’m sleepy and on a massive sugar crash from this flan. πŸ˜›
Ok, maybe a short story based on the whole sugar high/crash idea.

I remember when my brother, sister and I were kids. Every year we would get our mother a large heart shaped box of Fanny May candy for Valentines day. We used her money to buy it of course and I am fairly sure that any change went for things like Lemonheads and ice cream. Well, each and every year, mom would put the opened box into the fridge. She wasn’t a huge sweets eater (obviously I get my love of them from my sweets binging diabetic father hehe) so would put it there with, I’m sure, the idea that when she wanted a piece (ONE piece) she could get one (again… ONE piece. Who does that!?). Well, every.single.year. mom would invariably come to us with a heart shaped box asking what had happened. Why? Because what she held was a practically empty box bearing only one or two pieces of candy that had a bite out of the side, those pieces being the ones none of us kids liked.

Mom always said she hoped I had kids just like me. I did. I now have a “stash” of candy and junk food in my closet that the kids are supposed to stay out of. HA! yeah, right. The ones living at home go in it all the time and the ones who come and visit head straight to the stash, coming out bearing junk food galore and innocent expressions.

On a side note, taking a drink of Pepsi Throwback after eating a huge serving of flan isn’t advisable. It has absolutely no flavor according to my “sweeted out” taste buds plus I think my pancreas just cried a little, then died.

This is one yummy flan btw. Sweet (oh my, is it sweet), quite coconutty, with that mouth feel texture that everyone loves (man, that sounds vaguely obscene. but then I’m tired and everything is making me titter). The caramel sauce on the top is the perfect topping. I used to make flan just for the topping. I swear I did. I’m weird. This is intensely coconutty so if you’re so so about coconut flavor this may be one you need to pass by.

Creamy Coconut Flan

  • 1 cup sugar
  • 4 eggs
  • 3 egg yolks
  • 1 can sweetened condensed milk
  • 1 can cream of coconut (found with the drink mixers- do NOT sub coconut milk)
  • 1 cup heavy cream
  • 1 tablespoon vanilla extract
  • 1/4 cup coconut vodka
  • Toasted coconut for garnish (optional)
  1. Preheat the oven to 325 degrees.
  2. Pour your sugar into a small saucepot. Heat it over medium high heat until it is melted and a nice golden brown color. Don’t walk away once it starts melting. It doesn’t take long to go from melting to scorched and wasted.
  3. Pour the sugar onto the bottom of 8 one cup ramekins, swirling to coat the bottom of the ramekins with the melted sugar.
  4. Whisk the eggs and egg yolks in a large bowl until foamy. Add in the condensed milk, cream of coconut, cream, vanilla extract and vodka. Whisk until well combined. Strain through a fine mesh strainer into another bowl (preferably one with a pour spout) or large measuring cup.
  5. Pour the flan mixture evenly into the prepared ramekins. Set the ramekins into two deep baking dishes. Set into the oven then carefully add hot water to each pan to go about halfway up the sides of the ramekins. be careful not to slosh any INTO them though.
  6. Bake at 325 degrees until the center is almost set, about 30 to 40 minutes.
  7. Carefully remove from the pan (I used tongs) and set on a wire rack for about an hour, then transfer to the fridge to chill for at least an hour.
  8. Carefully slide a butter knife all around the edges of each flan and invert onto a plate. If it doesn’t come out,  place the ramekin into hot water for a minute or so to loosen it up, then try again. Garnish with the toasted coconut if using.

Print Friendly and PDF

Chocolate Chip Double Berry Scones

Chocolate Chip Double Berry Scones 2-001

I can hear the outcry now… “MORE scones, lady!!!??? What the heck?? Can you do anything but scones or citrus pies or risotto!?”

Yes. yes, I can. But I wasn’t thinking the other day when I, on my Facebook page asked everyone which they would prefer- these scones or a quick bread I am trying. They chose the scones. Sooooo, being a woman of my word, I made them. Because honesty is just how I roll. Well, when I trip on our land, downhill quickly is also how I roll but I won’t blog about that. Though photos would probably be hilarious.

Moving on- been interesting in our household lately. My (very pregnant) daughter and her boys are with us through mid August while her husband goes through Basic Training and AIT (the on the job training for whatever you will be doing part of the military) so having 2 extra little ones (they are 3 and 6) has been chaotic to say the least. But I love knowing that when they move, they will, for a time at least, until it fades, have some memories of living with gramma and grampa. My daughter is due in a few weeks so I’ll have time with the baby (girl) for a while too πŸ™‚

Plus, I’ve been having some health issues again. Not gonna go into detail here yet but I’ll cue you all in when things are more settled as to treatment. Until then, I’m just gonna continue to bake fattening things for all of you. Why? Cause I lurves you of course!!! Seriously. You have no idea what it means to me to know that people actually come here to my tiny blog, read my inane words and sometimes actually even make the foods I post.

These scones turned out delicious. I got the base recipe from The Pastry Queen Cookbook (you should have noticed by now that I love this cookbook) but changed it around. I just KNOW you’re surprised at that news. The only problem I had (which is my fault not the books) was shape. After I added the berries, I didn’t want to knead the dough, thus mushing the berries and toughening the dough, so I just reshaped it. BUT… I wasn’t able to get it back into a decent circle. so I tried making it more rectangular and cutting the scones from that. It turned out rather laughable πŸ˜› These taste absolutely amazing… light, tender, flaky with a perfect mix of berries and chocolate and an orange glaze that just complements it all. But the way they look? Kinda wonky lol. But I promise you; you won’t care once you make some and taste them how they look. Also, you may have better luck shaping the dough than I did ANYWAY thus negating the issue. So don’t let looks fool you. Just look at the nicely glazed surface… see the pieces of berry peeking out alongside some chocolate. Then go bake. And I promise… no more scones…. for a few days anyway πŸ˜›

Chocolate Chip Double Berry Scones

  • 3 cups flour
  • 1 cup sugar
  • 1 tablespoon baking powder
  • 1/2 teaspoon salt
  • 10 tablespoons unsalted butter, COLD
  • 1 tablespoon vanilla extract
  • 1 1/2 cups heavy cream
  • zest from one large orange (about 1 to 2 tablespoons)
  • 1 cup semi sweet or bittersweet chocolate chips
  • 1/2 cup fresh raspberries
  • 1/2 cup fresh blackberries
  • Glaze-
  • 1 cup powdered sugar
  • 2 teaspoons orange zest
  • 1/3 cup orange juice
  1. Preheat oven to 375 degrees. Line a buttered baking sheet with parchment paper then butter the paper.
  2. In the bowl of a stand mixer fitted with the paddle attachment (as always, you can use these directions with a hand mixer), combine the dry ingredients on low speed, including the orange zest.
  3. Cut the butter into small pieces, then add to the flour. Beat on low speed until the butter is in small pea sized pieces. Then add in 1 cup of the cream and the vanilla and continue beating on low speed. You want the dough to come away from the sides of the bowl in a clean ball of dough, no floury remnants left behind. If it still looks dry, add more cream, about a tablespoon at a time until it forms the dough ball.
  4. Turn out onto a lightly floured board and gently knead the chocolate chips into it. You’re not trying to work the gluten up like in bread dough. That will make the scones tough.
  5. When the chocolate is incorporated, gently pan the dough out into a fairly thin circle or rectangle. Lay the berries down on one side of the dough, then fold the other side down over them. Press gently to seal.
  6. Reshape the dough (circle if you want wedges, rectangle if you want squares or diamonds) and cut into either 10 wedges or if making squares or diamonds (for the diamonds, cut into squares then cut them in half diagonally), cut into 12 pieces. Brush each with some of the leftover cream and sprinkle with sugar.
  7. Bake at 375 for about 15 minutes for wedges or 10 to 12 minutes for squares or diamonds. You want them a nice golden brown on top.
  8. For the glaze- in a small bowl, mix together the glaze ingredients. Whisk well to get rid of lumps.
  9. Pour the glaze out onto a shallow lipped plate.
  10. Dip the top of each scone into the glaze. Let dry for about ten minutes then dip each one again. Let dry a bit before serving though when they are warm and sticky they are awfully hard to resist πŸ˜€

Print Friendly and PDF

Chocolate, Cherry & Pistachio Scones

Chocolate, Cherry & Pistachio Scones

Chocolate, Cherry & Pistachio Scones


I’ve mentioned a couple of hundred times by now that I’m not one of those people who does things by the seasons. Nope, I’m that weirdo at the grocery store with no coat and flip flops when it’s 20 degrees out. I’m the reason you’re smelling bbq and woodsmoke in January and suddenly craving grilled chicken. I’m the one making heart cookies in August. While at the same time making a nice comforting warming beef stew or chili. I’m that person posting Pumpkin bread in May and having everyone who comes here (all two of you hehe) wonder what the heck I’m on and why I’m so bass ackward.

Yes. I’m weird. This however is why you like me, right?

*crickets*

From what I’ve seen, most people tend to seem to bake scones during the Winter, many times even around the holidays. This may have something to do with everyone being far wiser than I and not turning on their ovens in the middle of a heat wave. I have never claimed wiseness though so it’s all good. I claim only insanity, a warped sense of humor and an unhealthy love for Cheetos and almost any sort of Gummy candy (right now my current addiction is These Brachs Juicy Berries Gummies. Oh my gosh, I love them and talk about lack of wisdom… it’s unwise for a bag of them to be near me or I’ll eat every.single.one.

But… today wasn’t about gummy candy (tonight when I watch Glee however, all bets are off). Today was about scones. This recipe was originally an Ina Garten one but I found it long ago on the now defunct blog “Gingerbread Bagels”. I don’t know the blog closed of where Lindsey, the owner, disappeared to, but I still think of her and hope she’s ok. Originally, this was just dark chocolate and dried cranberries but we all know I’m genetically incapable of doing a recipe the way it was written. So now I have left my mark on this one and love how I changed it πŸ™‚

These scones are probably my favorite scones ever. They are flaky and tender… a little bit crispy on the outside and tender on the inside. The chocolate and cherries go so well together and the orange zest and almond extract add a lovely flavor to these. Add in the yummy pistachios and the bit of crunch they add and it’s scone Heaven.

You know the drill. Get to baking!

Chocolate, Cherry & Pistachio Scones

  • 1 1/2 cups mini chocolate chips
  • 1 5 ounce bag dried cherries
  • 1/2 cup chopped salted pistachios
  • 2 cups flour
  • 1/3 cup sugar
  • 1 tablespoon baking powder
  • 1 teaspoon salt
  • 2 teaspoons orange zest
  • 1 1/2 sticks COLD unsalted butter, diced
  • 1/2 cup COLD heavy cream
  • 2 large eggs
  • 1 tablespoon vanilla extract
  • 1 teaspoon almond extract
  • Glaze-
  • 1/2 cup powdered sugar
  • 1/2 teaspoon vanilla extract
  • 2 to 3 tablespoons heavy cream (may need more or less to make glaze drizzling consistency)
  1. Preheat oven to 375. Line a buttered baking sheet with parchment paper and then butter the paper.
  2. Combine the flour, baking powder, salt and orange zest in the bowl of a stand mixer. Add in the cold butter and mix on low speed with the paddle attachment until the flour has only small lumps the size of peas left in it. (Alternately, do the same with a hand mixer or pastry blender)
  3. Whisk together the 2 eggs, 1/2 cup cream, vanilla extract and almond extract. Pour slowly into the flour mixture and continue mixing at low speed until dough comes together in a sticky ball from the side of the bowl.
  4.  Dump onto a lightly floured board. Pat down into a circle of about 3/4 of an inch thick. Cut into 8 wedges with a lightly floured knife or pizza cutter.
  5. Lay close together but not touching on the baking sheet. They will rise and touch as they bake and you’ll have nice soft sides where they do, crispy ones where they didn’t.
  6. Bake at 375 for about 17 minutes or until they are nicely browned and firm on top. Don’t over bake or you’ll lose that great texture!
  7. When done, let cool for about minute in the pan, then carefully transfer over to a wire rack to finish cooling.
  8. For glaze, simply whisk together all the glaze ingredients in a small bowl. Drizzle over the cooled scones.

Print Friendly and PDF