Cranberry White Chocolate Amaretto Oatmeal Cookies

Cranberry White Chocolate Amaretto Oatmeal Cookies

Cranberry White Chocolate Amaretto Oatmeal Cookies


I have a confession to make. *Takes a deep breath and sobs* No Amaretto was harmed in the making of this post. I lied!!! It’s just almond extract!!! *Throws myself at the mercy of the courts…. and cookie eaters. But, in my defense, how would Cranberry, White Chocolate and Almond Extract have sounded as a title? It needed excitement, pizzazz, oomph! Amaretto is exciting! Fine, maybe not so much, but you get my drift. So, when you make these cookies, just don’t tell anyone that the almond flavor is from almond extract and not amaretto. It will be our little secret. You, me and the 3 other people who actually read my blog. :-p

Now on to my whining weather report. WHAT HAPPENED TO AUTUMN!!!!??? It disappeared!! It’s the first week in November and I had to turn the A/C on last night because it was too hot in here to sleep comfortably. Who turned off the cold?! It is NOT, I repeat, NOT supposed to be 80 degrees during the day in November; not even in Kentucky. And other states that allow that nonsense need to stop it right now.

Because I said so.

On that note (as I watch two of my three readers back away slowly), let’s move on to the cookies.

I loved these. And they got the kid approved thumbs up too, which is always nice. One would think that any kid would give a thumbs up to cookies, but nope, not mine. With me having been baking all of their lives (heck, most of MY life) and running a food blog, they are more particular and have higher standards than the “normal” children. There is nothing more humorous than getting a verbose critique from a seven year old- “These are good momma, but they could be chewier/sweeter/crunchier”… whatever the specific food should be.

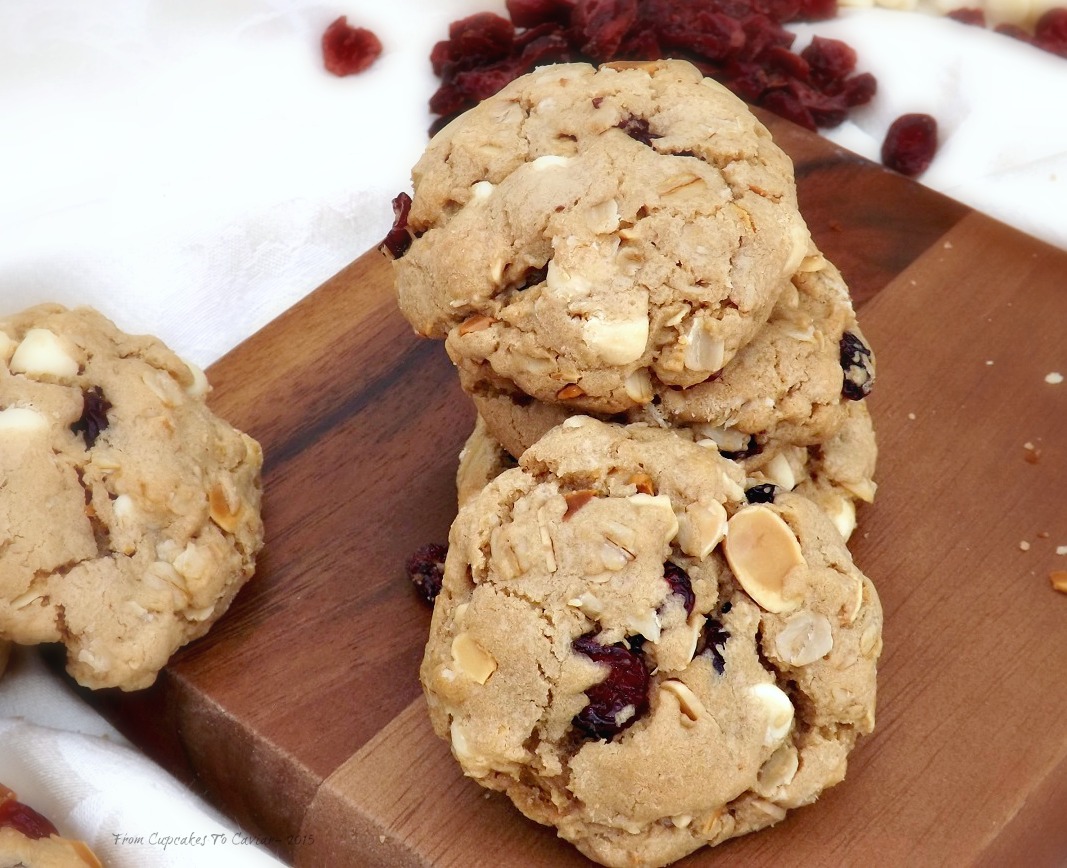
These have a nice nutty flavor from the toasted almonds. I deliberately toasted these a little browner than I usually do because I wanted a nuttier flavor. It worked wonderfully. So when you toast the almonds, get them to a nice medium brown color. Just make sure to give them a stir in the pan once to make sure they brown evenly. The cranberries added a nice tartness to the cookies and the white chocolate a creamy sweetness. Since these have oats and cranberries in them, feel free to eat them for breakfast. They’re good for you *coughcough*! Honest Injun! Even with the tablespoon of almond extract in these, the almond flavor is still fairly mild, so go ahead and add a teaspoon more if you want an extra punch of flavor.

You know the drill… 🙂

Cranberry White Chocolate Amaretto Oatmeal Cookies

  • 1 cup (2 sticks) unsalted butter, room temp
  • 1 cup packed dark brown sugar
  • 1 cup sugar
  •  2 eggs + 1 egg yolk
  • 1 tablespoon vanilla extract
  • 1 tablespoon (add an extra teaspoon if you want more almond flavor) almond extract
  • 3 cups flour
  • 1 teaspoon baking soda
  • 1 teaspoon baking powder
  • 1 teaspoon salt
  • 1 1/2 cups oats (if you REALLY want to punch up the flavor, toast your oats for about 6 minutes or so at 350. Just make sure to stir once and also to let them cool COMPLETELY before adding them to the dough.)
  • 1 12 ounce package white chocolate chips
  • 1 1/2 cups dried cranberries
  • 1 cup sliced almonds, toasted at 350 until medium brown
  1. Preheat oven to 350 degrees. Lightly grease two cookie sheets.
  2. In a large bowl, at medium speed using a hand mixer cream together the butter, the brown sugar and the sugar until light and fluffy.
  3. Scrape the bowl down and add the eggs and egg yolk. Stir in the vanilla extract and the almond extract. Beat just until blended.
  4. In a small bowl, whisk together the flour, baking powder, baking soda and salt. Add to the butter mixture. Stir in (use a nice heavy wooden spoon) the oats, cranberries, white chocolate and toasted almonds. Make sure to dig down there to the bottom of the bowl and stir so that you don’t have parts of the dough with no add ins in it.
  5. Make rounded tablespoons of the dough and place about 2 inches apart on the prepared cookie sheets. Bake at 350 for 12 to 14 minutes; 12 if you want slightly chewier, 14 if you want crispier.  If, by chance, the dough is too soft to work with, cover the dough and throw it in the fridge for maybe 30 minutes, then proceed.
  6. Let cool on the pan for 2 to 3 minutes to give them a chance to firm up, then transfer to a rack to finish cooling.
  7. FYI- this dough freezes well. I made just part of the batch and have the rest frozen to use closer to Christmas.
Cranberry White Chocolate Amaretto Oatmeal Cookies

Cranberry White Chocolate Amaretto Oatmeal Cookies

Copyright Notice: From Cupcakes To Caviar images and original content are copyright protected. Please do not publish these materials anywhere without prior permission.

Overstuffed Pizza Potato Skins

Overstuffed Pizza Potato Skins

Overstuffed Pizza Potato Skins


Ok, I mentioned these like a week ago on my facebook page. Oops. I kinda forgot to post them or even make them until tonight. Can I blame old age, senility, six kids and the damage they have done to my brain cells? My husband and his snoring? Global warming? I got spit on by a camel at the fair once? Some psychological issue that hasn’t yet been discovered and named?
Ok… sorry. I’m done now. But all of the above are still perfectly valid excuses. Just sayin’.

Back in the day, I think I’ve mentioned before, I worked at T.J.Applebees (now just Applebees). One of the things they did then were ten cent wings and ten cent potato skins. Yes, grasshopper, I am so old that wings and potato skins used to go for a dime during happy hour. Excuse me while I go take my Geritol. They also did one dollar pitchers of margaritas and I have many very vague memories of sitting with the other waitresses and drinking a pitcher or six. Ahhh, good times, good times. I think.

Theirs were the typical skins; cheddar cheese, bacon bits, green onions. Yummy as can be, but c’mon, do you REALLY think I’m going to make them that way? I’m the woman that made these potato skins. After all this time, you all know I can’t be normal.

So, me being me, as opposed to me being say Sandra Bullock or Michelle Pfeiffer because God decided that I should look more like the love child of Phyllis Diller and Tiny Tim, I made them differently. I had been craving pizza recently and we couldn’t afford take out, so I used some ingredients I had here at home to make…well, the love child of potato skins and supreme pizza. My husband was like “I don’t know about this… I’m not much on potato skins”. He’s had four in the last 30 minutes. I am of course, gloating. Marital gloat…. it’s almost better than chocolate.

These have a few steps, but they’re quite easy to make, even for multi step. Each step is simple stuff like sauteing veggies or scooping out potatoes. I have faith that you can handle it. :-p I made this for 8 potatoes (16 skins), but it’s easily increased or decreased. If you end up with a little bit extra cheese and/or meat/veggie mixture, it makes a wonderful pizza omelet.

You know the drill… 🙂

Mrs. Cupcake… who is bloated from too much cheese.

Overloaded Pizza Potato Skins

  • 8 medium potatoes
  • olive oil
  • salt
  • 1 small onion, sliced in half, then thinly sliced into half rings
  • 1 small green pepper, chopped into bite sized pieces
  • 1 tablespoon minced garlic
  • 1 tablespoon squeeze basil (available in the produce section)
  • 1 5 ounce package mini pepperoni slices
  • 1 4 ounce package Italian Sausage crumbles (by the lunch meats)
  • 3 small Roma (plum) tomatoes, cut into bit sized pieces
  • 1 15 ounce can or jar of pizza sauce ; use your favorite.
  • 1/2 lb sharp cheddar cheese, shredded and mixed with
  • 1/2 lb Mozzarella cheese, shredded
  1. Preheat oven to 350. Rub each potato lightly with olive oil, sprinkle with salt. Pierce each one to prevent a lovely little steam explosion in the oven, then place on the middle rack of the oven. bake until a fork can easily pierce the center of the potatoes, about 40 minutes.
  2. Remove from the oven, cut each potato in half and let sit until cool enough to handle, about 30 minutes.
  3. Use a small spoon and carefully scoop out the insides of each potato half, being sure to leave a thin shell around the edge so the potato isn’t too fragile to handle. Reserve the scooped mashed potato for another use- This is a good recipe to use it for
  4. Turn the oven to 450, then smear the edge and inside of each potato half with a small amount of olive oil. Place back in the oven and let bake until the edges of the potatoes are getting crispy and lightly browned, about 10 to 15 minutes.
  5. Meanwhile, in a medium pan, pour 3 tablespoons olive oil. Add in the sliced onions, sliced green peppers and garlic. Saute over medium heat , stirring occasionally, until the veggies are soft and the onions are lightly browned. Add in the sausage, squeeze basil and the pepperoni; continue cooking until the meats are heated through. Add in the tomatoes and cook just enough to heat them; you don’t want them getting mushy. Set aside when heated.
  6. Remove the potatoes from the oven and turn oven back down to 350. Use a pastry brush to lightly brush the insides of each skin with pizza sauce, about a teaspoon or so in each.
  7. Sprinkle each one with a small amount of the mixed cheeses, then spoon some of the meat/veggie mixture into each one. Lay directly next to each other (they help support each other and it prevents them from toppling over in the oven) in a baking dish. Sprinkle the rest of the cheese over the tops of the skins.
  8. Bake at 350 degrees for about 15 minutes, or until the cheese is melted and bubbly. Serve hot, with the remaining pizza sauce warmed and served on the side as a dipping sauce.

Copyright Notice: From Cupcakes To Caviar images and original content are copyright protected. Please do not publish these materials anywhere without prior permission.

Chocolate Chip Double Berry Scones

Chocolate Chip Double Berry Scones 2-001

I can hear the outcry now… “MORE scones, lady!!!??? What the heck?? Can you do anything but scones or citrus pies or risotto!?”

Yes. yes, I can. But I wasn’t thinking the other day when I, on my Facebook page asked everyone which they would prefer- these scones or a quick bread I am trying. They chose the scones. Sooooo, being a woman of my word, I made them. Because honesty is just how I roll. Well, when I trip on our land, downhill quickly is also how I roll but I won’t blog about that. Though photos would probably be hilarious.

Moving on- been interesting in our household lately. My (very pregnant) daughter and her boys are with us through mid August while her husband goes through Basic Training and AIT (the on the job training for whatever you will be doing part of the military) so having 2 extra little ones (they are 3 and 6) has been chaotic to say the least. But I love knowing that when they move, they will, for a time at least, until it fades, have some memories of living with gramma and grampa. My daughter is due in a few weeks so I’ll have time with the baby (girl) for a while too 🙂

Plus, I’ve been having some health issues again. Not gonna go into detail here yet but I’ll cue you all in when things are more settled as to treatment. Until then, I’m just gonna continue to bake fattening things for all of you. Why? Cause I lurves you of course!!! Seriously. You have no idea what it means to me to know that people actually come here to my tiny blog, read my inane words and sometimes actually even make the foods I post.

These scones turned out delicious. I got the base recipe from The Pastry Queen Cookbook (you should have noticed by now that I love this cookbook) but changed it around. I just KNOW you’re surprised at that news. The only problem I had (which is my fault not the books) was shape. After I added the berries, I didn’t want to knead the dough, thus mushing the berries and toughening the dough, so I just reshaped it. BUT… I wasn’t able to get it back into a decent circle. so I tried making it more rectangular and cutting the scones from that. It turned out rather laughable 😛 These taste absolutely amazing… light, tender, flaky with a perfect mix of berries and chocolate and an orange glaze that just complements it all. But the way they look? Kinda wonky lol. But I promise you; you won’t care once you make some and taste them how they look. Also, you may have better luck shaping the dough than I did ANYWAY thus negating the issue. So don’t let looks fool you. Just look at the nicely glazed surface… see the pieces of berry peeking out alongside some chocolate. Then go bake. And I promise… no more scones…. for a few days anyway 😛

Chocolate Chip Double Berry Scones

  • 3 cups flour
  • 1 cup sugar
  • 1 tablespoon baking powder
  • 1/2 teaspoon salt
  • 10 tablespoons unsalted butter, COLD
  • 1 tablespoon vanilla extract
  • 1 1/2 cups heavy cream
  • zest from one large orange (about 1 to 2 tablespoons)
  • 1 cup semi sweet or bittersweet chocolate chips
  • 1/2 cup fresh raspberries
  • 1/2 cup fresh blackberries
  • Glaze-
  • 1 cup powdered sugar
  • 2 teaspoons orange zest
  • 1/3 cup orange juice
  1. Preheat oven to 375 degrees. Line a buttered baking sheet with parchment paper then butter the paper.
  2. In the bowl of a stand mixer fitted with the paddle attachment (as always, you can use these directions with a hand mixer), combine the dry ingredients on low speed, including the orange zest.
  3. Cut the butter into small pieces, then add to the flour. Beat on low speed until the butter is in small pea sized pieces. Then add in 1 cup of the cream and the vanilla and continue beating on low speed. You want the dough to come away from the sides of the bowl in a clean ball of dough, no floury remnants left behind. If it still looks dry, add more cream, about a tablespoon at a time until it forms the dough ball.
  4. Turn out onto a lightly floured board and gently knead the chocolate chips into it. You’re not trying to work the gluten up like in bread dough. That will make the scones tough.
  5. When the chocolate is incorporated, gently pan the dough out into a fairly thin circle or rectangle. Lay the berries down on one side of the dough, then fold the other side down over them. Press gently to seal.
  6. Reshape the dough (circle if you want wedges, rectangle if you want squares or diamonds) and cut into either 10 wedges or if making squares or diamonds (for the diamonds, cut into squares then cut them in half diagonally), cut into 12 pieces. Brush each with some of the leftover cream and sprinkle with sugar.
  7. Bake at 375 for about 15 minutes for wedges or 10 to 12 minutes for squares or diamonds. You want them a nice golden brown on top.
  8. For the glaze- in a small bowl, mix together the glaze ingredients. Whisk well to get rid of lumps.
  9. Pour the glaze out onto a shallow lipped plate.
  10. Dip the top of each scone into the glaze. Let dry for about ten minutes then dip each one again. Let dry a bit before serving though when they are warm and sticky they are awfully hard to resist 😀

Print Friendly and PDF