Peppermint Bark Flourless Chocolate Cake

Peppermint Bark Flourless Chocolate Cake


As I was perusing… I love the word perusing… I also love the words Beijing, Machu Picchu, Monkey and Pretoria.  What? Why are you looking at me that way? I like words. I’m a blogger. It stands to reason that words would make me happy. They’re my life, man! My livelihood! My reason for living!

Sorry. I’m done now.

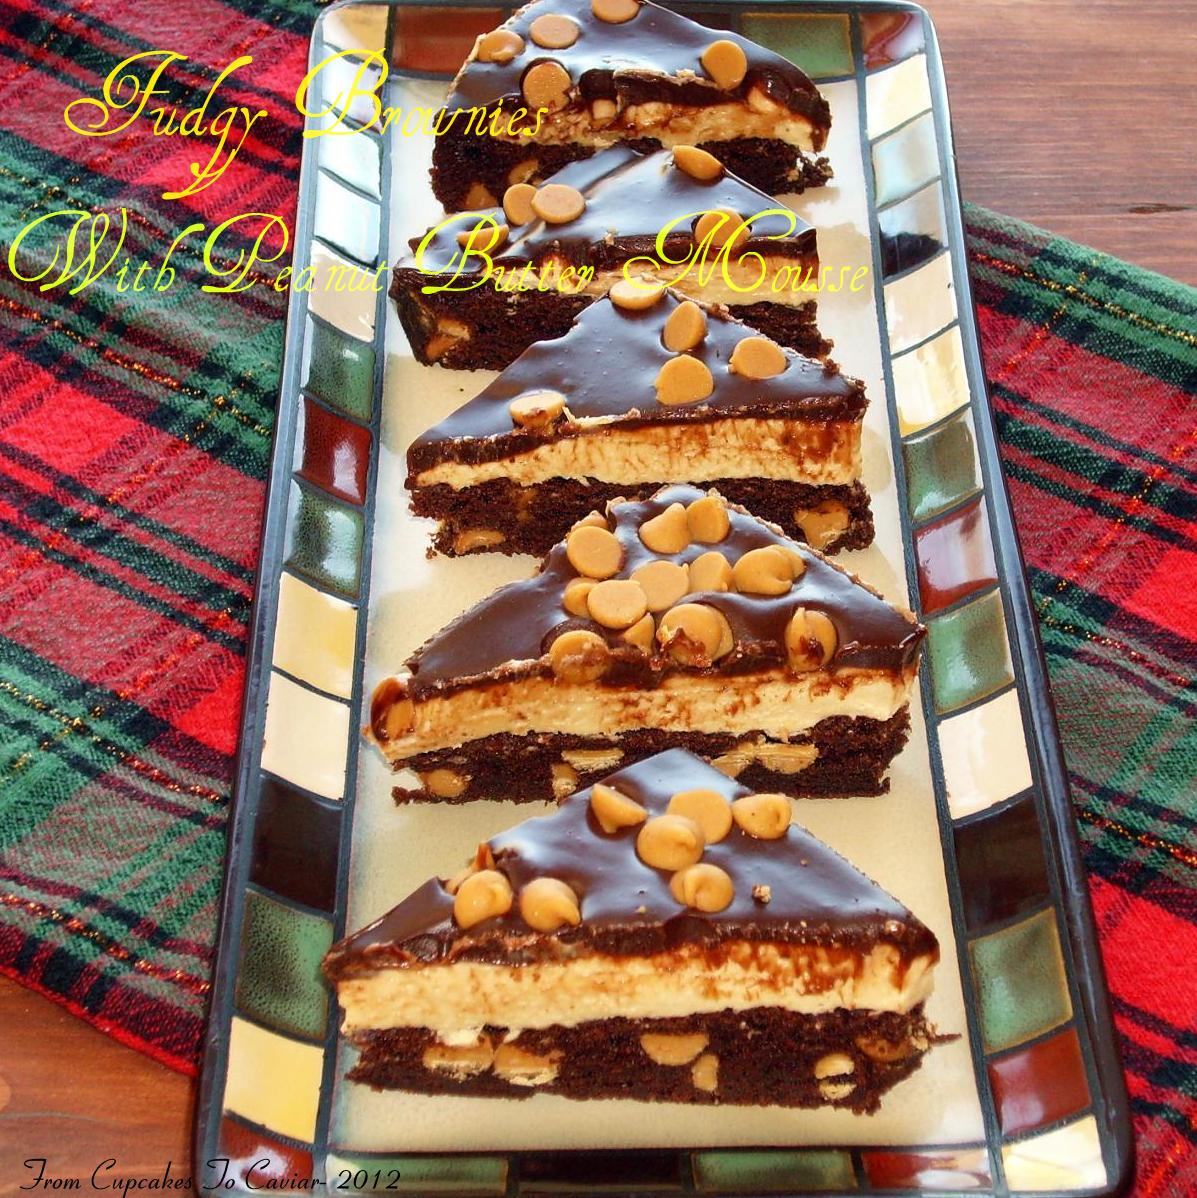
Erhmmm, as I was perusing the blog the other day, I noticed that it had been 12, I’ll type that again as a word…(I like words. have I mentioned that?) TWELVE, posts since I had done anything chocolate. And even then, it wasn’t pure chocolate. It was cookies that merely involved chocolate chips. Not that that’s a bad thing. But it’s not the type of chocolate that makes one swoon. It’s not the type of chocolate that leaves you gasping for breath and thinking that you never want to eat chocolate again. Or for at least an hour. It’s not the type of chocolate that has you planning secret hideaways into the closet, leaving your six year old naked, shivering and waiting for his bath as you whisper sweet nothings to the chocolate.

This isn’t just me, is it?

Sorry. I’m done now. Maybe.

This is pure chocolate overload… pure chocolate nirvana…pure chocolate…

Sorry.

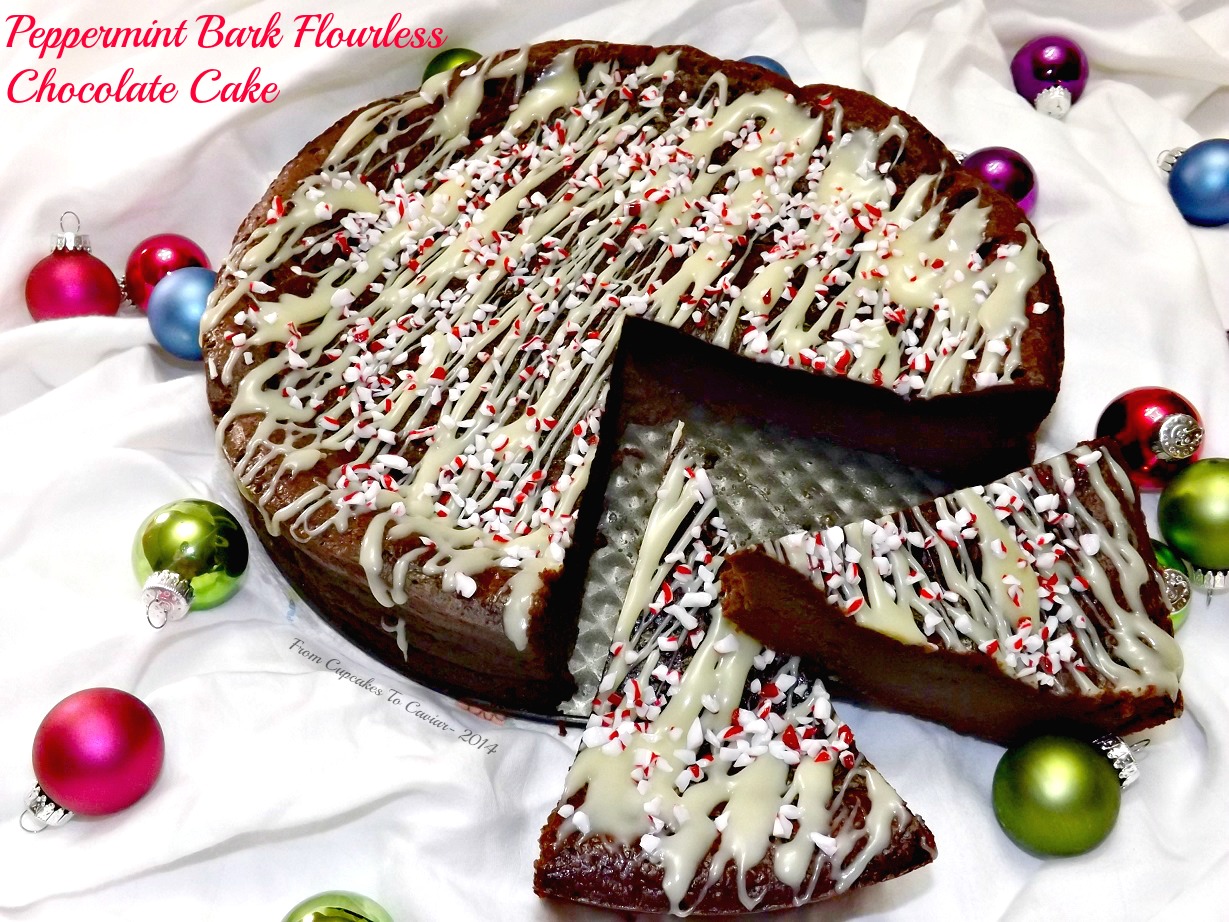
This is yummy. I have made a flourless chocolate cake before here on the blog and I won’t tell you that this is miles away from that one in preparation and baking. This one is, however, gussied up for Christmas. It looks like a huge round of peppermint bark. And rather tastes like it too. It’s dense, fudgy, outrageously rich and decadent (this uses a pound each of chocolate and butter, after all) and totally over the top delicious. You can’t eat but a sliver of this at a time (closet hideaways notwithstanding) so it goes a long way, making it perfect for a party. Make this at Christmas and Santa will bring you diamond rings, houses, BMW’s, your own pool boy named Juan. Ok, maybe not.

You know the drill…. 🙂

Love you!

Mrs. Cupcake

Peppermint Bark Flourless Chocolate Cake

  • 16 ounces good quality semi sweet or dark (not too dark or the cake will be bitter) chocolate, chopped
  • 1 pound unsalted butter
  • 1 cup sugar
  • 1 cup heavy cream
  • 1/4 teaspoons salt
  • 9 eggs (yes, nine)
  • 2 tablespoons vanilla extract
  • 1 1/2 teaspoons peppermint extract
  • 1/2 cup white chocolate chips
  • 2 1/2 tablespoons heavy cream
  • 1/2 cup crushed peppermint candy (candy canes work great)
  1. Preheat oven to 350 degrees. Grease a 10 inch springform pan (you can get this size at Wal mart) and set the pan on a baking sheet. This is in case of any leakage.
  2. In a medium saucepan, combine the chocolate, butter, sugar, salt and cream. Cook over low heat, stirring frequently, to melt the chocolate and butter. Make sure to stir it all up and get this nice and smooth.
  3. In a large bowl, whisk together the eggs, vanilla and peppermint extract. Slowly whisk in half of the chocolate mixture. Again, slow is the key so you don’t scramble the eggs. You want to slowly temper them. Return the egg mixture to the chocolate mixture, stirring to combine.
  4. Pour the batter into the prepared pan. Bake at 350 for about 45 to 55 minutes, or until a toothpick inserted in the middle comes out clean. Let the cake cool in the pan for about 2 hours, then refrigerate it for at least 4 hours, preferably overnight. When the cake comes out of the oven, it will look puffy, then will fall and sink. This is what it’s supposed to do, so don’t panic and think you did something wrong.
  5. In a small bowl, combine the white chocolate and cream. Microwave for 35 seconds on high, then stir. It should be melted. If not. put it back in for about 5 seconds. Drizzle the white chocolate over the cake, then sprinkle with the crushed peppermint.
  6. Cut into thin slices to serve. It’s easiest cut with a knife run under hot water, then wiped dry.

Copyright Notice: From Cupcakes To Caviar images and original content are copyright protected. Please do not publish these materials anywhere without prior permission.


Caramel Apple Pie Streusel Bars

Caramel Apple Pie Streusel Bars

Caramel Apple Pie Streusel Bars


I am notorious for totally sucking at making apple pies. I add far too much cinnamon and don’t slice my apples thinly enough, leaving some pieces half raw and others too mushy. I also stunk at pie crusts.  Well, I used to be anyway. For holidays, I STILL tend to buy Marie Callendars Dutch Apple Pie. Why, if I no longer suck? Cause 1) I’m lazy and 2) I love them, so I keep using the whole “I stink at making apple pies!” excuse. Sooner or later, my husband will catch on that I continue to buy $8.00 pies when I could just as easily make one for half the cost, but for now, when Thanksgiving day gets here, I have a Marie Callendar pie waiting in the freezer. Darlin’, if you’re reading this, I’m lying right here…honest, I still stink at making pies *bats lashes and looks innocent*

But, to be honest, I may just leave that pie in there this year and make these bars. I had originally planned on a bar that could be more hand held and had a double crust. But, as happens with me often, and with a lot of bloggers, it morphed into something different. This is still caramel apple pie, but less hand held bar (even though it was done is a square pan) and more “cut a slab of this bad boy, put it on a plate and smother it in caramel sauce and vanilla ice cream” sort of pie. It CAN be hand held, if you’re on the run, since it’s not drippy unless you put far too much caramel lol. But it’s really more of a plate dessert.

This is more multi-step than I usually do, but none of those steps are difficult. Make the dough for the crust and while it’s chilling, prepare your streusel and the pie filling. Then roll out your dough, put it in the pan, top with the filling, then top with the streusel. Voila… ready to go. You DO need to let this cool until it’s completely cool however. Really, with any fruit pie, you should do that. How many times have you cut a warm pie and ended up with half of the filling oozing out into the pan? Let it cool and if you want it warm, you can nuke it for 30 seconds. Trust me. It will set up firmer and not be an oozing mess. Once ready to serve, cover it as desired in caramel sauce (in my case, about 8 or 9 cups worth) and maybe some ice cream. Eat, Enjoy. Thank me. Oh..this crust makes enough for two, so if you’re not wanting to double up the filling and streusel and make two pans, just freeze the other half of the dough until you need it. It never hurts to have some on hand.

Caramel Apple Pie Streusel Bars

  • Crust- (lightly adapted from Emeril Lagasse)
  • 3 1/4 cups flour
  • 1 teaspoon salt
  • 2 teaspoons sugar
  • 1/2 cup butter, cold
  • 2/3 cup solid shortening, cold
  • 6 to 10 tablespoons ice water (the original recipe called for 4 to 5, but that was nowhere near enough)
  • Filling-
  • 5 1/2 cups cored, peeled and chopped (bite sized chunks) apples, about 5 apples. I used a mix of tart and sweet apples
  • 1 1/2 tablespoons lemon juice
  • 2/3 cup sugar
  • 3 tablespoons flour
  • 1 tablespoon cinnamon
  • 1/2 teaspoon ground cloves
  • 1/2 teaspoon ground nutmeg
  • 1/2 teaspoon ground ginger
  • 1 cup Kraft caramel bits (found in the baking aisle)
  • Streusel-
  • 3/4 cup flour
  • 3/4 cups oats (NOT instant)
  • 1 teaspoon cinnamon
  • 1/2 teaspoon salt
  • 1/2 cup dark brown sugar
  • 1/2 cup unsalted butter, cold
  • caramel sauce for topping
  1. Make the crust- Preheat oven to 375 degrees. Line a 9×9 square pan with foil, using two long pieces, each going in the opposite direction. (line one way, turn pan, line the opposite way, so that all four sides of the pan have a layer of foil) In a large bowl, combine the flour, salt and sugar. Using a pastry blender, cut in the butter and shortening until it looks like small pebbles or peas.
  2. Add the ice water, no more than 2 tablespoons at a time, mixing well after each addition. Add water until the dough comes together when mixed and isn’t sticky, just firm and holding itself together when pressed. Wrap dough in foil or plastic and chill while you make the streusel and filling.
  3. Streusel-
  4. In a medium bowl, combine the flour, oats, salt, sugar and cinnamon. Cut in the butter using a pastry blender or your fingers until it is crumbly with, again, pea sized pieces. It’s ok if some chunks are a bit larger. Set aside.
  5. Filling-
  6. In a large bowl, toss the apple chunks with the lemon juice. In a small bowl, combine the flour, spices and sugar. Pour over the apples and mix well, making sure to stir from the bottom, as the flour will settle. Add in the caramel pieces and stir well.
  7. Put together-
  8. Get your chilled dough. Cut in half and store half for later use. On a lightly floured board, roll the dough out into a square that measures about 2 inches larger than the pan, about 11×11. Easiest way to gauge- just hold the pan upside down over the dough and eye how large it is. If you need more dough, just use some from the saved half. That half can still be used for mini tarts or tassies. Gently (I use a dough scraper) lift the dough up and lay it in the pan. Press gently down into the pans, going up the sides about 2 inches. If it is uneven, carefully cut tiny bits off of the higher areas and use it to patch onto the shorter ones.
  9. Pour the filling over the prepared crust, smoothing top. Sprinkle the streusel over the filling. Bake at 375 minutes until the top is golden brown and the filling is bubbling around the edges, about 60 to 70 minutes.
  10. Let cool in the pan until completely cool. Cut and serve, drizzling (pouring copious amounts of…) caramel sauce on top of each piece, reheating for about 30 seconds in the microwave is desired.

Copyright Notice: From Cupcakes To Caviar images and original content are copyright protected. Please do not publish these materials anywhere without prior permission.

Thumbprint Cookies

Thumbprint Cookies

Back when my oldest (now grown) kids were little, I started a tradition that has stuck to this day and will probably continue until I am too old and feeble in mind and body to get to the stove. Mind you, there are some who would say that I already am feeble in mind, but that’s another story. And those people don’t get cookies from me. 😛

The tradition started because when they were little, I was too broke to buy them Christmas presents. I always had food in the house though so I figured that I may not be able to get them gifts, but they could have cookies. Plus, I always seemed to be trying to recreate a festive Norman Rockwell sort of holiday (even though my family is more like one of those Christmas movies where they are dysfunctional as all heck, yet are funny and have each others backs) and cookies seemed one way to do it.

So even now, I make cookies. Lots…and lots…of cookies. Oh my gosh, do I make cookies. I am the reason there is a shortage of baking supplies in Kentucky every year. And the reason my kids, husband and myself all need larger clothing come New Years Day. I usually make about 15 different kinds of cookies plus fudge, scones, all sorts of baked goods. Then we get fatter.

One of the ones I have been making since the first year I started this is Thumbprint Cookies. Who doesn’t like those, huh? The ones I make aren’t fancy; there are no unusual ingredients in them though I have branched out in the toppings since back in the day. These are simple, easy for a beginning cook, great for the kids to help with and they taste yummy. You can top these with jam, marmalade, different curds, chocolate kisses. You name it. This makes a LOT of cookies but the recipe is easily cut in half.

You know the drill… 🙂

Thumbprint Cookies

  • 1 cup sugar
  • 2 cup unsalted butter, room temp
  • 2 teaspoons vanilla extract
  • 2 eggs
  • 4 1/2 cups flour
  • 2 teaspoons baking powder
  • 1 bag mini chocolate chips (make sure it’s the mini ones; the regular sized ones poke out and get hard when baked plus make it difficult to shape the cookies)
  • toppings of choice
  1. Preheat oven to 350.
  2. In a large bowl, beat the sugar, butter, vanilla and eggs until light and creamy.
  3. Add in the flour and baking powder. Mix well.
  4. Fold in the chips; mix well.
  5. Wrap the dough in plastic wrap and chill for about 30 minutes.
  6. Shape the dough into 1 inch balls and place on a cookie sheet 2 inches apart. Make a bowl shaped indent on the top of each cookie ball. I use the cap from a 2 liter bottle of pop; it works perfectly.
  7. Bake at 350 for about 12 minutes; until the edges of the cookie are light brown and the tops are set. While still in the pan, lightly repress the indentation since baking will have made it puff out.
  8. Remove from the pan and cool on a rack. When they are cool, fill with your choice of toppings. Store with waxed paper between the layers so they don’t stick together.

Copyright Notice: From Cupcakes To Caviar images and original content are copyright protected. Please do not publish these materials anywhere without prior permission.


Red Velvet Peppermint Cheesecake Brownies

Red Velvet Peppermint Cheesecake Brownies

Red Velvet Peppermint Cheesecake Brownies


Out of my six kids, three are already grown and married and I have 7 grandkids. Yes… seven. Four from my oldest son and 3 from my only daughter. My son Cameron and his wife Tiffany haven’t decided if I am getting any from them, the boogerheads. But that’s ok… I mean, here I am, at the age of 29 with 7 grandkids! That should keep me going, right? At my young age? (You’re falling for this, aren’t you? Humor me here.)

My daughter in law Tiffany has a strange addiction to anything Red Velvet. Until I met her years back, I had never even tasted anything red velvet-ish. Not even once. Truthfully, I still prefer my chocolate cakes, cupcakes and brownies to be a deeper chocolate flavor but I can see the allure that red velvet has for others, so I make it. Don’t get me wrong… I also eat it when I make it lol.

Tiffy unfortunately wouldn’t like this version. Why? Because it has mint and as much as she loves red velvet, she has an aversion to mint. We keep her around even in light of these fatal flaws of heres.

These however are a chocolate/mint/red velvet/ cheesecake/  lovers dream. You get all of these things all mixed up in these brownies. They are a peppermint red velvet brownie swirled with a creamy vanilla cheesecake topping.. Ummm, I think I will manage to eat one or two or eight of these even without being a major fan hehehe.  These are a slightly cakey brownie when they first cool, but if you refrigerate them, they get fudgier and firmer, which is more to my liking. They are also easier to cut that way. These brownies don’t take but a few minutes to throiw together and get into the oven, then they have an approximately half hour bake time. So these are perfect for those “oh crap, I need something for that church Christmas dinner” or just as an easy treat for your family or best yet, as a pretty brownie to put out on your Christmas cookie tray.

These originally came from Southern Living. I made very little in the way of changes, just the type of chocolate used and the amount of cream cheese in the topping and I quadrupled the amount of peppermint extract. The original called for 1/4 teaspoon and first time I made these, I couldn’t taste even a hint of peppermint. Not a bit.

You know the drill….

Red Velvet Peppermint Cheesecake Brownies

  • 2 ounces semi sweet chocolate, chopped
  • 2 ounces unsweetened chocolate, chopped
  • 3/4 cup unsalted butter
  • 2 1/3 cups sugar, divided
  • 1 small (1 ounce) bottle red food coloring
  • 1 teaspoon peppermint extract
  • 1 tablespoon vanilla extract
  • 1 1/2 cups flour
  • pinch salt
  • 6 ounces cream cheese, room temp
  • 2 egg whites
  • 2 tablespoons flour
  • crushed peppermint candies to sprinkle on top (optional)
  1. Preheat oven to 350 degrees. Line a 13×9 inch pan with foil, making sure to have enough to overhang the pan somewhat and then grease the foil.
  2. Microwave the chocolate and butter together in a large bowl at about 60% power for 1 minute. Stir, then do again in 30 second intervals until the chocolate is completely melted.
  3. Stir in 2 cups of the sugar, then add the eggs, one at a time, mixing just until well blended after each one. Add the food coloring, the peppermint extract and 2 teaspoons of the vanilla; mix well. Add in the 1 1/2 cups flour and mix just until the flour is blended in.
  4. Spread batter into the prepared pan.
  5. In a small bowl, combine the cream cheese, 1/3 cup sugar, the remaining vanilla, egg whites and 2 tablespoons flour. Beat well.
  6. Spoon the cream cheese mixture over the top of the brownie batter and swirl in with a butter knife.
  7. Bake at 350 for about 30 to 34 minutes or until a skewer inserted in the middle comes out with just a few moist crumbs. Let cool on a rack in the pan for about an hour, then use the foil to lift the brownies out onto a cutting board. Carefully remove the foil and cut the brownies into bars. Store these tightly wrapped in the fridge.

Copyright Notice: From Cupcakes To Caviar images and original content are copyright protected. Please do not publish these materials anywhere without prior permission.


Ultra Creamy Hot Fudge Sauce

Ultra Creamy Hot Fudge Sauce

Ultra Creamy Hot Fudge Sauce

Back when I was a kid, when dinosaurs roamed the Earth and mankind had a population of about 12, I loved hot fudge sundaes. I remember that, when my father would come to stay with us (my mom had surgery once and he stayed with us, which I loved) or we with him, which I did quite often as I grew, being the daddys girl that I was, he would make us these huge bowls of ice cream (my God, I just wrote the worlds longest run on sentence). And when I say huge, I mean huge. The man had no boundaries when it came to sweets, a trait he kept throughout his life. He would put about 43 scoops of ice cream in a large industrial size vat, then he would cover that with either Hersheys syrup or hot fudge, then add whippped cream, sprinkles and about 309 cookies surrounding it. Needless to say, my brother, sister and I ate every bowl and then licked the vat clean. He usually had to call for the firemen to help us back out of the vat, but it was worth it.

As time went on, I turned my back on my beloved hot fudge for other flavors (*sobs and begs hot fudge to forgive me*) like butterscotch. Now, I still love butterscotch and I will admit to it being my flavor of choice when it comes to ice cream toppings, but I still also have a weakness for a good hot fudge sauce. There are some decent ones you can find at the stores but that’s the key word…. decent. You have not tasted hot fudge untiul you have had homemade hot fudge dripping it’s warm, decadent creamy self (man, is it getting hot in here or is it just me? *fans my face*) down a vat bowl of ice cream. There is just no comparison. This sauce is has a glossy sheen when warm and drips wonderfully over ice cream… or pudding… or a pot roast**… or a marshmallow. But cold, it has definite uses too. Like say, a spoon. You, hot fudge and a spoon. Enough said.

This oringally came from Taste Of Home and is barely adapted; just the brandy and the cooking time.

You know the drill…

Ultra Creamy Hot Fudge Sauce

  • 1 cup heavy cream
  • 3/4 cup unsalted butter, room temp
  • 1 1/3 cups packed light brown sugar
  • 1/4 cup sugar
  • 1/8 teaspoon salt
  • 1 cup unsweetened cocoa powder
  • 1/2 cup plus 2 tablespoons light corn syrup
  • 2 ounces unsweetened chocolate, chopped
  • 1 tablespoon vanilla extract
  • 1 tablespoon brandy (doesn’t add an alcohol taste; just adds depth to the flavor but consider it optional)
  1. In a heavy bottomed saucepot, combine the cream and the butter. Stir over low heat until the butter is melted. Add the brown and white sugars and the salt. Stir and cook over low heat until the sugar is completely dissolved.
  2. Whisk in the cocoa powder and the corn syrup. Cook over low heatr, stirring constantly, until the cocoa is dissolved and blended.
  3. Add in the chopped chocolate. Cook and stir for about 3 minutes, until the chocolate is completely melted. Continue to cook over low heat, simmering this for about 5 minutes (more if you want a very thick sauce but keep in mind that this will thicken as it stands plus even more so in the fridge). Remove frm the heat and add in the vanilla and the brandy if you’;re using it. Let cool, then pour into glass jars. Store in the fridge. (disposable plastic containers work too. Just make sure the sauce is cool first)
  4. This is a wonderful Chrismas gift, put into pretty jars and tied with a holiday ribbon and maybe gifted with some ice cream bowls.

Copyright Notice: From Cupcakes To Caviar images and original content are copyright protected. Please do not publish these materials anywhere without prior permission.


Old Fashioned Fruitcake

Old Fashioned Fruitcake

Old Fashioned Fruitcake


A couple of weeks ago, I asked on the blogs facebook page if the readers liked or hated fruitcake. I was fully expecting a lot of “ewwww, I HATE fruitcake!”. But to my surprise, the vast majority of the responses were people saying they either loved it or had at least learned to appreciate it. Yep… fruitcake. Candied peels, unnaturally dyed cherries and pineapple, the whole kit and kaboodle.  I was totally tickled since I have always loved fruitcake.

About ten years or so ago, I started making my own. I got the recipe from The New Doubleday Cookbook, one I used to have, but have since lost *sobs* (excellent cookbook btw… if you can find it, get it). Luckily, a few years ago, I was able to find the exact recipe on an about.com site. Yay! This is a typical fruitcake recipe, similar to what one would get at a higher end grocery or through mail order. But even though the fruits are expensive, this is still cheaper than buying one prebaked, plus you know the ingredients going in and the biggest plus, it tastes ten times fresher. ANDDDDDD, you soak this bad boy in a rum or brandy soaked cheesecloth (you can sub apple juice) to up the drunken goodness lol.

This isn’t at all difficult. But you DO need to get this made now for it to be ready for Christmas eating. It is a two day process to make it then it ripens in the soaked cloth for 3 weeks. Could you eat it immediately? I suppose so, but trust me, it tastes far better as it ages. Also, the original recipe calls for making this in a ten inch tube pan. I use two loaf pans; one large, one 8 inch. It works perfectly and that way I have one cake I can soak in rum and one I soak in juice to be kid friendly. Otherwise, I have changed this recipe very little. I add a bit more dried fruit, more vanilla and almond extract, less nuts, no currants and that’s about it. Ok, so maybe I’ve changed it more than I realized lol. Regardless, I’m going to write this as I make it.

You know the drill…. 🙂

Old Fashioned Fruitcake

  • Fruit Mixture-
  • 1 1/2 lbs fruitcake mix (found this time of year in any grocery store, usually near or in the produce section)
  • 8 ounce container candied lemon or orange peels (your preference)
  • 8 ounces raisins
  • 8 ounces golden raisins (can use a full lb of one or the other if you prefer)
  • 8 ounce container candied cherries
  • 8 ounces finely chopped pecans or walnuts, toasted
  • zest of 2 large lemons (about 2 tablespoons)
  • 1/4 cup lemon juice
  • 1/2 cup orange marmalade
  • 1/4 cup brandy, rum or orange juice
  • 2 teaspoons vanilla extract
  • 1 teaspoon almond extract
  • Cake-
  • 2 cups flour
  • 1 teaspoon cinnamon
  • 3/4 teaspoon nutmeg
  • 1/4 teaspoon cloves
  • 1/4 teaspoon allspice
  • 1 teaspoon baking powder
  • 1/2 teaspoon salt
  • 1 cup unsalted butter, room temp
  • 1 cup sugar
  • 6 eggs
  • Cheesecloth for wrapping
  • Rum, Brandy or Apple Juice for soaking
  1. Place all the fruit mixture ingredients in a large bowl. Stir well to mix. Cover the bowl and let it sit overnight at room temp.
  2. The next day, preheat oven to 250 degrees and grease and flour the bottom of either a 10 inch tube pan or two loaf pans.  Put a large shallow baking pan filled with boiling water on the bottom rack of your oven.
  3. In a medium bowl, combine the flour, cinnamon, nutmeg, cloves, allspice, baking powder and salt. Stir to combine.
  4. In a large bowl, cream together the butter and sugar. Add the eggs, one at a time, beating well after each addition.
  5. Pour the dry ingredients into the bowl of wet ones. Beat just enough to thoroughly blend. Now, carefull spoon the fruit mixture into the bowl of batter. Stir well to combine and make sure all the fruit is covered well in batter.
  6. Pours into the prepared pan or pans. Bake at 250 degrees for approximately 4 1/2 hours, until the cake has shrunk slightly from the sides of the pan and/or until a skewer inserted in the middle comes out with only a few moist crumbs on it. MOIST, not liquidy.
  7. Cool in the pan on a rack for one hour. Loosen the edges with a butter knife then carefully turn out onto the rack to finish cooling. When completely cooled, wrap the cake(s) in a rum, brandy or juice soaked cheesecloth, then wrap tightly in foil. Let ripen for at least 3 weeks. This can be aged even longer. Just make sure to redampen the cheesecloth every three weeks. Just remember, the more you soak this, the more alcohol is getting into it, so don’t eat and drive! 😛

Copyright Notice: From Cupcakes To Caviar images and original content are copyright protected. Please do not publish these materials anywhere without prior permission


Deep Dish Pecan Pie

Deep Dish Pecan Pie

Deep Dish Pecan Pie

I love the whole idea of Thanksgiving. Beyond the obvious loving the meal part (I am a turkey fiend), there is something about the knowledge that on a day when I am sitting down with my family to our Thanksgiving meal, so are millions of other Americans here and abroad. I get a mental image of so many other families saying grace before they eat as they join hands. I think of them laughing as they enjoy the meal, many, just going by odds, laughing over the same lame jokes (oh my gosh, mom burned the pies AGAIN!) at the exact same time. I smile when I think of the kids all over America asking for the 10th time “can we have dessert now?” when all the adults want to do is sit back and catch up with each other over a cup of coffee and a glass of wine. It all gives me chills… the nationwide brotherhood so to speak, the idea that when it comes down to it, we are all one people. I feel the same way at Christmas when I think of so many opening their present early morning as they try not to yawn over the hour (though yes, I know not everyone celebrates Christmas) and on July 4th. So many things join us together as a nation, as a large extended family and Thanksgiving is one of those times.

One of the things I look forward to every year is Pecan Pie. As much as I love it, I can’t seem to bring myself to make it at any other time than Thanksgiving. It just feels wrong. But, so that some of you having a horde of family and/or friends over this Thanksgiving can have a good recipe, I made an exception this year. The things I do for you *she says as she shoves a spoonful of pie into her mouth*. This is a BIG pie. It will easily serve about 12 to 16 people unless you make the slices huge. It’s also not quite as tooth achingly rich as the pecan pie I posted last year. For me, it is a toss up which I prefer. This one is sturdy enough to hold a slice in your hands but it lacks the goopiness of the other. This one isn’t as sweet, but then again, this is ME here… I have no problem with sweet hehe. So what will I do? I’ll make both here. Then I have my sweet gooey pie and my husband has one that’s not as rich, cause he’s a wimp. Either way though, this is fantastic with some lightly whipped cream or as I like it, just with some warm cream poured around it.

You know the drill… 🙂

Deep Dish Pecan Pie

  • Crust-
  • 3 1/2 cups all purpose flour
  • 1 teaspoon salt
  • 2 tablespoons sugar
  • 1 cup plus 2 tablespoons solid shortening, such as Crisco, chilled in freezer and sliced thin
  • 2/3 cup ice water (you may not use it all)
  • Filling-
  • 3/4 cup dark brown sugar
  • 3/4 cup granulated sugar
  • 1 cup white (clear) corn syrup
  • 1 1/4 cups dark corn syrup
  • 6 eggs, beaten well
  • 1/3 cup unsalted butter, melted
  • 1 3/4 cup coarsely chopped pecans
  • 1 tablespoon vanilla extract
  1. For crust- In a large bowl, combine the flour, salt and sugar. Stir to combine. Dump in the shortening and using a pastry blender, quickly cut the shortening into the flour  until you have a crumbly mixture. You want there to still be some lumps in here, so don’t make it too fine.
  2. Add your ice water, one tablespoon at a time, mixing with a fork after each, until a small piece of the dough holds together in a ball when gently squeezed. When the dough is ready, wrap it in foil and refrigerate for at least 30 minutes, but up to 2 days if you’re making the dough ahead of time.
  3. While the dough chills, make your filling. In a medium saucepot, combine the sugars and corn syrups. Bring to a boil over medium high heat and let boil for three minutes.  Set aside to cool slightly.
  4. When cooled down, slowly drizzle two cups of the sugar mix into the eggs, whisking all the time. This will temper your eggs and prevent them from scrambling when added to the sugar mix,. When you have whisked in all two cups, then pour the eggs into the saucepot with the sugar mix, again whisking the whole time. Then add in the vanilla and the pecans. Set aside.
  5. Make your crust- Preheat the oven to 350 degrees and get out a 13×9 inch baking pan. Flour your working area well. Get the chilled crust, lay down on the work area and press it rather flat with your hands. Then roll out into a rectangle (you may have to help it keep the correct shape by periodically reshaping it as you roll) about 3 inches larger than the pan all around.
  6. Use a spatula to gently pry the dough off of the board or counter and roll it around the rolling pan to transport it to the pan. Gently drape it into the pan and press down into the bottom and edges of the pan. Crimp the top edges as desired.
  7. Pour the filling into the pie shell. Bake at 350 for 15 minutes, then turn the oven down to 325 to finish. Remove form the oven when you can insert a butter knife halfway between the edge and the center of the pie and it comes out clean, about 60 to 75 minutes. The pie will finish cooking form it’s own residual heat. Let this cool completely before you try to slice it or you will end up with a liquidy mess. If you want warm slices, simply reheat them in the microwave for about 10 seconds per slice.

Copyright Notice: From Cupcakes To Caviar images and original content are copyright protected. Please do not publish these materials anywhere without prior permission.


Too Much Chocolate? You’re Kidding, Right?

Fudge truffle Pie With Mascarpone Cream

Fudge truffle Pie With Mascarpone Cream

Is there such a thing as too much chocolate? My husband has joked (ok, half joked) that it’s different for a man, that women are hormonally wired to want chocolate more than males do. I’m not sure that’s true, no matter how many jokes/pins/whatever there are combining women, PMS and chocolate. But I think of it this way. If HE thinks that women have this strange NEED for chocolate, who am I to argue? With that mindset,a ll he does is roll his eyes as I grab the Reeses Cup package from the check out lane or smiles when I talk about how he just must, absolutely must, get me some Fanny May chocolates. I mean… I NEED them, right?  Why fight that line of thought? Heh.

This recipe however, come perilously close to too much. When you make it (and you must make it. If you’re female, tell anyone who asks that my husband, who is a medical professional, says that you need this pie. If you’re male, say you’re making it for your wife or sister or mother. Then eat it all yourself.

This pie is like a truffle in a crust. It’s rich, thick, smooth, supremely chocolatey and any other adjectives one can think of that mean “OMG, hand over this pie now and no one will get hurt!”. The mascarpone cream I added to it just adds to the decadence. Yet at the same time it cuts the richness a bit making it easier to fit in 4 or 5 more bites of pie. See? I’m always thinking of your needs here. I’m a pal that way.

No matter how much you love chocolate though, I suggest small slices. This pie can easily serve 12 people. Not to mention, I would guesstimate that a small slice of this has about 12,000 calories. Add some of the Mascarpone Cream and you’ve upped it to about 15,000 calories, give or take a thousand 😀

Fudge Truffle Pie With Mascarpone Cream Topping

  • 6 eggs
  • 1 1/2 cups sugar
  • 1/3 cup cornstarch
  • 1 3/4 cup heavy cream
  • 2 cups whole (or 2%) milk
  • 5 ounces unsweetened chocolate, chopped
  • 1 tablespoon butter
  • 4 teaspoons good quality vanilla extract
  • 1 large premade graham cracker crust (feel free to use a deep dish pastry crust, but plan on leftover filling, which you can then eat warm with a spoon; not a bad predicament to be in)
  • Mascarpone Cream-
  • 8 ounces mascarpone
  • 1 cup heavy cream
  • 1/4 cup sour cream
  • 1 teaspoon vanilla extract
  • 1/3 cup powdered sugar
  1.  Separate your eggs, putting the whites into a sealable container in the fridge. Save them for meringue cookies or a couple of egg white omelets. After eating this pie, you’ll want to watch your calories for a bit anyway hehe.
  2. Place the yolks in a small bowl or measuring cup. Beat lightly then set aside.
  3. For the filling, in a large nonstick pot, combine the sugar and the cornstarch. Gradually whisk in the cream and milk, then stir in the chocolate.
  4. Cook over medium heat, stirring constantly. Continue to cook until it is thick and bubbly. At first it will look like the chocolate just isn’t melting into it but keep going; it all comes together. Just don’t stop stirring or it will stick and burn and burned pudding smells and tastes disgusting and it makes baby kittens whimper..
  5. When it thickens, reduce the heat and cook for a couple of minutes more.
  6. Gradually stir about a cup of the filling mixture into the egg yolks, stirring the whole time you’re combining them. You have to temper your yolks. If you just dump them into the hot mixture, you’ll have chocolate filling with scrambled eggs mixed in. Yum??
  7. Stir the egg yolk mixture into the chocolate mixture. Bring to a gentle boil and cook for another 2 minutes, again stirring constantly.
  8. Take off the heat. Stir in the butter and vanilla extract.
  9. Pour the filling into the crust. Cover with plastic wrap and refrigerate for about 4 hours.
  10. About ten minutes (or up to a day; no more though) before you’re ready to serve, make your topping.
  11. In a medium bowl, whip the mascarpone until light. Pour in the powdered sugar and vanilla and beat until fluffy and combined. Fold in the sour cream with a rubber spatula. Add in the heavy cream and beat at low speed until the mixture is light, fluffy and looks like a soft custard. If not using right away, eat a spoonful or six then put in a covered bowl in the fridge.
  12. When ready to serve, cut the pie (this slices quite nicely. It’s a firm filling) into small slices and serve either with a dollop of topping on each slice or with the topping in a bowl so everyone can put on how much they’d like.


Print Friendly and PDF

Best.Brownies.Ever

Cocoa Brownies With Browned Butter And A Raspberry Swirl

Cocoa Brownies With Browned Butter And A Raspberry Swirl

Now you all know me. I am not prone to rhapsodizing foods as the “best ever” (suddenly hopes that there are no posts I’m forgetting that say something is the best ever). That of course doesn’t count Cheetos and Twinkies *has a moment of silence for Twinkies…as I do each day*

But these brownies really are the best ever. At least the best I’VE had. And c’mon folks, I’m 48 years old… that’s a lot of brownie eating years to cover. I’ve had boxed prepackaged brownies, Little Debbie brownies (to which I admit having a soft spot for even though I am fairly sure that there is not even ONE real food in them), mix brownies, so called gourmet brownies, burned to a crisp brownies (don’t ask… it wasn’t pretty.) brownies made with chopped chocolate, brownies made with cocoa, blondies, brownies red headed step child and so on and so forth. I’ve eaten a lot of brownies.

I was always convinced that I preferred ones made with unsweetened chocolate blocks or something like that as opposed to ones made with cocoa. I’m not sure why really; just that the one seemed richer than the other I guess and in my mind, that equated to better brownies. So when I first saw this recipe, I wasn’t sure about them since they use cocoa powder. But the idea of using browned butter intrigued me and man oh man, am I ever glad I did. These are hands down my favorite brownie now. And my husband agrees with me. I don’t count the kids because they’re kids… they would eat chocolate flavored cat littler if I served it. But yes, they liked these too. The ones here count as the third time I’ve made them since before Christmas. Point there being that this time, I was ready to experiment a bit beyond the regular recipe. Not much however. Just added about 1/3 of a cup of raspberry preserves to them (swirled on) before baking and I didn’t use the walnuts this time. But I would seriously suggest making these plain and as per the recipe the first time. One, just to get the hang of it, two, to enjoy these in all their pure chocolatey goodness. After that though, this recipes would lend itself to many variations… and I plan on trying them many ways hehe

Another wonderful thing about this recipe? You don’t need a bowl. This all gets mixed right in the saucepan. Can’t beat that… amazing taste AND easy.

Cocoa Brownies With Browned Butter And A Raspberry Swirl

  • 10 tablespoons unsalted butter
  • 1 1/4 cups sugar
  • 3/4 cup unsweetened powder (NOT drink mix)
  • 1 1/2 teaspoon vanilla extract
  • 1/4 teaspoon salt
  • 1 1/2 teaspoons instant coffee (optional; my addition. You can’t taste it, it just rounds out the chocolate flavor)
  • 2 teaspoons water
  • 2 large eggs, cold from the fridge
  • 1/3 cup plus 1 tablespoon flour
  • 1 cup walnut pieces
  • 1/3 cup raspberry preserves or jam (optional)
  1. Position oven rack in the bottom third of oven and preheat to 325 degrees.
  2. Lightly butter an 8×8 square baking pan and then line with parchment paper. Lightly butter the paper or spray with cooking spray.
  3. Melt the butter in a medium saucepan over medium heat. Cook until the butter isn’t foaming anymore and there are browned bits on the bottom of the pan. Stir often and keep an eye on this. It can go from lovely browned butter to a smelly burned mess in no time flat. This will probably take about 5 minutes or so.
  4. Remove from the heat and immediately add in the cocoa, sugar, water, vanilla and salt. Stir well.
  5. Let cool five minutes. Add the cold eggs to the hot mixture, one at a time, beating well (by hand) after each addition. When the mixture is thick and glossy, add in the flour. Beat for 60 strokes.  I won’t tell anyone however if you do it 61 or even 59. It’s ok. We’re a flexible crowd.
  6. Stir in nuts if using. Spread batter into the prepared pan. This would be the time to swirl in jam if you wanted to do that.
  7. Bake at 325 for about 25 minutes or until a skewer inserted in the center comes out almost, but not quite, clean. Cool the pan on a rack then lift out by the edges of the paper. Cut into 16 squares. Or just leave it in the pan, ladle whipped cream on top, get a spoon and get gloriously ill. Your choice.

Simple Doesn’t Always Mean Simplistic

Fudgy Brownies With Peanut Butter Mousse

I may have ranted mentioned before my irritation with people who are constantly talking about how they would never do this or never do that or “omg, how can you USE this when you cook?!” when it comes to cooking and ingredients. You know the ones I am talking about? The who claim that a preservative has never ever passed their lips, that everything they cook with, feed their family and/or eat is organic, humanely raised, home made down to growing the ingredients themselves, even the wheat. And God forbid they were to ever eat something made with a prepackaged mix. Mind you, these are also the same people who, were a world crisis to happen, would be the first to uphold all of Darwins theories about survival of the fittest because they are too entrenched in one way of cooking and eating. Though, mind you, I am personally convinced that 98% of them frequently hide in their closets and eat Hershey bar or Little Debbie snack cakes, but I’ll admit that I may be projecting a bit there 😛 The other 2 percent just scare me.

But the people who supposedly live by this credo would be missing out when it comes to these brownies. Why? because they are made with *GASPS LOUDLY* a boxed mix. The recipe comes from one of those Pillsbury monthly books. I used to buy them all the time and I have had this one for over 20 years. I’m not even sure they make these cookbooks anymore actually which is a shame because they helped me a LOT in my early years of cooking for a family.

When I first decided to use this recipe, I considered improvising and using a homemade brownie recipe for the base of these. It was a case of wanting to look good and not wanting readers or other bloggers to roll their eyes at me. But then I remembered that when I MADE this blog, one of the things I promised myself and any readers I would get in the future was that I would NOT be someone full of pretense. I would blog the way I cooked. And while I rarely use boxed brownie mix, it has been known to be made in my household. It’s easy, they taste good, it’s a good way to get kids into cooking and it’s quick.

Many of you know that I’m not a peanut butter fan for the most part. But every once in a while I still use it because my family enjoys it. And I have to admit… I really really like these. The brownie is nice and chewy and the creamy topping is rich with a slight tang from the cream cheese. Add in the ganache topping and I would happily wager that they could convert many a boxed mix hater (and peanut butter hater like me). There is nothing about these that screams “boxed mix”. They are also pretty darn attractive and would make a good addition to any cookie tray, be it for the holidays or a Summer bbq… whatever. So go on… go buy a box of brownie mix. G’wan.

Fudgy Brownies With A Creamy Peanut Butter Mousse

  • One box brownie mix, batter prepared according to directions (or make homemade if the spirit moves you)
  • 1 package peanut butter chips, 1/2 cup reserved
  • 3 cups powdered sugar
  • 1/2 cup creamy peanut butter
  • 1/4 cup unsalted butter, softened
  • 4 ounces cream cheese, softened
  • 3 tablespoons milk or cream
  • GANACHE-
  • 6 ounces semi sweet chocolate chips
  • 3/4 cup cream
  1. Preheat oven to 350 degrees. Butter a 13×9 baking pan. Line it with parchment paper then butter the bottom only of the paper. Trust me… use the paper. it’s not expensive and it will be nearly impossibly to get the brownies out neatly otherwise.
  2. Prepare brownie mix according to package directions, stirring the peanut butter chips into the batter (not the reserved 1/2 cup)
  3. Bake according to box directions, using the lowest cookie times so the brownies are fudgy and not hard. (I’m not putting specific times here because different brands may call for different times)
  4. Cool in pan set on wire rack until completely cooled.
  5. When cool, make the mousse. In a large bowl, combine the peanut butter, the butter and the cream cheese. Mix until smooth and creamy. Slowly add in the powdered sugar. beat until you have a spreadable creamy mixture. Eat a few spoonfuls hehe.
  6. Spread the mousse mixture over the top of the brownies.
  7. Refrigerate while you make the ganache.
  8. To make the ganache,  put the semi sweet chocolate in a small bowl. Scald your cream then pour it over the chips. Let it sit for about 3 minutes or so then stir. the heat should have melted the chips quite nicely. Stir until smooth and shiny.
  9. Let the ganache come to room temp. Do NOT pour over the mousse when warm or you’ll melt the mousse.
  10. When it’s at room temp, slowly pour the ganache over the peanut butter mousse. Use it all. When it’s poured, refrigerate the pan to let the ganache set up.
  11. When chilled, cut into squares… or circles… or hexagons if that makes you happy.

Print Friendly and PDF