Easy Spicy Southwestern Rice & Beans (& A Hamilton Beach Giveaway!)

Easy Spicy Southwestern Rice 4

Hey, everyone! Tis me, your local loon. I have a delicious recipe for you (do I do ANY other kind? I mean…really? Pshaw! *looks totally fake humble* 😛 ) as well as a Hamilton Beach giveaway. As you already know, I’ve been a proud ambassador for them for a couple of years now and I love their products. This is the final 2016 review and it’s one I personally love. I had a rice cooker I bought for $3.99 at Goodwill before this and sure, it worked; more or less. Problem was, all it did was rice and the way the inside lid was made, you couldn’t clean under it and there was nothing stopping condensation from getting up in there. So what did that lead to? The starches in the water from the rice would get in there and mold and every time I opened the lid, all that oh so nasty water would drip down the backside of the cooker. Not INTO the rice, but still…  I was soooo ready for a new rice cooker.
We’ve been using it literally since the day it came and I am in love with it. I am a total and complete failure at cooking rice on the stove. I even burn rice a roni. Guess what? I can make my rice a roni in this rice cooker and no longer have to scrape it off the bottom of a pan, lol. Plus, we eat a lot of brown rice and that can be difficult to get cooked all the way through. Another plus; this cooker has a steamer basket up top that can be used at the same time as when you have rice cooking or by itself. That comes in handy getting veggies steamed while the rice is cooking or can be used to, say, make some fish up top while the rice cooks below. Did I forget to mention that you can also cook oatmeal and other grains in this? Yup. You totally want to try to win the Hamilton Beach 4-20 Cup Rice And Hot Cereal Cooker or if you don’t win, go to their website to buy it. While you’re there, you can check out some of the other great appliances they have on their site  Here are the cool features of the cooker-
Hamilton Beach Rice Cooker
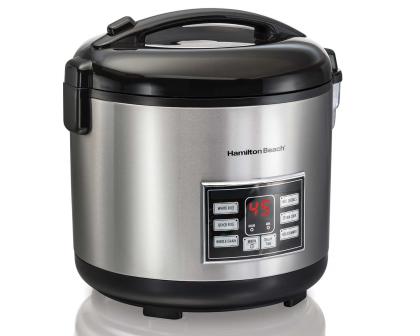
4-20 cup cooked rice capacity – 2-10 cup uncooked rice capacity
With rice rinser/steam basket
Great for oatmeal, grits, and cream of wheat
Delay start makes breakfast and meal planning easier
Use your own recipe or packaged pasta & rice mixes
Automatically shifts to warm after cooking
White rice: cooks all varieties of white rice, including short- and long-grain rice
Quick rice: great for preparing rice in a hurry
Whole grain: for brown rice, farro, quinoa, and other whole grains
Keep warm: illuminates when cooking is complete
Delay start: prepare for cooking up to 15 hours in advance
Heat/simmer: use this function for flavored pasta and rice mixes, beans, soups, and one-pot meals
Steam cook: vegetables, meats, fish, and more
Hot cereals: great for oatmeal, grits, and cream of wheat

cooking timer

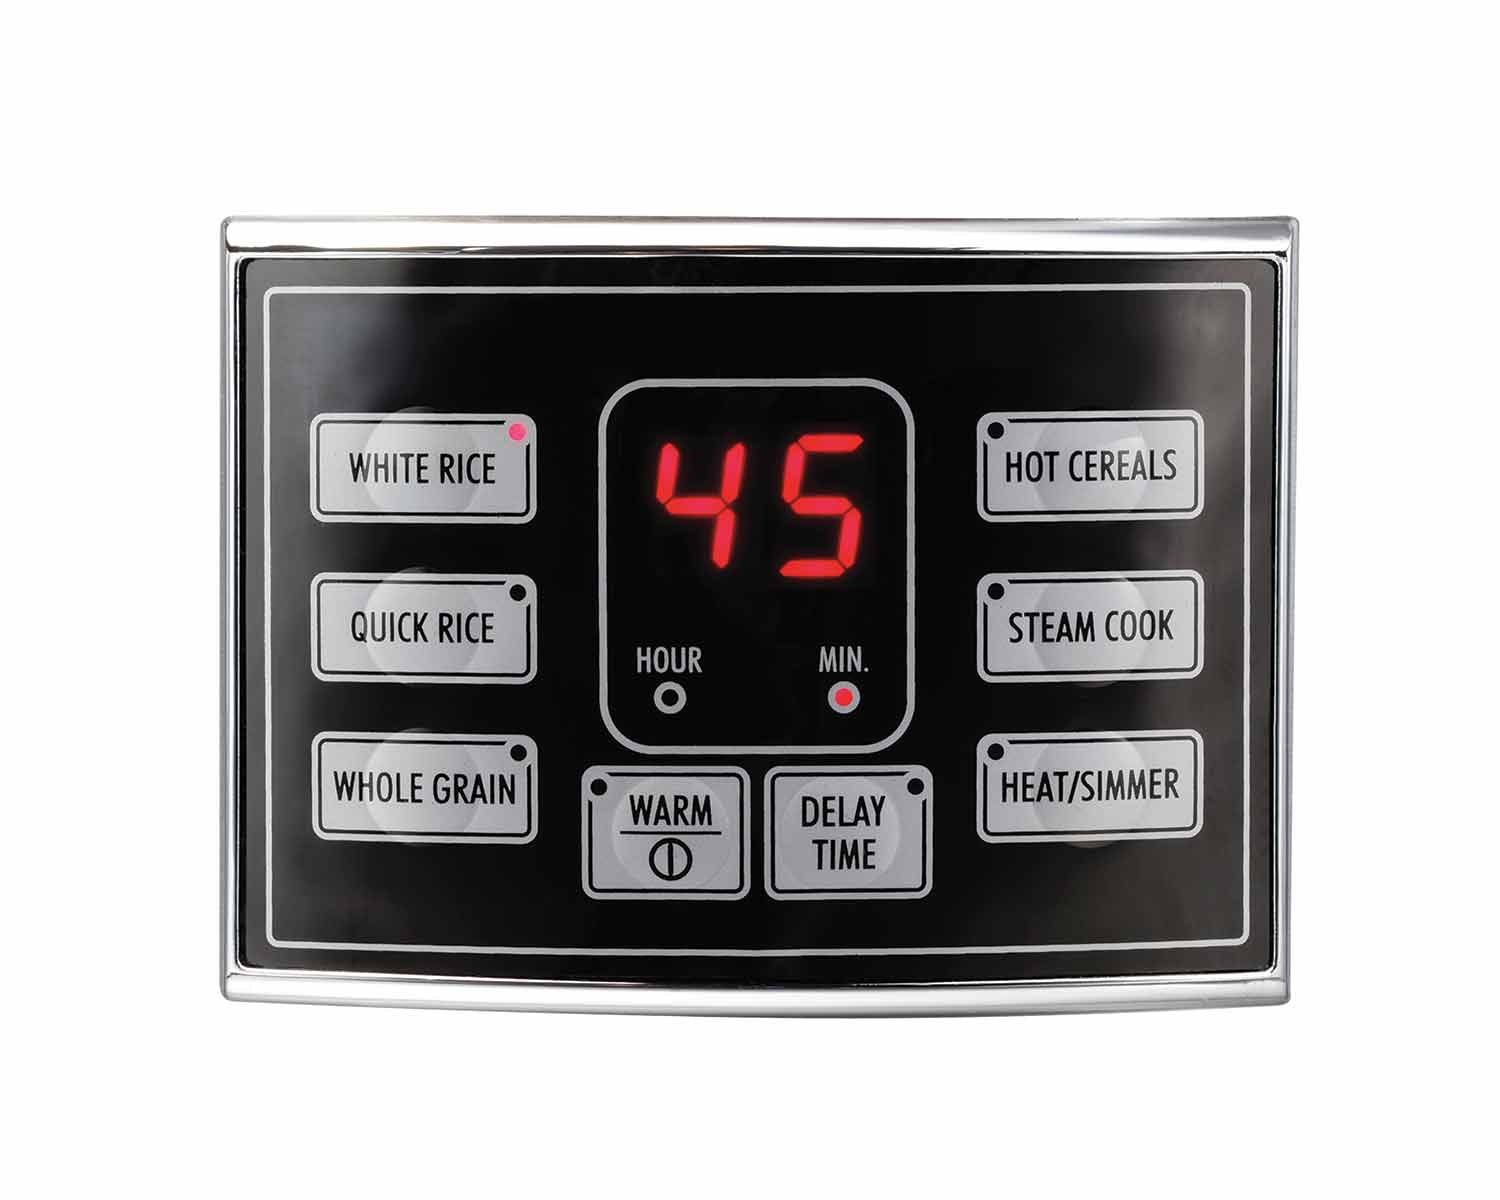
The push button timer area of the cooker

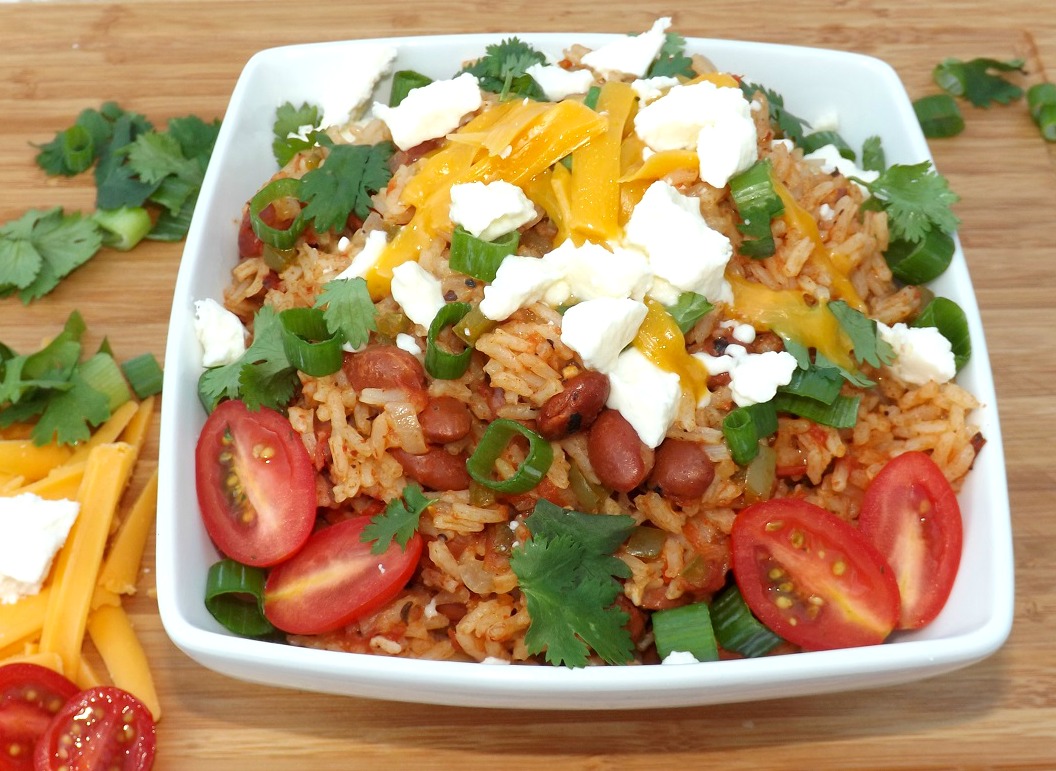
So what did I make? Well, I have a confession to make. I adore pretty much any flavor of Rice A Roni with a definite weakness for both the Mexican and the Spanish ones. So, I wanted to make a rice similar to those, but without having to stand over the stove worrying that I was going to burn it. I have to say, I succeeded admirably *she again says humbly* I have one step in here outside of the rice cooker, but it can easily be considered optional. I saute the veggies for a couple of minutes with the rice, then dump it all in the rice cooker. I wanted to get rid of the raw taste of the veg, plus brown the rice a bit. But again, that step is totally up to you. I also added a can of pinto beans cause I adore rice and beans. No matter what though, get one of these Hamilton Beach rice cookers and make this rice!

Easy Spicy Southwestern Rice & Beans

  • 2 tablespoons vegetable oil
  • 1/3 cup minced green pepper
  • 1/2 cup minced onion
  • 1/2 tablespoon minced jalapeno pepper
  • 1 tablespoon minced garlic
  • 3/4 cup long grain white rice
  • 1 1/4 cups good quality chicken broth
  • 1/2 of a 15 ounce can of salsa style fire roasted diced tomatoes (you could sub whatever flavor you want, or plain. Just make sure it is a type that has a good amount of liquid.)
  • 1 well drained and rinsed can of pinto beans (again, make this how YOU like it. Prefer black beans? Use them, just make sure you rinse them well. Or maybe kidney beans. Or NO beans)
  • 2 tablespoons ketchup (no, it doesn’t make the rice taste ketchupy. It just cuts the acidity of the tomatoes some)
  • 1 tablespoon of either McCormick Mexican seasoning or McCormick Southwestern seasoning (they are quite similar in taste, so either would work)
  • a few dashes of liquid smoke
  • sliced green onions, cilantro, grape tomatoes and various cheese for garnish
  1. Pour the oil into a medium non stick pan (8 to 10 inch),  then add the veggies. Sautee over medium heat for maybe 3 minutes or, just enough to cook off some of the rawness. Add in the rice, crank the heat up to medium high and cook for about two minutes more, or until some of the rice is a light golden brown,
  2. Scoop all of this straight into the rice cooker. Pour the chicken broth and diced tomatoes with their liquid over the top of the rice.
  3. Add the ketchup, liquid smoke, can of drained beans, and seasoning. Give this all a few good stirs, then close the lid, set the cooker for white rice and go read a book, or do some housework (you know you prefer the book idea).
  4. When it’s done, stir it well, then spoon it into a serving dish. Garnish with sliced green onions, fresh cilantro, some chopped grape tomatoes and cheese. I used some cheddar and some queso fresco. This was so good!

Easy Spicy Southwestern Rice 7

Copyright Notice: From Cupcakes To Caviar images and original content are copyright protected. Please do not publish these materials anywhere without prior permission.

Now for the giveaway!! Hamilton Beach is kindly allowing me to offer one lucky reader one of these lovely rice cookers all of their own. Just use the entry form below, doing as few or as many of the types of entries as you want. I will choose a random winner in a week and notify them by email. They will have 48 hours to get back to me. if they don’t, an alternate winner will be chosen. Good luck! [promosimple id=”a5d8″]

Hamilton Beach sent me a rice cooker for review, but all opinions in this post are 100% my own.


My favorite Brown Butter Chocolate Chip Cookies & A Hamilton Beach Giveaway!

Browned Butter Chocolate Chip & Toffee Cookies

Browned Butter Chocolate Chip & Toffee Cookies

It’s time for me to get to enjoy being a Hamilton Beach Ambassador one more time! I always love when I get the chance to share my thoughts on one of their products with you, and I especially love getting to give away whatever that product is to one of you! So, what do we have to talk about today? The most recent thing the lovely people at Hamilton Beach sent to me is their Easy Reach 4 Slice Toaster Oven .

4 Slice Easy Reachâ„¢ Toaster Oven with Roll-Top Door

4 Slice Easy Reachâ„¢ Toaster Oven with Roll-Top Door

This toaster oven is so darn cute! Yes, I just called a toaster oven cute. But really, it is.31334 Other women will understand it, while men will just shake their heads and assume I’m insane; rather like my husband does when I say that those teeny tiny mini sized bottles of ketchup are cute. Inside, this oven is only a wee bit smaller seeming than the typical toaster oven. What makes it seems tinier is it’s lack of bulk. You have a glass door on the front that rolls up rather than opens downward. This has a pro and a con. It makes it easier to get into the oven without worrying about the door getting in your way as you pull things out. BUT… and this is again something most women will “get”; it also means that you can’t set any sort of knick knacks or decorations on top of this oven. On my old one, I kept the cup that held all the keys, my ceramic cow named Herman (don’t ask) and a knick knack that once belonged to my mother in law. With this one, I can’t do that due to the roll top door.
But it makes up for it in other ways. The Hamilton Beach 4 Slice goes from 200 degrees all the way up to 450 degrees. Beyond toasting, you have the already mentioned bake function, plus a broil one. I can see THAT one working great for melting the cheese on top of something or crisping up a food; making burgers.

Did I mention that the door was removable? Can we say “easy cleanup”?! Unlike ones where you end up with a door so splattered and icky that you can’t see through it, with this one, after each use, just take the door off, wash it up, dry it and put it back on. No mess! 31334-04 This comes with a removable rack that can be used in two different positions and a crumb tray that isn’t attached inside, so you can pull it out easily and clean it off.
My old toaster oven? I was afraid to actually COOK anything in it. I used it for toast and frozen pizzas and that was about it. But I knew if I was going to be able to accurately review this for you, I needed to branch out a little. I thought about homemade pizza, then realized that was still hedging my bets; pizza is pizza when it comes to baking. So I finally decided to make one of my family’s favorite cookies; my Brown Butter Chocolate Chip & Toffee Cookies. This cookie isn’t cheap to make generally, so I was counting on this oven to do it correctly and not end up burning the tops or the bottoms like other ones have done. So I took a deep breath and dived in.
IT WORKED!! The cookies came out looking just like they should, though they seemed to finish baking about a minute and a half quicker. Obviously, you can’t fit a full sized tray of cookies in there, but the oven comes with a tray and that tray fits four cookies just fine. If made smaller, you could fit six, but I like generously sized cookies 😀 My sons got a hold of the cookies (I only got ONE cookie! Darn kids!) before I got a photo (I had only made a half batch) so the photo I am using here is my old one, but trust me, there was no difference in the cookies.
As for the cookies themselves, if you haven’t tried these before, now’s your chance! These cookies are awesome, if I do say so myself, hehe. They are ooey gooey, with a slight nutty flavor from the browned butter, but no actual pesky nuts. They have that wonderful soft middle with the crispy edge. You could make a half batch like I did and have enough for the here and now, or make the full batch of dough, freeze half in cookie sized balls, then bake in the toaster oven anytime you get a craving. You can bake straight from frozen; just add a couple of minutes time on.

                         Browned Butter Chocolate Chip & Toffee Cookies

  • 1 cup (2 sticks) unsalted butter, browned to a golden brown color & cooled
  • 1 cup packed dark brown sugar
  • 1/3 cup sugar
  • 1 egg
  • 1 egg yolk
  • 2 tablespoons cream
  • 1 tablespoon vanilla extract
  • 2 1/4 cups all purpose flour
  • 1 teaspoon baking soda
  • 1/2 teaspoon salt
  • 1 12 ounce bag semi sweet chocolate chips
  • 1 bag Heath Bar toffee chips (or 4 Heath bars, crushed)


  1. To brown the butter, in a medium saucepan, over medium heat, melt the butter. Let cook,stirring frequently, until it turns a golden brown color. This can take anywhere from five to ten minutes. It will sputter, spit and foam a lot at first then that will stop. Do NOT walk away from this as it can go from yellowish butter to burnt garbage very quickly.
  2. Pour the browned butter into a large bowl, leaving behind all the solid bits at the bottom of the pot (though if you get some in there it’s no big deal. Don’t worry about it.). Let cool.
  3. When cool, pour both kinds of sugar into the bowl with the butter. Beat until well mixed.
  4. Add in the egg and egg yolk, then pour in the vanilla and the cream. Beat on low speed until well mixed.
  5. In a small bowl, combine the flour, baking soda and salt.
  6. Pour the dry ingredients into the wet and at slow speed (unless you want to be covered in flying flour), mix until you have a cohesive cookie dough.
  7. Fold in the chocolate chips and the toffee bits.
  8. Now you can chill for about an hour if you want. The original recipe says to but I didn’t bother and they were fine.
  9. Heat oven to 350 degrees. Line a cookie sheet with parchment paper or a silicone mat. If you don’t have a silicone mat, please go buy one. They aren’t cheap but oh my, they’re worth it. Trust me on this. The first time you use it, you’ll totally understand. Spray the cookie sheet with baking spray.
  10. Scoop the cookies up and place about 2 inches apart on the lined cookie sheet.
  11. Bake at 350 until golden brown on the edges, about 10 to 12 minutes. Do NOT over bake or they will lose that delicious softness and gooeyness (yes, that is now a word). They should be firm on top if you press one lightly but not hard.
  12. Let cool for a minute on the sheet then transfer over to a wire rack to finish cooling.

Copyright Notice: From Cupcakes To Caviar images and original content are copyright protected. Please do not publish these materials anywhere without prior permission.

Now for the fun part; the giveaway! Enter below for your chance (chances) to win one of these Hamilton Beach 4 Slice Toaster Ovens for yourself!

[promosimple id=”95f8″]

Disclosure-The lovely people at Hamilton Beach provided me with a 4 Slice Easy Reach Toaster Oven With Roll Top Door to review, but all opinions are 100% my own and completely honest.

Old Fashioned Banana Bread & Hamilton Beach Freebies (maybe for YOU!?)

Old Fashioned Banana Bread

Old Fashioned Banana Bread

Yes, yes I am still alive. As Mark Twain is said to have remarked, “Rumors of my death have been highly exaggerated”. Mind you, even as ancient as I am, I wasn’t around back then, so I don’t know that he actually uttered those words. But if one goes by the claims of the internet, he, Abraham Lincoln, Samuel L Jackson and Morgan Freeman are the only people who ever said anything worth quoting, other than a few random quotes attributed to Thomas Jefferson or Patrick Henry.
But I digress. Imagine that. I am here to bring you food!! Plus a giveaway. You all know I have had the much envied position of being a Hamilton Beach Ambassador for a couple of years now. As one, I get the opportunity to review their products from time to time and then offer those same products to you, my faithful (and slightly offbeat and rather warped) readers.
Today, I am bringing you two of the most iconic small appliances from Hamilton Beach– their 6 Speed Hand Mixer and their pretty darn awesome Stand Mixer. Let me tell you my thoughts on both now- First, the 6 Speed Hand Mixer-

Hamilton Beach Hand Mixer

Hamilton Beach Hand Mixer

I love this bad boy. This is the type of mixer one reaches for when doing the typical cooking/baking that requires a mixer. it is sturdy, easy to use ( I love the hand grip. It fits comfortably in my hand) and this one comes with some cool attachments,Hamilton Beach Attachments including a milkshake mixer (think of it rather like an immersion blender). I also love the storage area underneath. it’s a nice, convenient and NEAT (I have a thing for anything that leads to less drawer clutter) way to keep the attachments nearby. This mixer works well for everyday thing and has a “burst” button that gives you some extra power when you need it. it’s pretty much the perfect everyday mixer.
Now on to the Hamilton Beach Stand Mixer

Hamilton Beach Stand Mixer

Hamilton Beach Stand Mixer

. This one is a bit more powerful than the hand mixer and has the convenience of the bowl and hands off usage. It doesn’t have the horsepower, so to speak, to do heavy doughs easily, so no, this isn’t one to try to make 4 loaves of whole wheat bread in. But for regular baking and mixing, this is a workhorse. It worked fine for me when I made chocolate chip cookie dough in it and we all know that that dough can be rather dense. The only thing I DIDN’T like though I know I may be in the minority with this, were the stability suction cups on the bottom to hold it still when mixing. They are a great idea, but if one tries to move the mixer from one spot to another, the way it sticks to the counter makes it pull up forcefully and can make the contents of the bowl go everywhere. Don’t ask me how I know this, please. Ahem. This one comes with a standard flat beater hook, a dough hook and a whisk attachment.Stand Mixer AttachmentsYou want to win these. Trust me. You do. Both together are close to a $150.00 value and with the attachments, are sooooo helpful in the kitchen! I made my famous (hey, it is… in my household! 😛 ) Old fashioned Banana Bread using the hand mixer and it worked wonderfully. Oh, you want the recipe, you say? Well, ok, if I MUST *gives you an evil glare and gets on to the recipe* 😛 <3

Old Fashioned Banana Bread

  • 2 1/2 cups flour
  • 1 teaspoon salt
  • 2 teaspoons baking soda
  • 1 cup solid shortening
  • 1 1/2 cups sugar
  • 2 cups of mashed bananas (this is about 5 to 6 medium bananas)
  • 1 tablespoon vanilla extract
  • 1 teaspoon banana flavoring
  • 1 teaspoon butter flavoring (optional, but it adds a nice flavor)
  • 4 eggs
  • 1 cup coarsely chopped toasted walnuts (toast in a single layer in a 350 oven until they are a light golden brown)
  1. Preheat your oven to 350. Grease a 10 inch loaf pan (if you don’t have a 10 inch pan, make this in a 9 inch, and pour about 2/3 of a cup of batter into a mini loaf pan, a couple of muffin cups or a ramekin and bake it in there or you’ll end up with overflow everywhere) and set aside.
  2. In a small bowl, whisk together the flour, salt and baking soda.
  3. In a large bowl, on low speed, cream together the shortening and the sugar until well combined. Add in the mashed bananas, vanilla, banana and butter flavorings and eggs. Beat well.
  4. Dump in the flour mixture and on the lowest speed, combine JUST until mixed. it’s fine if there are a few lumps or white streaks. I have said before and will say again, you do NOT want to over beat quick breads and/or muffins. You end up with tough rubbery final products doing that. Resist that urge.
  5. Fold in the toasted walnuts. Again; don’t over mix.
  6. Pour the batter into the prepared pan/pans.  Bake at 350 for 55 to 75 minutes (yes, that’s a large gap. I’ve had it done by both both times. I have no idea why other than my oven is stupid 😛 ) or until a wooden skewer inserted in the middle comes out clean. If this starts to brown too much, just lay a piece of foil over the top as it bakes.
  7. Let it sit in the pan for ten minutes, then gently invert it over your hands and transfer it to a rack to finish cooling.

In the interest of full disclosure, Hamilton Beach provided me with both mixers for review and my personal use. But all opinions in here are 100% my own.

Now! On to the giveaway!!! Use the PromoSimple entry form below to enter to win both of those cool mixers!

[promosimple id=”8e42″]

Chocolate Covered Raspberry Milkshake & A Hamilton Beach Giveaway

Chocolate Covered Raspberry Milkshake

Chocolate Covered Raspberry Milkshake


Hey everybody! It’s time for a creamy Summer recipe and a Hamilton Beach giveaway. I still so love being one of their ambassadors. Their products are wonderful and this one is no exception.  Before I give you the recipe and details on the giveaway, let me tell you why you want this blender. 😀

BlenderRaise your hand if you’ve ever had a blender that came with a cheap, “look at this funny and it’ll break” plastic jar! *Raises my hand and waggles it around wildly*. Not with this bad boy. This jar is SOLID. It’s a nice thick, heavy glass jar with a good heft to it. If you can manage to break this jar, you should probably not be trusted with kitchen appliances or sharp objects, hehe.

Also, have you ever been making something in the blender and it gets stuck down by the bottom? Then you have to turn it off and shove a spoon or butter knife down by the blades and try to unclog it. That won’t happen here for two reason. The first is that this has a 700 watt motor and it makes the liquids move! The “wave action” continually forces the mixture down towards the blades so it doesn’t get clogged. This recipe used some thick ice cream and not a whole lot of liquid, but the blender had no problems breaking it down. The second is that if things DO get stuck, they give you what they call a “stir spoon”, a thick plastic spoon that works wonders for stirring things up down by the bottom of the blender.

Another plus to the Hamilton Beach Wave Action Blender is the pour spout. This one seals up when the blender is in use and gently pulls open when you’re ready to pour and you don’t end up with a puddle on the counter as you have with some blenders that are hard to pour from due to an overly large pouring area.

The ONLY issue I have with the Hamilton Beach Wave Action Blender is the lid. It fits so well that it can be difficult for hands like mine, that are arthritic, to pull off. Even if I opened the pour spout to let air in, it was still a struggle to get the lid off. BUT… that said, for those of you with no joint pain, that shouldn’t be a problem.

Now, on to what I know you want; the recipe for a creamy, delicious Chocolate Covered Raspberry Shake and a chance to win one of these fantastic blenders.

Chocolate Covered Raspberry Milkshake

  • 2 cups chocolate ice cream
  • 1/2 cup good quality chocolate milk (GOOD stuff here, not some cheap watery store brand)
  • 2 dry pints fresh raspberries
  • 1 1/2 tablespoons instant coffee granules
  • chocolate syrup and whipped cream for garnish
  1. Dump your raspberries in a large bowl and smash them down to pulp. The easiest way I’ve found is simply to take a flat bottomed glass and smush them. No getting out a food processor and it takes just seconds.
  2. Then, push them through a fine mesh strainer (I use the same flat bottomed glass to push them through) into a large measuring cup. You should end up with about 3/4 of a cup of puree. It’s ok if it’s a bit less or more.
  3. Dissolve the coffee granules in the chocolate milk. Pour the milk into the blender, then add the ice cream and 1/2 cup of the berry puree. If you want a thinner shake or just want to make it go farther, add a bit more chocolate milk. Just make sure to add some more raspberry puree also, so you don’t overpower the raspberry flavor with the chocolate.
  4. Use the milkshake setting on the Hamilton Beach Wave Action Blender to blend it all up until it’s smooth and creamy.
  5. Get two 8 to 12 ounce glasses out. Tilt the glasses sideways and drizzle the chocolate syrup in a circle over the inside of the glass. It will drizzle down and make a pretty design on the inside of the glass. Divide the shake mixture between the two glasses and top with whipped cream, some of the extra raspberry puree and some chocolate syrup. Enjoy!!

Copyright Notice: From Cupcakes To Caviar images and original content are copyright protected. Please do not publish these materials anywhere without prior permission.

Hamilton Beach provided me with a Hamilton Beach Wave Action Blender for review  and will send one to one winner of my giveaway, 18 years or older, in the United States. I received no other compensation for this and all opinions are my own.

Caramel Mocha Shake With Cocoa Whipped Cream & A Hamilton Beach Giveaway!!


Caramel Mocha Shake With Cocoa Whipped Cream


My husband is one of those people who has to have his gallon few cups of coffee in the morning when he gets up or it is like living with a drowsy grizzly bear. I’m normally a tea person myself, but in the last year or so have gotten into the habit of having a cup or two of coffee every other day or so. I think it came about because of the convenience of things like K-Cups. I wasn’t feeling like I was wasting coffee by making a half pot and not even finishing that much. So when the lovely people at Hamilton Beach contacted me and asked if I was interested in doing the first Brand Ambassador Campaign of 2015 by receiving and reviewing one of their 2-Way FlexBrew Coffee Makers , I was thrilled. I thoroughly enjoyed working with them last year and hope to continue to do so for a long time. Their products are wonderful and this coffee maker was no exception.

Hamilton Beach 2-Way FlexBrew Coffee Maker

Hamilton Beach 2-Way FlexBrew Coffee Maker

The 2-Way FlexBrew Coffee Makers is so darn convenient! It works for the coffee guzzlers like my husband because on one side you have a 12 cup carafe and can make a full pot to get going. On the other side is an individual brewer where you can make it one cup at a time using a K-Cup pod or the coffee reservoir that comes with it. Using the reservoir, you can use whatever type/flavor of coffee you prefer, not just a prepackaged pod. Better for the environment and less expensive. This side of the brewer works wonderfully for someone like me who does it one cup at a time  So far, we are loving the FlexBrew. There is a bit of a learning curve with the K-Cup side as you insert the pods a bit differently and it can be tricky getting the insert in until you get used to it. But once you do, it’s easy peasy. The K-Cup side can brew up to a 14 ounce cup of coffee and like I said, you can use the insert it comes with to use your own coffee and not a pod. Another feature I love is that you can make the coffee regular strength or, as they call it, “bold”. Basically, bold has the coffee stay in the filter for a bit longer, thus draining out every bit of flavor and making a stronger cup of coffee. This works great for me on the days when I’m needing a bit more of a caffeine jolt.

As usual when I review one of their products, Hamilton Beach is letting me offer one of these Flex Brew Coffee Makers to one of my readers. That reader could be you! The entry form is down below *points down*

With the weather heating up, it was a natural choice for me to make a yummy coffee milkshake using coffee made in the FlexBrew. Oh my, this puts those drinks from a certain national coffee chain to shame. I used a chocolate caramel gelato (imagine that…me…using caramel :-P) and instead of plain old milk, I used chocolate milk in this. Then I topped it off with a cocoa whipped cream and a drizzle of caramel syrup. With the coffee brewing time included, this takes maybe 7 minutes to make. You can be sitting on your porch with this not particularly diet friendly drink in hand, enjoying the weather. And if you were really feeling froggy, you could throw a shot or two of Kahlua or Baileys in this to give it an adult flair. 😀

You know the drill… and don’t forget to enter the giveaway!!!!

Caramel Mocha Shake With Cocoa Whipped Cream

  • 1/2 cup freshly brewed coffee (throw a couple of ice cubes in it to cool it down quickly)
  • 2 cups chocolate or chocolate/caramel gelato (I used Breyers Chocolate Caramel Gelato)
  • 1 1/2 cups good quality chocolate milk (please don’t use something like a Yoo-Hoo. I’ll cry. Those are just chocolate flavored water.)
  • 2 cups ice cubes
  • 2 tablespoons caramel syrup
  • Cocoa whipped cream-
  • 1/2 cup heavy cream
  • 2 tablespoons sugar
  • 1 tablespoon unsweetened cocoa powder
  • dash of vanilla extract
  1. Make your whipped cream while your coffee brews- simply combine all the whipped cream ingredients in a medium bowl and use a whisk to beat until firm peaks form, about 4 minutes. You can do it… work those arm muscles!
  2. Combine all the shake ingredients (and don’t forget to add that shot of Kahlua if you’re wanting to go that route) in a blender. Cover and blend on high speed until thoroughly blended, about 2 minutes.
  3. Pour into 3 glasses and top with the cocoa whipped cream. Drizzle with some extra caramel syrup.

Copyright Notice: From Cupcakes To Caviar images and original content are copyright protected. Please do not publish these materials anywhere without prior permission.

Hamilton Beach provided me with a 2-Way Flexbrew Coffee maker for myself and will send one to one winner of my giveaway, 18 years or older, in the United States. I received no other compensation for this and all opinions are my own.

[promosimple id=”733c”]


Product Info for the Hamilton Beach 2-Way FlexBrew Coffee Maker-

  • Single serve side:
  • Compatible with K-Cup®* Packs or ground coffee
  • Brews up to 14oz from ground coffee in travel mug**
  • Adjustable cup rest allows for standard-size cups or travel mugs
  • Better coffee extraction than the leading competitor
  • 12 cup carafe:
    • Brew a full pot of coffee
    • Regular or bold brew strength
    • Programmable timer with 2 hour automatic shutoff
    • Automatic pause & serve to grab a cup before the brew cycle is done
  • Durable, stainless steel features and dishwasher safe, removable parts
  • Equipped with a “Quick Start” Guide with simple, step-by-step brewing guidelines
  • Customer service support available through a US toll-free number
  • One-year warranty
  • This model is the same as 49983A, 49983P and 49983S.

Brewing with a Single-Serve Pack 

For some java drinkers, pouring fresh-ground coffee into their coffeemaker is the perfect start to their day. For other coffee lovers, being able to quickly insert a pre-packaged, single portion pack into their coffeemaker and enjoy a piping hot cup in a few minutes is a match made in heaven. The 2-Way FlexBrew® Coffeemaker offers the added convenience factor of a pack holder, which allows quick instant brewing in less time than an in-store café experience. Simply insert the single-serve pack and push the lever down – that’s it.

Brewing with Ground Coffee

Pre-packaged coffee isn’t for everyone or every palate. The 2-Way FlexBrew® Coffeemaker caters to coffee aficionados by featuring a single-serve permanent filter brew basket that holds a variety of fresh-tasting ground coffee. You can grind your own coffee beans to the medium-grind setting or save time and purchase pre-ground coffee. Brands such as Folgers, Maxwell House, Dunkin’ Donuts, and Starbucks are recommended because they are medium-grind coffees.

Note: Coffee that is ground too finely will cause an overflow. If you are unsure about the coarseness of your coffee, check with your coffee manufacturer.

About Homemade Brewing

Did you know that 86% of coffee drinkers still brew most of their java at home? With more and more Americans picking up the coffee habit and cutting back to save money, coffeemakers are now being designed to be more feasible and economical for the home budget and lifestyle. Source: 2012, National Coffee Association of USA

Caramel Mocha Shake With Cocoa Whipped Cream2


Â