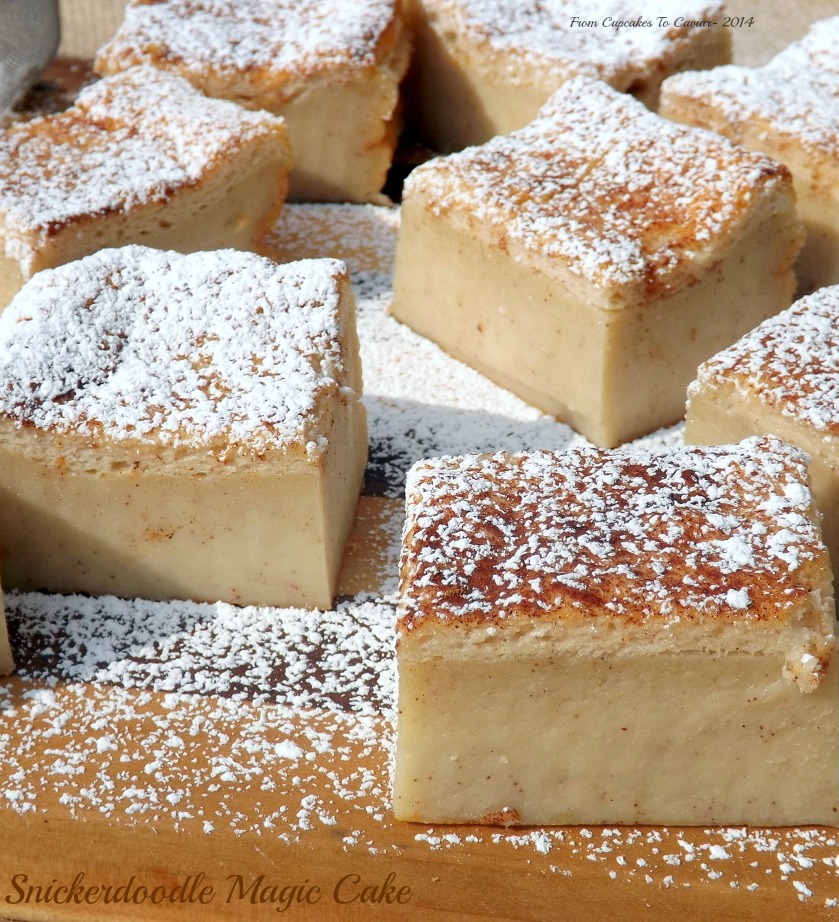
Snickerdoodle Magic Cake

I think we all know by now that I tend to be late on trends. I am ornery, I am contrary, I am too darn independent for my own good and every time a food gets trendy, I mentally fold my arms over my chest, stick my nose up in the air, give a silent “hmmpphhh” and walk off until it’s no longer trendy. Which of course is a case of biting off my nose to spite my face (on THAT note, you know how most sayings got their starts in something that actually happened at one time? Well, I want to know who the heck bit off their own nose to spite their face and how the heck they even did that! What? That’s the way my mind works. I never claimed it was pretty in my head!) because then, by the time I come off my high horse and try something, everyone else is already bored with it.
But I think I may have gotten this one in under the wire. I am still seeing incarnations of “Magic Cake” all over the place. You can see different flavors everywhere you look. Except for one flavor. Snickerdoodle. I looked and looked to make sure and no one else had a Snickerdoodle Magic Cake. Woo to the Hoo for being first at something!
What is a Magic Cake, you ask? In theory, the thin batter bakes up into 3 distinct layers. I say in theory because I tried twice and mine didn’t separate. Mind you, I used cream in this instead of milk thus the liquid that is fattier could have had something to do with that. But you know what? That’s ok. This is good as it is and I wouldn’t change it just to get layers. Layers, schmayers. Pahhh! Who needs ’em?! I ended up with a nice thick custardy layer that has a smidgen of a cakey layer on top, all of this flavored with the cinnamon sugar taste that makes you think of Snickerdoodles.
You know the drill…. 🙂
Snickerdoodle Magic Cake
- 4 eggs, separated
- 3/4 teaspoon cream of tarter
- 2 teaspoons vanilla extract
- 3/4 cup sugar, divided
- 2 cups heavy cream, lightly warmed
- 3/4 cup flour, whisked together with 1 1/2 teaspoons cinnamon and 1/2 teaspoon salt
- 1/2 cup unsalted butter, melted
- 1/4 cup powdered sugar mixed with 1/2 teaspoon cinnamon for dusting the top of the cake
- Preheat oven to 325 degrees. Line an 8×8 baking pan with foil and lightly grease the foil.
- In a small bowl, at high speed, beat the egg whites with 1/4 cup of the sugar and the cream of tarter until stiff peaks form, about five minutes. Set aside.
- In a medium bowl, at high speed, beat together the egg yolks and the remaining sugar until pale yellow and creamy looking.
- Mix in the flour mixture. Now, use a whisk to slowly whisk in the warm cream (trust me; don’t use an electric beater. The mixture is soupy and will splatter EVERYWHERE.), then mix in the butter and finally, fold in the egg whites.
- Pour this into the prepared pan and bake at 325 degrees until the top is a nice light golden brown and the top is firm but still jiggles some when shaken, about 30 to 45 minutes.
- Let cool in the pan until completely cooled (I refrigerated mine because I have a thing for chilled custards), then carefully use the foil to lift the whole thing out onto a board to cut into serving sized pieces. Dust with the powdered sugar/cinnamon mixture. Serve.
Copyright Notice: From Cupcakes To Caviar images and original content are copyright protected. Please do not publish these materials anywhere without prior permission.