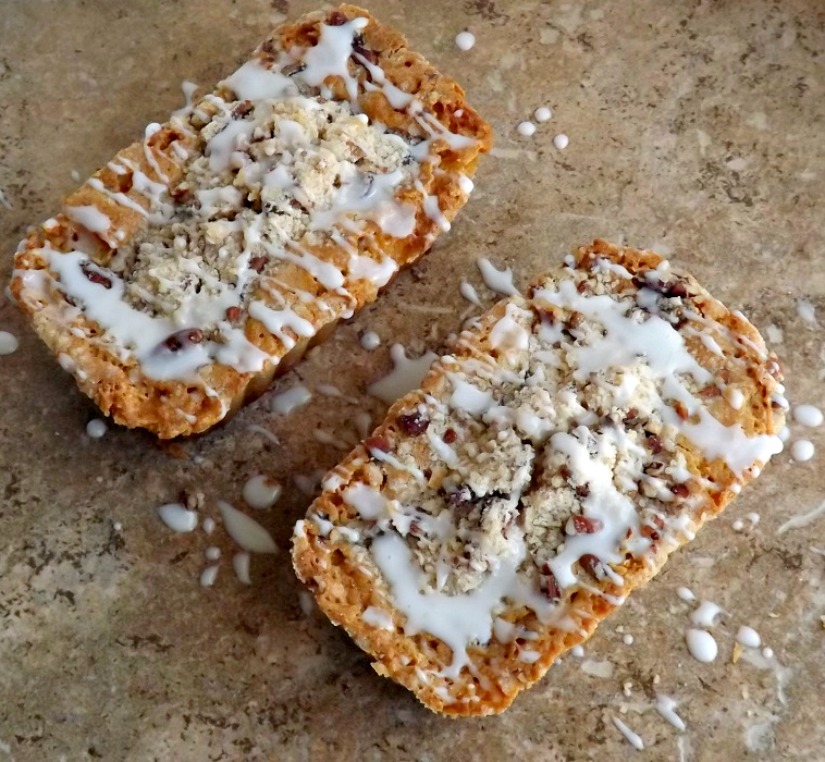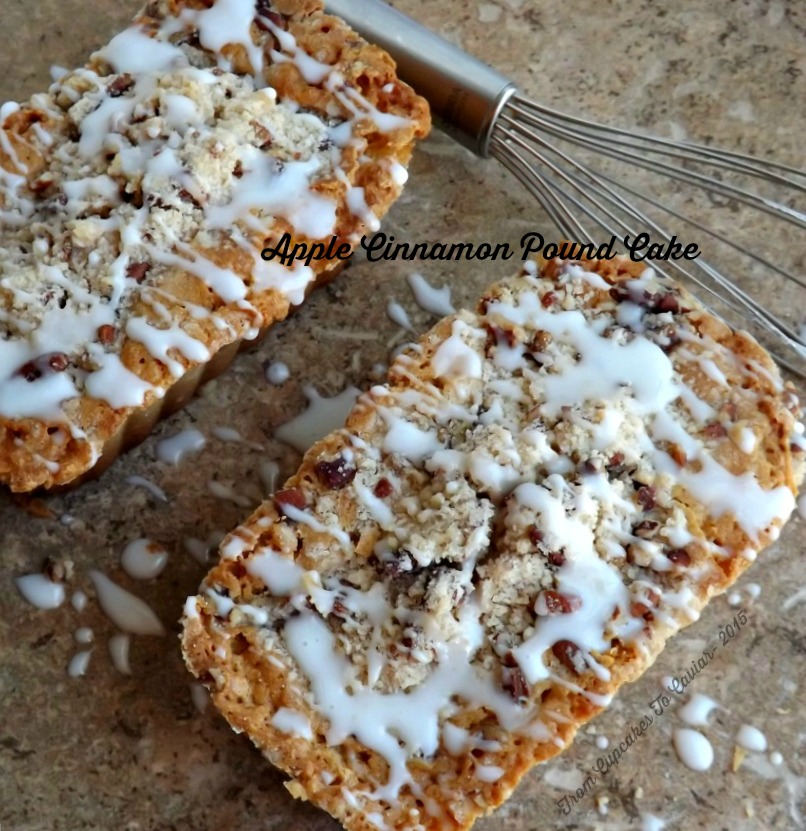
Apple Cinnamon Pound Cake

I’ve been on a bit of a hiatus recently. I HAD been trying to post Monday through Friday, but some minor health issues have prevented that much posting. But… God willing, I’m back. Ok, so it’s not Monday yet, but I didn’t feel like waiting. Because I love you. And I wanted cake. Now. On a totally unrelated note, who had an awesome Valentines Day!? Neither my husband nor I are big on the whole “show your affection one day a year” thing, so I live vicariously through the roses and chocolates of others. I do however, tend to get small gifts for my kids on Valentines Day. I got the boys little boxes of chocolates for a buck apiece at Wal-Mart. Only young males could get those and then say “wow, this is awesome chocolate, momma. And it smells so good!” It takes a 5 pound box of Godiva to get that reaction from me.
I’ve said before that when it comes to cake, pound cake always tops my list. It’s buttery…since most of the recipes for it use about 42 sticks of butter. It’s rich; that could be that whole butter thing again. Yet, it’s not heavy and overly sweet as cakes with frosting can be. Which means you can eat more.
I got the original recipe for this from a Southern Living Magazine. No idea what month or year since it’s just a torn out recipe now. But it’s quite tasty. It didn’t turn out particularly pretty, nor did it rise as high as I’m used to pound cake rising, but it tastes really good and ultimately, isn’t that all that matters? This has a lovely apple cinnamon flavor and those yummy, crispity (yes, that’s now a word. Welcome to “Janet Language”) edges everyone loves. Plus, you get streusel and we all know how much I love streusel. it could be that whole butter thing with that, too. Butter is love. Butter is also big hips, greasy fingers and hardened arteries but I prefer to think of it as love.
You know the drill…. 😀
Mrs. Cupcake… who needs more pound cake.
Mini Apple Cinnamon Pound Cakes With Crunchy Streusel
- 1 1/2 cup unsalted butter, room temp
- 3 cups sugar
- 6 eggs, room temp
- 3 cups flour
- 1 1/2 teaspoons cinnamon
- 1 teaspoon nutmeg
- 1/4 teaspoon cloves
- 1/2 teaspoon baking powder
- 1/4 teaspoon salt
- 1 cup apple cider or apple juice
- 1 1/2 teaspoons vanilla extract
- Streusel-
- 3/4 cup flour
- 1/2 cup chopped pecans
- 3 tablespoons sugar
- 1/2 teaspoon cinnamon
- 1/4 teaspoon nutmeg
- pinch salt
- 1/4 cup unsalted butter, melted
- Glaze-
- 1/2 cup powdered sugar
- 2 to 4 tablespoons of apple juice (can sub milk or water)
- In a small bowl, combine all the streusel ingredients. Mix well and set aside.
- Preheat oven to 350. Grease 6 mini loaf pans (the disposable foil ones are fine), set them inside a baking pan and set aside.
- In a large bowl, beat the butter until fluffy. Add in the sugar and continue beating until light and fluffy. Add the eggs, one at a time, beating well after each addition.
- In a medium bowl, combine the dry ingredients; whisk well.
- Alternately add the flour mixture and the apple cider (juice) to the butter mixture, starting and ending with the flour (third of the flour, half the juice, third of the flour, rest of the juice, rest of the flour). Beat just until combined after each addition. Mix in the vanilla.
- Divide the batter between the 6 loaf pans. Sprinkle two to three tablespoons of the streusel over each pan (if you have any streusel left over, just bag it up and freeze it.).
- Bake at 350 until the tops are golden brown and a toothpick of wooden skewer inserted into the cakes comes out clean, about 35 to 45 minutes.
- Let cool in pans on a rack. Combine glaze ingredients in a small bowl and whisk until smooth. Drizzle over the pound cakes.
Copyright Notice: From Cupcakes To Caviar images and original content are copyright protected. Please do not publish these materials anywhere without prior permission.