Quick & Easy Turkey, Bacon & Cheese Chowder

Quick & Easy Turkey, Bacon & Cheese Chowder 2


I have never been a big soup person.  I like it and even keep a stockpile of chunky soups in case the zombie apocalypse occurs, but it’s not generally something I crave. So when a recipe title (with no ideas attached btw,…just a title, because this is how my brain works.) popped into my head last night while I was trying to sleep, I knew I had to run with it.

Why does that happen, anyway!? Lalalalaa, I’m laying here all drowsy…ahhh, beautiful sleep is upon me…wait for it… CRAP… I forgot to check the kids…I need to sew that button on…I forgot to buy eggs…the cat is impeding my breathing by laying on my neck…I need to pee…and oh yeah, here’s a recipe title with no further info. You have fun trying to sleep now!  Signed- your brain.

Sorry. I’m done now. Where was I? Soup…

I, like 4,356,982 other Americans, had a bunch of turkey left over from Thanksgiving. When one buys a 20 pound turkey for 5 people, this is bound to happen. But do I ever learn? Nooooooo… not me. I continue to cook as if I have five children living with us, or like when my daughter, son in law and three kids lived with us. Mind you, two teens, a 51 year old man, myself and a six year old can eat a fair amount, but still. A 20 pound turkey?! Am I insane?!! Forget I asked that.

I’m going to move past all the tangents. I am obviously not capable of writing a coherent post today. Call it turkey tuckered…cranberry coma, potato pooped, stuffing somnolence, pecan pie peaked…sorry. I’ll stop now.

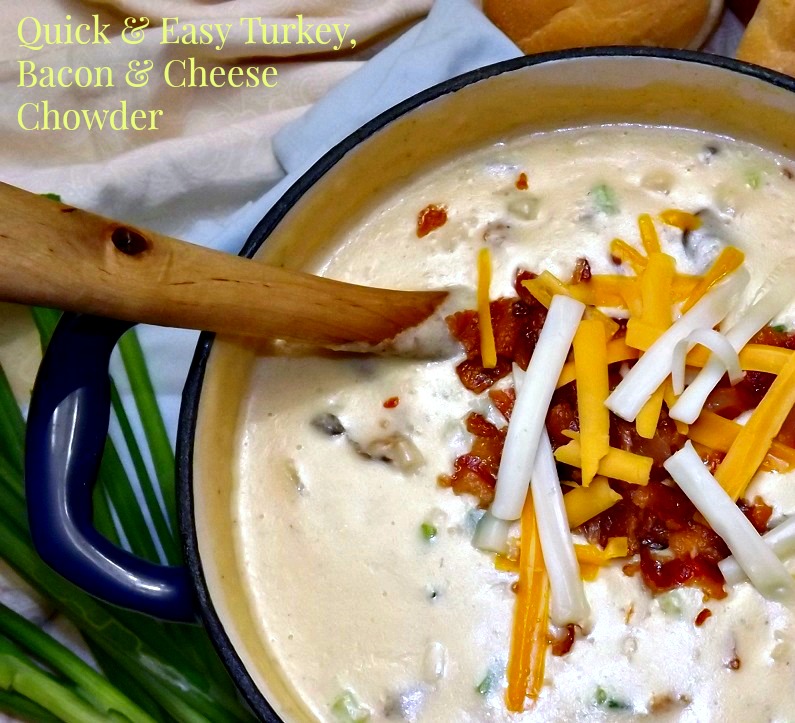
This was one of my throw together ideas. All I had was a name that came at 2am. My husband is fond of saying that my best recipes are the ones I just throw together. The problem being that, half the time, I then forget what I used and you never see these delightful recipes because I am over here foaming at the mouth trying to recall ingredients. Thus why I’m typing this out with a bowl of this yummy chowder in front of me. This really is a delightful chowder…or “chowdah” as my sister in law would say, being the proud Bostonian she is. This is thick and hearty and warming and soothing and any other cozy adjectives that come to mind. It is chock full of turkey, bacon and two cheeses. Since you use leftover turkey and already made mashed potatoes, this comes together quickly. A 30 minute or so simmer and there you go… nice hot, creamy chowder. Erhmmm, chowdah.

You know the drill… btw…. I love you guys!

Quick & Easy Turkey, Bacon & Cheese Chowder

  • 2 tablespoons vegetable oil
  • 1 cup chopped onion
  • 1/3 cup chopped celery
  • 1 lb sliced mushrooms (optional- most of us loved them, but my husband whined. If you have a mushroom hater, omit them if you desire)
  • 1 tablespoon finely chopped garlic
  • 4 cups chopped cooked turkey (I used all breast meat; use what pleases you)
  • 3 cups half and half or whole milk, divided
  • 2 1/2 cups mashed potatoes (homemade, store bought form the refrigerated section, whatever)
  • 12 ounces bacon, cooked crisp and crumbled, 1 tablespoon drippings reserved
  • 4 ounces sharp cheddar, shredded, plus more for garnish
  • 4 ounces Monterey jack cheese, shredded, plus more for garnish
  • 2 tablespoons flour
  • 2 green onions, sliced, plus more for garnish
  • salt and pepper to taste (I would usually give measurements, but bacon varies in it’s saltiness and pepper love varies. I used about a teaspoon of each)
  1. Pour the oil into a heavy bottomed pot or dutch oven. I use my purty blue 4 qt dutch oven because…purty.
  2. Add in the chopped onions, chopped celery, garlic and mushrooms (if using). Stir to combine, cover then saute over medium heat until softened and the onion is lightly browned, about 7 minutes.
  3. Add in the chopped turkey. Stir,and heat just long enough to thoroughly warm up the turkey, about 3 to 4 minutes.
  4. Add in 2 1/2 cups of the half and half (or milk) and the mashed potatoes. Stir well and bring to a simmer over medium heat, stirring frequently. Do not let this boil.
  5. In a small bowl, combine the last 1/2 cup half and half and the 2 tablespoons flour. Pour the slurry into the chowder and stir to combine. Continue stirring until mixture thickens up somewhat, about 3 minutes. If it’s too thick for your taste, add a wee bit more milk or cream.
  6. Add in about 3/4 of the bacon and the reserved one tablespoon of drippings. Add in the cheese and 2 green onions. Stir constantly until the cheese is melted and completely incorporated in the chowder. Add in salt and pepper to taste. Simmer for about 10 minutes just to meld the flavors, stirring frequently
  7. Serve hot, garnished with the remaining bacon, cheese and green onions. Serve with crusty bread and a salad and you have a perfect meal.

Copyright Notice: From Cupcakes To Caviar images and original content are copyright protected. Please do not publish these materials anywhere without prior permission.

Ham & Swiss Scones (And Keeper Of The Memories)

Ham & Swiss Scones

Ham & Swiss Scones


Every once in a while, I’ve brought up my family outside of my husband and kids. Sadly, as one ages, one finds that family circle getting smaller. In my life, since my sister Sandra and both our parents have passed away, there is only myself and my brother left. We also have two half sisters, whom I love dearly, but they didn’t grow up with us so don’t have the same set of memories or same history, unfortunately.

Steve and I have always been fairly close. We’ve had our ups and downs, times our relationship was splintered (Lilo And Stitch quote- “This is my family. I found it all on my own. It’s little and broken, but still good. Yeah, still good“. I love that movie.), but all in all, we’ve stayed close.

Since childhood, I’ve had a faulty memory. It seems to be due to an accident in youth. Add in the stroke from a few years back and a lot of my past is missing. Well, Steve and I have a habit of spending a fair amount of time on the weekends texting each other and many of his texts start out with, “Do you remember…”. Unfortunately, a lot of the time, I don’t. Steve has become, in my eyes, the Keeper Of The Memories. He is the one who reminds me of things we did as kids, the people we knew and the things we did, many of them crazy and probably dangerous and illegal, keeps me up to date on which relative has died, which was one that was nasty in the past, etc etc. He’s the one that helps me recall certain movies we watched 73 times as kids, which songs were important to us, usually for silly reasons and keeps the memories of our parents and sister fresh.  I’m the one that still rags him about using my Barbie Make Up Doll Head as Franken-Barbie for his garage haunted house one year and reminds him of the time we stood in the kitchen for an hour, him 18, me 13, while I tutored him in the fine art of talking to girls. Steve and I are the only people we each have who remember each others pasts. We remember the bad hair cuts (I still have the picture of you in 7th grade when your hair was shoulder length), the teen years when we both were rather hard to get along with, the fights with our parents. We know about the times of eating ketchup sandwiches cause there wasn’t anything else to eat even though our mother worked her butt off, the trips to Alabama, the nights up watching Creature Feature, the night mom kicked her then b/f out of the house for kissing another woman and “do you doubt my veracity?”. We remember “doodles” and “ewww, you “blew it” “. Siblings have their own language, their own inside jokes and memories. They make us laugh, they make us nostalgic and sometimes, they make us sad. But there is a bond there that can’t be shaken. It’s different than the one you have with parents, because for a lot of your growing up years, parents are the enemy. Siblings are the ones who can beat the crap out of you, but no one else better try it. They are the ones who are sad with you when your parents age and die. They are a tie to your own past and a part of your forever. You don’t see the age, you don’t see them as the grown ups they are. They always stay the kid you played with, argued with and made memories with.

What does any of this have to do with Ham & Swiss Scones? Not a thing. But make the scones anyway. They are completely delicious. 🙂

Ham & Swiss Scones

  • 3 cups flour
  • 1 tablespoon baking powder
  • 1 teaspoon salt
  • 1 1/2 teaspoons dried dill weed
  • 1 tablespoon dried minced onions
  • 10 tablespoons chilled unsalted butter, sliced thin
  • 1 egg
  • 1 1/2 cups heavy cream
  • 12 ounces (about 1 1/2 cups) diced ham
  • 12 ounces Swiss cheese, cubed into about 1/2 dice
  1. Preheat your oven to 375 degrees and line a greased baking sheet with parchment paper.
  2. In a large bowl, combine the flour, baking powder, salt, dill weed and dried onion.
  3. Using a pastry blender, cut in the cold butter until the mixture resembles coarse crumbs.
  4. Break the egg into the heavy cream and whisk to combine. Pour all at once into the flour/butter mixture. Stir well with a fork until the mixture comes together into a ball. Add in the cheese and ham and use your hands to (as quickly as possible) mix them into the dough.
  5. Dump it out onto a lightly floured board or counter and knead a few times just to incorporate the ham and cheese.
  6. Pat down into a 3/4 inch thick circle and cut into 12 wedges. They don’t have to be perfect. Mine are usually misshapen and ugly and I have come to prefer that; there is something homey and rustic about them that way.
  7. Bake at 375 for 20-25 minutes or until they are golden brown. See all the cheese that oozed out and clung to the sides of the scones? Don’t be upset… that crispy browned cheese is one of the best things about these!
  8. Let cool for at least 30 seconds before eating them. 😀

Copyright Notice: From Cupcakes To Caviar images and original content are copyright protected. Please do not publish these materials anywhere without prior permission.


Cracked Pepper & Two Cheese Biscuits

Cracked Pepper & Two Cheese Biscuits

Cracked Pepper & Two Cheese Biscuits


I have a thing for biscuits, scones, quick breads, all of that type of food. They are quick, they are easy and the biscuits are pure southern comfort food. There is nothing like a biscuit, spread with some fresh butter and dripping with honey or jam.

That said though, there are times I like to change it up. Biscuits are fun to play with.  Ok, that came out sounding strange. I now have a mental image of myself and the boys outside batting around a biscuit. Hmmm, back when I was first learning to make them, that actually may have been possible, though if someone got hit with one, it would have been fatal.  Asssssss I was saying before I had an “ooo, shiny thing” moment there,  biscuits are fun to play with. The normal ones are delicious, but they lend themselves to so many variations. I have made them with the addition of bacon, green onions, cheese, dried fruits, you name it, it can probably go in biscuit dough.

This time I wanted to make them a wee bit more sophisticated. Though sophistication falls by the wayside when they are being eaten by three boys whose idea of sophistication is McDonalds and whose table manners resemble a horde of hungry Hyenas attacking an elephant carcass after being on a 4 day juice fast. But hey, *I* actually took the time to savor them and enjoy the step up from plain biscuits.  I used a good amount of cracked pepper in these (enough that when my five year old actually stopped eating long enough to breathe, he said “these are spicy, momma!” I used two slightly more upscale cheese (as opposed to say, American cheese slices 😛 ) and the flavor was wonderful…. cheesy, peppery, with all the flavors of a good biscuit also. This is perfect for a fancier dinner or a family dinner or just to nosh on.

You know the drill…. 🙂

Cracked Pepper & Two Cheese Biscuits

  • 4 cups self rising flour
  • 1 teaspoon baking powder
  • 1/2 teaspoon salt
  • 5 1/3 tablespoons unsalted butter, refrigerator cold and sliced thin
  • 1/2 cup solid shortening, chilled and sliced thin
  • 1 1/2 cups buttermilk (use whole milk buttermilk if you can find it. It makes a far better biscuit and really, low fat milk in a biscuit is a waste of time calorie wise)
  • 2 tablespoons freshly cracked black pepper
  • 4 ounces Fontina Cheese, shredded
  • 4 ounces Havarti Cheese, shredded
  1. Preheat the oven to 425 (400 if your oven runs hot) degrees, Grease a large baking sheet.
  2. In a large bowl, whisk together your flour, baking powder, salt, black pepper and cheeses.
  3. Drop the butter and shortening into the bowl of flour. Use a pastry blender to cut the butter and shortening into the flour until it resembles pea sized crumbs.
  4. Make a well in the center and pour in the buttermilk, all at once, Use a fork to stir and combine the milk with the flour until you have a cohesive dough. Dump the dough onto a lightly floured board or counter top. Pat it down into a flat circle. Fold it into thirds like you’re folding a letter to fit into an envelope. Pat it down again, fold it one more time. Finally, pat it into a rough circle of about 1 inch high.
  5. Cut out as many biscuits as you can get, laying them right next to each other in the baking pan if you want soft sided biscuits or about an inch apart if you want crisp sided biscuits.
  6. Bake at 400 to 425 for about 20 to 24 minutes, until they are firm on top and golden brown. Take off the pan and serve piping hot, preferably with some nice fresh homemade butter. Believe it or not, even with the cheese and the pepper, these are excellent with honey on them too; it adds to the flavor, making a sweet/savory combo.

Copyright Notice: From Cupcakes To Caviar images and original content are copyright protected. Please do not publish these materials anywhere without prior permission.


Three Cheese, Pancetta and Fig Scones

Three Cheese, Pancetta & Fig Scones

Three Cheese, Pancetta & Fig Scones

I’ve always had a yearning to travel. While I love my country and have hopes to someday explore all the back roads and hidden gems in North America, there are soooooo many other places I want to see. There is a movie I absolutely love called The Way . I have now seen it 8 times and have recommended it to so many people that Emilio Estevez should be sending me part of his royalties lol. I won’t give the plot away. Just go to the link and then go buy the movie.
This movie leaves me aching to see the world (as well as attempt the pilgrimage the movie portrays though I know I may never be able to afford it), including parts of it not shown in the movie. I honestly can’t think of one part of the world I don’t want to see. I am “that” person who watches with wide eyes the TV travel shows, devours travel books and especially loves when my two loves; food and history are mixed in with the travel idea. When I lived in Germany, I was never blessed enough to get anywhere else in Europe and it is, of course, one of the parts of the world I want to see. And one of my main loves there is Scotland. I have seen so much of the country via books, movies, TV and the Internet and love it. I admit that food wise, there are some Scottish specialties I will probably not try… think Haggis, “Potted Heid” (their version of headcheese)

While they may not have originated there, scones seem to be synonymous with Scotland. I am pretty sure however, that these are not exactly Scottish in the flavor combo. The other day I asked on my facebook fan page whether everyone would prefer bacon and Swiss or pancetta and Swiss. One woman mentioned using figs and I loved the idea. So I incorporated them into the scones and I love them. Thanks Diane! These scones marry sweet and savory quite nicely. I just took my go to scone recipe, deleted the sugar and added in chopped dried figs, 3 types of cheese and crispy pancetta. These are slightly crispy, wonderfully flaky and getting a bite of fig with a bit of pancetta, all mixed into a cheesy scone, is amazing. The use of both butter and cream in these makes them melt in your mouth tender.

You know the drill… 🙂

Three Cheese, Pancetta & Fig Scones

  • 3 cups flour
  • 1 tablespoon baking powder
  • 1 teaspoon salt
  • 1 teaspoon Herbes De Provence (found easily in the spice aisle and is wonderful with so many foods, it’s worth buying if you don’t have any on hand)
  • 10 tablespoons chilled unsalted butter, sliced thin
  • 4 ounces diced Pancetta, fried until crisp and then blotted with a paper towel to remove the grease
  • 3/4 cup of coarsely chopped dried figs (use good ones. Trader Joes sells some great dried figs. But where ever you get them from, make sure they are nice and fresh, not all shriveled and hard)
  • 1/2 cup grated Parmesan cheese (NOT that powdery stuff. Buy the real thing)
  • 1/2 cup shredded Swiss cheese
  • 1/2 cup shredded sharp cheddar
  • 1 egg
  • 1 1/2 cups heavy cream
  1. Preheat oven to 375 degrees. Lightly grease 2 9×13 baking sheets.
  2. In a large bowl, combine the flour, baking powder, salt and Herbes De Provence. Mix well.
  3. Using a pastry blender, cut the chilled butter into the flour mix until it resembles coarse crumbs. Stir in the pancetta, cheese and figs
  4. In a small bowl (measuring cup, large pair of hands, whatever) combine the egg and the 1 1/2 cups of cream. Mix well.
  5. Pour the cream mixture into the flour all at once. Stir well with a large wooden spoon or a fork. The mixture will still have some flour left on the bottom of the bowl. Dump it all onto a lightly floured board (make sure to scrape the bowl to get anything clinging in there) and knead for about one minute, just to get all the dry parts well combined.
  6. Pat into a large rectangle about 3/4 of an inch thick. Use a sharp knife and cut the dough into 12 pieces. Lay them on the prepared baking pans, near to each other but not touching.
  7. Brush the tops of the scones with heavy cream and sprinkle with sea salt.
  8. Bake at 375 degrees until they are light golden brown, about 20 to 25 minutes.
  9. Let cool on the pan for one minute, then transfer to a serving dish. These are best served warm and fresh, though you can reheat them by either nuking them for 30 seconds or so or putting them in a 350 degree oven for about 5 minutes.

Copyright Notice: From Cupcakes To Caviar images and original content are copyright protected. Please do not publish these materials anywhere without prior permission.

Creamy Cheesy Cheeseburger Macaroni & Cheese

Cheeseburger Macaroni & Cheese

Cheeseburger Macaroni & Cheese

I remember when I got married at 20. While I knew more or less how to cook and had been doing it for about ten years at that point, the main things I had made up till then were baked goods and home made candy. Dinners were pretty simplistic when our mom wasn’t home. So when my then husband and I moved to Germany and I was cooking for us both, it was…interesting… to say the least. One of the things I made we simply called “goop”. It involved taking a box of cheap mac and cheese, browning a pound of ground beef and mixing them. That was it. No seasoning, nothing. Also no nutrition and not much flavor hehe. Early home made Hamburger helper. Then when I had five kids, all fairly young, to feed, and I was working, the real hamburger helper became an easy stand by. Same concept; brown the beef, mix into the pasta. Easy, quick, with a flavor reminiscent of sewer water but the kids liked it.

Nowadays however, I prefer to make my version of it. Making it yourself leaves you with at some idea that there is a modicum of nutrition in there and no cheese that is powdered. Mind you, this is NOT diet food by any stretch of the imagination. What it is however is tasty, filling, hearty for a cool night and kids and adults both love it. The flavor actually does remind you of a cheeseburger from a fast food place that shall remain unnamed.  You have your ketchup and mustard, the dill pickle, even the little bits of re-hydrated dried onions.

My photo here bites donkey weenies. It was dark, I was feeling well and no matter how I tried, I couldn’t get decent light. So trust me, this is far better than my photo portrays it as being lol. Also, this makes enough for dinner on 2 nights so if you don’t want that cut this recipe in half :-)  I like the whole recipe myself. Gives me one night of leftovers, thus more time to be lazy and watch reruns of Army Wives. Win Win situation for me!

You know the drill…

Cheeseburger Macaroni & Cheese

  • 1 1/2 lbs elbow macaroni, cooked, drained and set aside
  • 2 lbs ground beef (chuck works best in this)
  • 2 lbs mild cheddar cheese, shredded
  • 1 lb Velveeta or American cheese, shredded or cubed
  • 1 1/2 cups milk
  • 2 eggs, beaten (bad eggs, bad eggs! Sorry; I’ll stop now.)
  • 1/4 cup unsalted butter
  • 3 tablespoons dill relish
  • 2 tablespoons mustard
  • 1/4 cup ketchup
  • 2 tablespoons dehydrated chopped onions
  1. Preheat oven to 350 degrees.
  2. Brown your ground beef over medium high heat. Drain, mix with your pasta and set aside. Bring your milk to a simmer in a heavy bottomed pot.  Add in the Velveeeta cheese; stir constantly over medium heat until the cheese is melted and the mixture is smooth.
  3. Take about 1 cup of the mixture and slowly drizzle into the beaten eggs, whisking constantly. This tempers the eggs and prevents them from turning into scrambled eggs when you add them to the milk.
  4. Pour the eggs into the pot of milk/cheese and stir constantly until combined. Cook over low heat for about 3 minutes. Remove from heat. Add in the ketchup, mustard, dill relish and dried onions. Set aside.
  5. Butter a large (3 quarts at least) baking dish. Add in half the pasta/beef mixture. Now cover with half the shredded cheese, then with half the cheese sauce mixture. Repeat this layering one more time. Sprinkle with additional cheese if desired but even I have to say it doesn’t need it. I know, right?! ME… saying you don’t need more cheese! Drizzle with some extra ketchup just to up the whole burger factor.
  6. Bake uncovered at 350 degrees until bubbly and golden brown, about 30 minutes.
  7. Served with a side salad and rolls, this makes and extremely kid friendly dinner. 🙂

Copyright Notice: From Cupcakes To Caviar images and original content are copyright protected. Please do not publish these materials anywhere without prior permission.


Lemony Cheese Risotto

Lemony Cheese Risotto2

There are some foods that transcend space, time and all things earthly. Once upon a time, I would have put Twinkies and Ho Ho’s in that category. Yeah yeah, I know. Who the heck puts snack cakes in with transcendental foods? I also put Cheetos, a rare ribeye steak, roasted brussel sprouts and salted caramel gelato in there so am I forgiven? Anyway, Twinkies and Ho Hos lost their spot cause they bite donkey toes now that they have changed over. I was close to being institutionalized when I found this out, but I’ve since moved on. Brachs Gummi Candis and Whole Foods Salted Caramel Brownies have filled the Twinkies void. Sorry, pretend Hostess people.

But one food that always seem to fit the whole beyond earthly, etc etc, is a good risotto. I made sure to put the word good in there because I’ve had and made some pretty bad ones. At their worst, they can be gummy, mushy, hard, flavorless and a waste of good Arborio rice.

At it’s best however, it’s creamy (with no added cream) full of flavor, a dish that can make the meal shine. This version? it’s the kind that will make you take up meditation just so that you can think about this rice. It will make you see heaven. Honest. It will. Would I lie to you?!

Go. Cook. Be free. Make risotto. Thank me later. Cause you really WILL thank me. You can cut this recipe in half, but it reheats well and makes a great lunch with maybe a chicken breast and a salad.

Best. Risotto. Ever.

Lemony Cheese Risotto

  • 1 lb arborio rice
  • 2 medium onions, chopped (about 1 1/2 cups)
  • 3 garlic cloves, minced
  • 2 tablespoons olive oil
  • 42 ounces chicken broth, heated to almost boiling and kept hot
  • 1/2 cup white wine (don’t use something you wouldn’t drink)
  • 2 tablespoons lemon juice
  • 1/4 cup crumbled bleu cheese
  • 3/4 cup grated Parmesan cheese
  • 1/2 cup freshly grated Mozzarella
  • zest of one lemon
  • 4 tablespoons unsalted butter, in chunks
  • freshly ground pepper to taste
  1. In a large sauce pot, combine your olive oil, chopped onions and minced garlic.
  2. Cook over low heat until the onions are soft and tender, about ten minutes.
  3. Pour in the rice. Stir well and cook for about 2 minutes, until all the rice is well coated.
  4. Put the heat on medium and pour in the wine. Cook, stirring constantly, until all the wine is absorbed.
  5. Pour the lemon juice into the broth.Add in 1/2 cup of hot broth to the rice. Cook, stirring constantly, until all the broth is absorbed. Add new broth, continuing to stir, 1/2 cup at a time, each time the previous amount is absorbed.
  6. When all the broth has been used, add in the Parmesan cheese, lemon zest, bleu cheese and mozzarella cheese.
  7. Stir in the butter and stir until it is melted. Use pepper as desired. You can also salt it but I have never seen the need as the Parmesan adds a sufficient salty flavor.
  8. Serve garnished with more cheese and lemon zest.
  9. Thank me. Preferably with big bills. 😛

Copyright Notice: From Cupcakes To Caviar images and original content are copyright protected. Please do not publish these materials anywhere without prior permission.


Creamy Cajun Shrimp & Bacon Alfredo

Creamy Cajun Shrimp & Bacon Alfredo

Creamy Cajun Shrimp & Bacon Alfredo


I think we’ve all learned how bad I am at following recipes, right? Well, today, I just threw the cookbooks out the window. Sorry, darlin… I’ll call a glass repair guy tomorrow.

I had a pound of very rare in our household (both because of cost and because my husband hates it so I rarely make it) jumbo shrimp. I had spent two days trying to figure out what to do with them. Batter fried? Tasty, but it doesn’t stretch far and since this is a rare treat, I wanted it to seem like more. Heck, give me an hour and I can finish a pound of fried shrimp myself. Gumbo? Too much trouble and I always use Andouille in my gumbo which I don’t have right now. So I started looking at recipes for Shrimp Alfredo. I didn’t like any of them lol. So I just went into the kitchen and started throwing Cajunish and Alfredoish (yes, those are now both official words) ingredients together. Those and bacon. Bacon makes everything better. I mean… it’s BACON!

I must say; this sauce turned out wonderfully. Spicy, creamy, shrimpy :-p Seriously, it’s quite good. Not too spicy but has a nice bite for the heat seekers like myself. The green peppers and onions and garlic make their presence known. Add in the bacon and shrimp and oh my… seafood (bacony) Heaven on a plate. Ok, so the pic is of it in a bowl. Work with me here.

Note… I had no fettuccine , linguine or other traditional pastas here so I used Penne. I actually think I prefer it now. The shape helps it catch more sauce then you can on a flat noodle shape. But use what makes YOU happy.

You know the drill…

Creamy Cajun Shrimp & Bacon Alfredo

  • 1 pound shrimp (I used jumbo but you could use large or extra large too. Just don’t go smaller or you could end up with overcooked shrimp. Save the smaller shrimp for something where it’s not sitting in a hot sauce)
  • 1 pound bacon, cooked until crisp, crumbled, 4 tablespoons of drippings reserved
  • 1 large green bell pepper, chopped (about 1 cup)
  • 1 large onion, chopped (about 1 1/4 cups)
  • 3 cloves garlic, minced
  • 3 tablespoons salt free Cajun seasoning (it can be hard to find but it’s worth it)
  • 1/2 teaspoon ground red pepper flakes (optional)
  • 2 teaspoons hot sauce (optional)
  • 2 cups half and half or heavy cream
  • 1 cup fresh grated Parmesan Cheese (if you use that canned dried stuff, I’ll cry)
  • 8 ounces of Mascarpone cheese (could sub cream cheese)
  1. Start a large pot of water boiling. When water comes to a boil, cook your pasta to desired doneness. Drain and set aside in a covered bowl.
  2. While it heats, pour your reserved bacon droppings in a large skillet. Add in the green pepper, onion and garlic. Saute over medium heat until the veggies are soft and tender.
  3. Pat your shrimp dry then add into the veggie mix. Also add in the Cajun seasoning and red pepper flakes Saute just until the shrimp start firming up and turning pink. They will finish cooking as the sauce heats.
  4. Pour the cream into the shrimp mixture. Pour in the hot sauce also if using.
  5. Turn heat down to low and simmer for five minutes or until sauce starts to simmer (don’t boil it), stirring frequently. Add in the mascarpone and stir until smooth and melted Add in the crumbled bacon and serve the sauce over the warm pasta.
  6. Garnish with more Parmesan cheese. Because you can never have too much cheese.

Copyright Notice: From Cupcakes To Caviar images and original content are copyright protected. Please do not publish these materials anywhere without prior permission.


Herbed Onion, Shallot & Cheese Bread

Herbed Onion, Shallot & Cheese Bread

Herbed Onion, Shallot & Cheese Bread

I love baking. I betcha never knew that, did you? I run a quiet little blog full of main dish recipes, vegan yummies (is it just me or the phrase “vegan yummies” a total contradiction in terms? hehe) and no baking whatsoever. or something like that. But really… I do love to bake. I don’t bake so that I have something to post on the blog. I blog because I love to bake. There is something about combining a bunch of ingredients, tossing them into a pan and creating something homey and comforting that appeals to the nurturer in me. And I love to share the recipes. And watch you all get fat with me. And buy stock in “fat girl pants” companies.

I especially love baking this time of year. Doesn’t most everyone? that whole colder weather, cozy house, yummy smells thing is great incentive. It’s also great incentive to buy a treadmill and a gym membership, but we won’t go there. Please see above about that stock option idea. 😀

My house smells amazing right now. I swear, one of the best smells ever is practically ANYTHING made with either cheese or onions. So combine cheese and onions with shallots, more cheese, Herbes De Provence, more cheese and make it all into a loaf of quick bread, and Janet is one happy camper. In all reality, I’d probably be a  miserable camper unless said camp had a jacuzzi tub, king sized bed, room (campfire) service and the campfire was a large fireplace overlooking either the mountains or the ocean. Ahhh, daydreams. They make life worth living, huh?

If you like savory quick breads and need something fairly quick to serve with dinner (or lunch or breakfast or a midnight snack) give this a try. Beyond the fact that I promise that your house will smell divine, this tastes so good. the top is slightly crispy form the cheeses, then you get the soft tender inside with more cheese and the flavor of the shallots, onions and garlic. This is great by itself. I can also see it going well with a bowl of soup or stew as the weather gets cooler. Shovel a boatload of butter on there (use two boatloads… I won’t tell) and eat half the loaf. I won’t tell if you do that either. I’ll just be counting my money from the fat girl pants stock.

Herbed Onion, Shallot & Cheese Bread

  • 2 1/4 cups flour
  • 4 and a half teaspoons baking powder
  • 1 teaspoon salt
  • 3 tablespoons unsalted butter, cold
  • 1 cup sharp cheddar cheese, divided
  • 3/4 cup fresh grated Parmesan cheese, divided
  • 2/3 cup diced onion
  • 2 shallots, diced
  • 2 cloves garlic, minced
  • 1/2 cup chopped green onions
  • 1 tablespoon unsalted butter
  • 1 egg
  • 1 egg yolk
  • 3 tablespoons vegetable oil
  • 1/2 cup milk
  • Preheat oven to 375 degrees. Grease and flour (or use a cooking spray) a 9 inch loaf pan.

1)- In a large bowl, combine the flour, baking powder and salt. Using a pastry blender, cut in the 3 tablespoons unsalted butter until fine crumbs form. Add in 3/4 cup of the cheddar cheese and 1/2 cup of the Parmesan cheese and the green onions. Stir well to combine.

2)-I n a small pot, melt the one tablespoon butter. Saute the onions (just the regular onion, not the green onion), shallots and garlic over medium heat, stirring frequently, until soft and tender. Remove from heat and let cool for five minutes.

3)- When cool, add the milk to the onion mix. Stir well, then add the egg, egg yolk and vegetable oil. Stir.

4)- Pour the onion mixture into the center of the bowl of flour. Using a wooden spoon (not a mixer) mix just until thoroughly combined and there are no dry spots left. This is a thick almost biscuit like dough so don’t expect it to be pourable.

5)- Dump the dough into the prepared loaf pan and pat down, smoothing the top.

6)- Sprinkle with the reserved cheese.

7)- Bake at 375 degrees for about 30 minutes or until the top is golden brown and a skewer inserted into the middle comes out clean. Let cool in the pan for 2 minutes, then turn out onto a wire rack to finish cooling.

Copyright Notice: From Cupcakes To Caviar images and original content are copyright protected. Please do not publish these materials anywhere without prior permission.

Easy Chicken Parmesan Pasta Bake

Easy Chicken Parmesan Pasta Bake

Easy Chicken Parmesan Pasta Bake


I mentioned in the last post that my husbands requested birthday cake every year is a German chocolate one. Well, his requested birthday dinner is Chicken Parmesan. Every.Single.Year. Did I mention that he asks for it every single year? He is a creature of habit, my husband is. Though I really have no room to talk. I tend to do the whole creature of habit thing myself though not with birthday cakes and birthday dinner. One- I usually have to make those myself so for dinner you’d darn well better believe it is going to be steak. Dessert… ehhh, who knows. I buy a cake more for the kids since cake doesn’t really excite me much. and two- if given the opportunity, I’ll ask for dinner out every time. Give up the chance to have someone else doing the cooking and cleaning? Not on your life!

But back to that whole chicken Parmesan thing. I am pretty sure he would alternate between that, my chicken curry, my lasagna or spaghetti and my chili or meatloaf every day with no problem. But beyond the fact that chicken Parm is a pain in the tush to make (you try making enough to feed not only a grown man but 2 teen boys, yourself and a 4 year old who loves “sketti”), it’s just not a favorite of mine so it’s a definite labor of love to make it. But… I also absolutely adore my husband so I wanted to make him something that at the very least mimics the idea of full blown chicken Parmesan. I think this casserole does a good job. To make it even better, it uses those evil convenience products and that makes this a fairly quick fix for a weeknight dinner.  You COULD use homemade pasta sauce and more power to you for it. You could also make fresh chicken and again more power to you, but I wanted something quick, easy and tasty. This worked in a delicious way. It’s hearty, filling, creamy, cheesy and comfort food to the max. You get bites of tender chicken mixed in with pasta as well as the creamy tomatoey (yes that is now a word cause I say so) sauce and ooey gooey cheese. Unless you’re feeding a lot of people, this will easily stretch to the next days lunch meal too. Light and low fat? Ummmm… no. But really? You came to THIS blog looking for low fat and low cal? *giggles hysterically*

You know the drill…

Easy Chicken Parmesan Pasta Bake

  • 1 rotisserie chicken, skin removed and meat cut into bite sized pieces
  • 1 14 to 16 ounce box Penne pasta (or ziti or whatever you prefer), cooked according to package directions and drained
  • 1 23 ounce jar pasta sauce (those jars are slowly getting smaller & smaller for the same price!)
  • 1 15 ounce jar Alfredo sauce
  • 1/3 cup grated Parmesan cheese
  • 1/4 cup fresh chopped Basil
  • 1/4 cup fresh chopped Parsley (can sub 1 1/2 tablespoons Italian Seasoning for this if you don’t have fresh)
  • 24 ounces freshly grated Mozzarella cheese
  1. Preheat oven to 350 degrees and spray a  3 quart baking dish with cooking spray.
  2. After draining your pasta, pour the jar of pasta sauce and the jar of Alfredo sauce into the empty pot. Stir to combine., Add in the Parmesan cheese, chicken, basil and parsley. Stir to combine.
  3. Fold in the drained pasta then 16 ounces of the Mozzarella cheese.
  4. Spoon the pasta mixture into the prepared dish. Bake at 350 degrees for 20 minutes, then top with the remaining 8 ounces of Mozzarella cheese and continue baking for about 15 minutes or until the cheese is melted and lightly browned and the casserole is hot and bubbly.

Copyright Notice: From Cupcakes To Caviar images and original content are copyright protected. Please do not publish these materials anywhere without prior permission.


Insanely Cheesy And Creamy Mac & Cheese

Yum
Insanely Cheesy And Creamy Mac & Cheese Once upon a time, I made atrocious mac and cheese. It tasted ok, but the texture was kind of grainy and gritty. Every once in a while, I would hit it and it would be good but those times were few and far between.

For years, I had seen recipes for it that used eggs to make a sort of cheesy custard but something about using eggs in mac and cheese just seemed weird to me, not to mention that, even to ME, it was like “whoaaaaa… like mac and cheese isn’t fattening enough as is without adding a bunch of eggs to it?” But I kept running into recipes with them in it and the photos I saw always looked good so I broke down and tried it.

I’m sorry I waited so long.

And looking back and thinking in a logical cooking way, it makes sense. Make an egg custard and put cheese in it and you’re going to have something delicious. I do it when I make Pastitsio (the love child of Greek mac and cheese and Greek lasagna) so I don’t know why I hesitated in this. Adding the eggs to the milk and cheese one might normally use to make a white sauce for M&C simply gives you a smoother, richer, better textured final product. If you’ve never used a custard base for pasta, don’t be nervous. If you remember to temper your eggs, you’ll be fine. All that means is to beat a little of the hot milk/cheese mixture into the eggs to heat the eggs up. That way they don’t immediately scramble when you add them to the milk. After that, it’s a breeze. You’ve got this!  For the life of me, I don’t recall where I got the un-changed up recipe originally. I had it hand written on a piece of paper with no info.

You know the drill… in this case, it’s go make some outrageously cheesy and creamy mac and cheese!

(I have updated this over the years, because it simply didn’t reheat well due to the sauce getting soaked up. When you first make this, you will think it’s too much sauce. It’s not. it works when first made, and helps the mac and cheese stay creamy when reheated. )

Insanely Cheesy And Creamy Mac & Cheese

  • 2 lbs macaroni
  • 30 ounces sharp cheddar cheese, freshly grated (don’t use the preshredded)
  • 30 ounces Monterey Jack cheese, freshly grated (don’t use the preshredded)
  • 3 lbs Velveeta, cubed
  • 3 1/4 cups milk (use whole for this or 2%. There is really no use using skim or 1%. I mean… really… with all the cheese?)
  • 5 eggs, well beaten
  • 1/2 cup unsalted butter
  • salt and pepper to taste
  1. Cook your pasta, drain well and set aside.
  2. While it’s cooking, combine your cheddar and Monterey jack cheeses in a large bowl. Set aside.
  3. Pour your milk into a medium, preferably non stick, pot. Over medium heat, bring the milk to a simmer.
  4. Add in the Velveeta cheese and stir constantly until smooth and completely melted.
  5. Take about 1/2 cup of the hot milk/cheese mixture and SLOWLY drizzle it into the bowl of beaten eggs, whisking with a fork constantly. When you have it all tempered, slowly pour the egg mixture back into the milk mixture, again stirring constantly.
  6. Butter a 4 to 6 quart baking dish ( I use one of those deep dish foil lasagna pans for this) and preheat the oven to 350 degrees. Don’t use a smaller one… this makes a LOT of mac and cheese. Pour half of the pasta into the dish. Sprinkle with salt and pepper and layer the sliced butter all over the top.
  7. Sprinkle half of the cheddar/jack cheese mixture over the top of the pasta, then pour half of the hot milk/cheese mixture over the top. Repeat this layering one more time.
  8. Bake at 350 until mac and cheese is bubbly and lightly browned, about 30 to 45 minutes.

Copyright Notice: From Cupcakes To Caviar images and original content are copyright protected. Please do not publish these materials anywhere without prior permission.